Not everyone knows what the correct size of a pioneer tie was, including those who had to wear the accessory during Soviet childhood. Few people have thought and still think about what the length, width and knot of a pioneer tie should be even today, when the accessory is considered nothing more than a fashionable attribute from the past, intended rather to be shocking.
One way or another, the idea of sewing a pioneer tie with your own hands from time to time visits fashionistas and fashionistas who are ready to go beyond the standards by making extraordinary products to create bright images.
Extract and Soviet GOST on technical specifications for pioneer ties
Step-by-step instruction
As a rule, any step-by-step instructions for creating a tie include the formation of a template, and then the main and additional parts, finishing the edges with ironing and fitting. Therefore, it is possible to form a product only if you fully follow the master class on the topic of how to sew a tie with your own hands, a pattern.
Making a template
For a template, you can take a ready-made step-by-step diagram from the Internet or from a popular blogger. As a rule, ties differ from each other only in length, material and color, and these parameters do not affect the basic design. Of course, you can always make your own unique design, but you need to base it on the classic design. It is best to use a cut old tie for the template. It will help the novice craftsman create his first product faster and not make mistakes in the calculations.
As for the length, the minimum tie pattern for a man should be 30 cm in size. The width is 7 centimeters.
Important! When creating such an element as a pattern for a men's tie, you need to understand that the width of the pattern should be 3 times greater than the width of the finished product, since the product will be turned to the middle 3 times
Cut out the main part of the tie
The main part is cut out carefully according to an existing template or a lesson in sewing ties. It must be placed at an angle of 45 degrees. The sharp corner of the fabric should be at the intersection of the thread along and across. Then you need to draw a knife along the outline and cut out the part.
Transfer seam lines for stitching facings
On the wrong side of the silk, you should draw seam lines for stitching the bottom edge. Next, repeat the same procedure with the upper end of the product.
Reveal additional details
In addition to the main fabric part, several more facings will be required. One will go to the bottom edge, the other to the top. This is the bottom corner with a part of the tie at least thirty centimeters. For interfacing, cut out several woolen pieces and baste them using long stitches, without adhesive interfacing. Next, make processing in the image of a single-layer part. You can use non-woven fabric for this. A strip should be made of silk along the width of the product minus a few centimeters. When finished, it should be 3 centimeters wide. Then all the patterns need to be ironed.
Rhinestones, clips, fasteners, chains, ends, sequins, beads, sequins, bugles and other accessories can be used as additional details for a tie. It can be decorated with smooth or machine embroidery, ribbons, and knitted inserts. It can also be made in a patchwork style with the addition of different materials, and it can have an unusual shape. For example, a female model can be decorated with a brooch or shaped like a flower, have a zigzag shape and be more suitable for a high fashion item, or become an decoration for an unusual and non-everyday look.
Finishing the top and bottom edges of the tie
Processing the edges is the most crucial moment. You need to finish the edges well with a sewing machine. Do this as carefully as possible
Note! There is no need to overcast the cut edges of the tie.
To process, you need to place the turning on the bottom of the product face up, aligning the corners. Next, stitch from the top to the first corner, then from the bottom corner to the other.
Note! Make a parallel seam in the same way. Finally, stitch the sharp corner of the finished model.
Source
Step-by-step instruction
How to quickly and easily sew a tie, adult and children's models
Carefully lay out the pattern on the ironed fabric. Make sure that there are no wrinkles on it.
If you choose a material with a pattern for sewing, imagine what the finished product will look like. Adjust the placement of the pattern so that the drawing ends up looking just right.
Using tailor's scissors, cut the fabric, leaving 1 cm from the outline as a seam allowance. Do the same with the interlining fabric. Only seam allowances will no longer be needed.
Secure the interlining fabric to the main fabric. If the material is self-adhesive, do it with an iron; if not, baste it.
Note!
- Flowers made of wool (85 photos) - how to felt a flower from felt or a wool brooch. Step-by-step instructions for beginners
- What can be made from wool (95 photos): felting for beginners, master class, felting techniques
- How to weave a “Dragon Scales” bracelet from rubber bands on a machine: photo examples, weaving patterns
Attach a piece of lining fabric along the bottom edge and sides. Leave the top edge open. The resulting pocket will serve as a place for the narrow tip of the tie.
Secure the center seam allowances with blind stitches.
Iron the finished product thoroughly.
Women's jewelry from a man's tie - how to make a stylish brooch with your own hands
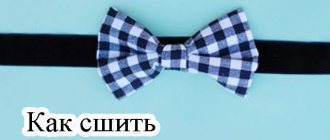
How to sew your own bow tie
Does your husband not wear a tie left over from a formal event or is the accessory out of fashion?
Don’t rush to throw away such a useful item - it will turn into a stylish brooch! Using this master class, make a decoration from a men's tie for your loved one with your own hands! An original brooch will decorate the lapel of a jacket, coat, raincoat, hat or large textile bag. A fashionable new thing will suit a lady of any age and style, it all depends on the finishing decor of the designer item.
- Preparation of materials and tools
- Master class on making a brooch from a tie
Preparation of materials and tools
For work, take the following materials and tools:
- Men's Tie;
- brooch holder;
- beads;
- chain;
- sewing threads in the color of the tie;
- needles and pins for hand sewing;
- scissors.
Master class on making a brooch from a tie
Clean out your closet and find ties that are taking up scarce space. If you find unnecessary jeans while cleaning, set them aside to make a bracelet and sew a comfortable backpack.
Ask permission to confiscate the item you like from the owner and start making women's jewelry from a man's tie.
Untie and carefully inspect the accessory. If it seems even a little dirty to you, wash and iron it. If the iron does not have a special soleplate and a delicate ironing function, iron through a damp cotton cloth.
About 10 centimeters from the wide end, make the first fold at an angle of about 45 degrees. Some products have a label sewn on the back that needs to be peeled off.
Wrap the first loop, trying to keep it symmetrical. Secure the loop with a sewing pin.
In the same way, fold the second loop in the other direction from the wide end. Thread a double thread through a hand sewing needle and use random stitches to sew both loops to the wide end. Keep the stitches on the front side of a man's tie small so that they are not noticeable and the decoration looks neat.
Fold and sew one small loop between the two loops.
Form the next two loops into a circle.
From the remaining length of the tie, add another loop and leave the narrow end open. Secure the decoration by stitching with thread.
On the reverse side, sew all protruding lines and folds.
Decorate the middle of a man's tie with beads. Sew them in an oval shape, imitating a buckle.
For added strength and to even out the outline, use a needle to pass the double thread through the beads several times, pulling slightly. Fasten the end of the thread to the wrong side of the brooch.
Take the almost finished jewelry in your hands and, after twirling it, decide how you will wear it. Additionally, decorate with a small piece of chain, sewing it near the beads so that it hangs beautifully.
Attach a suitable clasp to the back side. You can also use a standard shaped pin.
The unusual brooch is ready! A stylish, hand-made women's decoration made from a man's tie looks very beautiful. No one will guess that an old accessory is taken as the basis; they will rather think that the needlewoman worked for a long time on the craft, wanting to get an item, a brooch, similar to a man’s wardrobe item.
Brooches with bright and contrasting designs, polka dots, stripes, and plain ones look original. By laying out loops and folds to your liking, using various decorative accessories, you will create your own unique decoration.
If you have time, take a look at the section on making your own jewelry from various materials. Stylish things can be made from ribbons, leather, plastic suede, polymer clay
They are always unique and attract attention
Male butterfly
How to sew a bow tie with your own hands, patterns and description of the process
In order to complete a man’s look, a lot of accessories are included with the suit. One of the most important and visible accessories is a matching tie.
To create a bow tie with your own hands, you will need to prepare the following:
- Fabric of the required type. You can take not the whole canvas, but pieces and leftovers.
- Butterfly clasp.
- Threads in the color of the fabric, needle and scissors.
- Non-woven fabric.
- Heated iron.
First of all, you will need to cut out a rectangle, the size of which will be no less than 20 cm by 9 cm. Next, fold this rectangle in half, slightly marking the center.
Turn the fabric over to the right side and fold both sides of the rectangle towards the center. Iron each of the folds.
We sew it on the sides, turn it on the face and seal the back gap with non-woven material. Fold the center of the butterfly with an accordion and sew through it.
Carefully make a strip from the same fabric and stretch it around the center, stitching at the back. All that remains is to make and sew a ribbon for fastening. Many people make these ties from ribbons with their own hands.
Instructions for sewing a tie
Previously, brightly colored fabrics were used for sewing, but they wrinkled heavily and did not withstand high temperatures well. Usually it was satin or silk. Today there is no such strictness; you can take satin, linen, cotton, at your discretion. To do this you will need:
- Scarlet fabric 60*60 cm.
- Red threads.
- Scissors.
If you need a tie solely “for the soul,” then you don’t need to use patterns. It is enough to cut a ribbon, slightly widened towards the center, trim the edges and tie it around the neck.
Types of ties
At this point, when describing the types of ties, it is worth mentioning that these things are divided into three large subgroups. There are children's, men's and women's. There are also other more extensive classifications. According to one of them, the tie can be classic (150 centimeters), regatta with elastic band, windsor, plastron, butterfly, bolo, lavalier, sewing scarf and herring.
DIY tie
Children's with elastic band
An embroidered tie with an elastic band is a children's model for girls and boys, thanks to which the little gentleman or lady looks elegant. This is a practical and versatile pioneer item that can be worn both everyday and for a weekend, depending on the type of natural fabric and color. It can be created from either paired cotton or satin, silk and jacquard. Tying this pattern to a shirt for a child is as simple as possible. All you need to do is put the elastic band around your neck and adjust the edges of the dudes shirt.
Children's with elastic band
Men's classic
A classic men's tie is a thing made in a plain or discreet color from silk, wool, satin, cashmere, or linen. 100% wool is used for the lining. The size of the model reaches 11 centimeters in width.
Note! Classic models are those with polka dots, checks, grosgrain ribbons, paisley and various geometric, discreet shapes. Men's classic
Men's classic
Herring
A long narrow model, available in classic and non-classical styles. Worn in different designs. Easily converts into a Windsor with a Half Windsor, Grantchester, Elridge and Quad Knot. Like a classic tie, it is suitable for both festive events and going to the office. Made from the same materials.
You might be interested in How to make a fabric needle bed with your own hands using a pattern
School for girls
A school tie for a girl can be made in different shapes and colors. Its main detail is the severity of the colors. Can be issued in the form of a classic, a bow or even a neckerchief. May resemble a frill. Most often, satin and jacquard in a plain or checkered style are used to create it.
School for girls
Female
A woman's tie is no different in model from a man's or a child's. Produced from the same festive and, at the same time, practical fabric. It can have a classic and non-traditional shape. Unlike the men's model, it can be complemented with a variety of accessories and brooches.
Note! May be shaped like a frill or part of clothing. Today tulle products are also popular
You can sew from this material.
Female
Printing on pioneer ties
Print size: 25*52 cm
Print size: 25*25cm
Print size: 7*13 cm
Printing on pioneer ties can be done in several ways: 1. by silk-screen printing, 2. by sublimation, 3. by applying chevrons to pioneer ties, 4. by thermal transfer. The printing method is determined by the manager of our company depending on the colorfulness of the layout, the program in which the layout is provided, and the circulation. Prices for printing designs on pioneer ties up to A4 format using silk-screen printing
from 50 pcs. from 100 pcs. from 200 pcs. from 300 pcs. from 500 pcs. from 1000 pcs. from 2000pcs. from 3000pcs. from 5000pcs. from 10000pcs. 1 color 63 rub. 39 rub. 28 rub. 20 rub. 18 rub. 15 rub. 14 rub. 13 rub. 12 rub. 11 rub. 2 colors 88 rub. 58 rub. 41 rub. 36 rub. 26 rub. 22 rub. 20 rub. 18 rub. 17 rub. 16 rub. 3 colors 117 rub. 78 rub. 52 rub. 44 rub. 31 rub. 26 rub. 24 rub. 22 rub. 20 rub. 19 rub. 4 colors 135 rub. 79 rub. 62 rub. 53 rub. 40 rub. 31 rub. 30 rub. 28 rub. 27 rub. 26 rub. 5 colors 179 rub. 117 rub. 105 rub. 62 rub. 48 rub. 37 rub. 36 rub. 34 rub. 33 rub. 31 rub. 6 colors 212 rub. 135 rub. 94 rub. 74 rub. 55 rub. 42 rub. 41 rub. 40 rub. 39 rub. 37 rub.
Printing on dark fabric + 1 color (backing) Printing with special effects paints - +10% Packing the product in an individual bag + 4 rubles. (including the package) The cost of the control sample is 1000 rubles. for the color. Subsequently included in the circulation subject to confirmation of printing within 1 day. Prices for printing by other methods are determined by the manager individually based on the circulation, method and size of the layout.
Step-by-step diagram in pictures
In order to tie a tie using a clip, as was done in Belarus, Ukraine and other countries of the USSR, you must follow the instructions:
- A red scarf is draped around the neck;
- Next, a special clamp must be prepared;
- Alternately, each end of the pioneer tie is threaded into the holes of the retainer;
- The clamp closes.
If you want to tie your leader or pioneer tie in the classic way, as they did in the USSR, these step-by-step instructions are for you:
- First of all, the scarf is put on the neck;
- The ends must be crossed so that the right one is on top of the left one;
- The right end is threaded upward through the resulting neck loop;
- The left end also rises up, then is drawn from the right side into the loop;
- Both ends are tightened.
In the picture presented you can clearly see how quickly and simply the pioneers tied their tie. It should be noted that this method is the easiest to tie and in most cases no one had any difficulties with its implementation.
Let's consider another knitting option, which is called cowboy:
- First of all, the scarf is also placed around the neck. Both ends must be crossed, but so that the right end is on top of the left. Next, the right end needs to be pulled up through the resulting neck loop;
- After this, the right side of the pioneer tie goes down, and the left goes up from bottom to top;
- Next, the left side is carefully threaded through the formed eyelet on the right side, and out from the opposite side;
- Finally, you need to tighten the knot. So the real cowboy tie is ready.
And here is another simplest option for how to tie a scarf. In this case, you just need to make two classic knots, but make sure that the right end is always on top of the left.
Important! Before tying a tie, you need to fold its ends once or twice. How to do this is shown in the photo below.. In order to tie a square knot, follow the instructions below or the schematic image:
To tie a square knot, follow the instructions below or the diagram:
- As in all other cases, first you need to put the tie around your neck and cross the ends;
- Remember that the right end is always on top of the left;
- Next, the right end is threaded into the neck loop using the “bottom-up” method;
- Then the right side of the accessory is passed behind the left end and threaded into the resulting eyelet;
- Pull both ends to tighten the knot.
Another great way to wear a pioneer tie is the Tie Loop. This design is ideal for various formal events, since its appearance resembles the knot of a classic men's tie. So:
- The tie goes around the neck;
- The ends of the tie are then crossed so that the right side overlaps the left;
- After this, the left end bends around the right in front;
- Next, it is passed through the neck loop using the “bottom-up” method and threaded into the resulting eyelet;
- The ends of the tie are tightened.
Attention! If, after all, sophistication with knots is not for you, we recommend making your own clamp. You can use wood, leather or other available materials. The technology for making such a clamp is absolutely simple, and you don’t need to spend money on purchasing materials, because everything you need is at hand
So, let's look at the process diagram for making a stylish woven leather clip. Please note that in the picture the black part is the wrong side
The manufacturing technology of such a clamp is absolutely simple, and you do not need to spend money on purchasing materials, because everything you need is at hand. So, let's look at the process diagram for making a stylish woven leather clip
Please note that in the picture the black part is the wrong side
“And we had two types of pioneer ties: satin and silk...”
Photo from the archive of the newspaper Pensionerskaya Pravda
Every person leaves in his heart memories of his first teacher, of his school years. So I want to share such memories.
On a clear autumn morning back in 1963, a beautiful girl who became a teacher entered the building of a small rural school for the first time. And on the same day, September 1, we, nine village children (six girls and three boys), also crossed the threshold of our school for the first time. We became first graders. So fate united us and our teacher into a single school family.
The teacher's name was Raisa Mikhailovna Shchepotyeva. It’s as if I see her now: young, beautiful, in a polka dot dress... She immediately won our hearts with her kindness and cheerful disposition. How much love and patience this inexperienced girl needed to teach us how to write letters beautifully, solve examples, and read poetry with expression.
She became our second mother,
Forgiving our pranks at times. She played, sang, danced with us, and if necessary, she was a mountain for us.
During the big break, Raisa Mikhailovna organized tea parties. We brought mugs, sugar, and treats. The technician, Aunt Motya, boiled water on the stove, and we had tea. It seems that I can still taste the dogwood jam that my classmate Vovka brought...
Memories tear my heart:
Tatyana, Vovka, Zoya, Mishka, Sashka... Others call you by your patronymic - But for me you are just classmates!
Since there were few children in school, the classes were double. A row of desks by the window is one class, and against the wall opposite is another class, older guys. The teacher gives a task to one class - moves to another row, works with them. What has happened in such “double” lessons! I remember when we were older, we were in third grade. And our first-grader neighbors had a drawing lesson, they were playing music in their albums. Raisa Mikhailovna gave us a dictation. And suddenly someone shouts: “Valka, do you have a green pencil?” That was a laugh!..
In the classroom there was a huge map of the USSR hanging on the wall. During a geography lesson, Raisa Mikhailovna asked a classmate to show on the map the place where the Volga River originates. He stood by the card, hesitating... Then I couldn’t stand it - I jumped up, grabbed his hand and pointed at the card with my finger: “Yes, there you go!” For this, the teacher asked me to leave the class. In general, I studied well, studying was easy for me, but because of my tips, I often ended up at the door.
Raisa Mikhailovna fussed with us like a hen with chickens. What farms and villages have we visited with our amateur performances! We even had our own famous soloists - the Ivlev brothers, they played the button accordion and sang. And when they sang their signature “Frost draws patterns on the window glass...”, many in the audience cried.
During my time in elementary school, there were two significant events: when I was accepted into the October class and later - into the pioneers. There were two types of October stars: simple larger ones and small ones with a portrait of young Lenin. And how I cried when they pinned an ordinary star on my jacket, but I wanted another one, with a portrait of Ilyich!
Pioneer ties also came in two types: satin and silk. Raisa Mikhailovna and I walked seven kilometers to school in the village of Udobnaya, to the Pioneer bonfire, where we were tied with ties at the ceremonial assembly. And then I ran around the farm all day: so that everyone could see that I had been accepted as a pioneer!
We went to the same village and to the cinema, where we watched films about the war. I remember how my friend and I cried throughout the entire theater when we watched Chapaev. But we weren’t allowed to see the film “Kotovsky”: there were “naked” guys in underpants galloping into the attack with swords drawn.
Raisa Mikhailovna also often took us on hikes and excursions. Sometimes our teacher's husband and their little son joined us. And every time we returned home, we visited Uncle Lena Fomenko, a photographer. There are entire albums of school photographs. Reviewing them is like turning over the pages of those unique years.
Much in life is forgotten, but the first teacher, school friends are, like parents, sacred, for life. And the fact that we, her “first nine,” received a solid foundation in life and became real people is largely the merit of Raisa Mikhailovna Shchepotyeva. Her memory will forever remain in the hearts of grateful students.
Valentina Ivanovna Piskova,
Krasnodar region
Here you can subscribe to the Pensionerskaya Pravda newspaper
Payment and delivery
1. Pickup
Self-pickup of pioneer ties is carried out at the address: st. Vereiskaya, 29. Minimum quantity - 20 pieces. Shipment is carried out only after agreement with the manager on the availability of products in the warehouse and the time of collection of products. Payment is made upon receipt or prepayment (as agreed). 2. By courier to the address
Deliveries are made through SDEK couriers.
Products are shipped to the courier within 1-3 days from the date of prepayment of the order. The cost of delivery to the address is 350 rubles. In case of urgent delivery
(within 1 day, subject to the possibility of its implementation) - 500 rubles.
3. To the pick-up point
Your order is also shipped to SDEK with 100% prepayment. Delivery cost is 250 rubles. Delivery to SDEK is free within 1-3 days from the date of payment of the order.
History [edit | edit code]
During its existence, the pioneer tie has undergone a number of changes.
At first, the tie was not tied, but was fastened with a special clip, which depicted pioneer symbols - a fire against the backdrop of a hammer and sickle, surrounded by the inscription “Always ready!” The image of the five logs of the fire and the three tongues of its flame symbolized the five continents and the Communist International, which was supposed to ignite the flame of revolution on these continents. The ends of the tie were threaded into the opening of the clamp from above with its clamp open, which was deflected by pressing the thumb. Holding the ends of the tie with one hand, with the other hand the clamp was pulled up to neck level and, releasing the lock, the ends of the tie were secured.
Due to the complexity of manufacturing, clips did not become truly widespread, and pioneer ties, from the moment of their inception, in most cases were tied with a special knot.
The special knot of the pioneer tie was simple to perform: children quite easily learned that they needed to make a simple knot twice so that the right end of the tie always wound on top of the left (or vice versa).
Pioneer ties were produced in various shades of red and from various fabrics. The most widespread production was of red-orange ties made of acetate silk. When unfolded, such a tie is an isosceles triangle with a base of 100 cm and a height of 30 cm (the sides are approximately 58.3 cm). The mass-produced model was produced by hot trimming and began to unravel at the edges after a few years of wear. Ties stitched at the edges were difficult to buy; they were distinguished by a slightly darker color than scarlet, closer to red.
There was a period when the chairmen of the council of squads wore red ties with a yellow border.
History of the tie clip
For some time, a tie clip with pioneer symbols coexisted with a pioneer badge. Later, in connection with the improvement of pioneer symbols and in connection with the greater distribution of the pioneer badge, tie clips were supplanted as a duplicate element of pioneer paraphernalia.
This was also facilitated by a psychological moment: in the late 1930s, the imagination of some Komsomol leaders saw in the symbolism of a tie clip at the same time a Nazi swastika, Trotsky’s profile and the letter “Z”, which, in their opinion, meant the name of the “enemy of the people” Zinoviev. Because of these rumors, mass refusals to wear pioneer ties and clips began in schools and pioneer camps. In this regard, a special investigation was carried out by the Central Committee and the NKVD, which found nothing of the kind and condemned the harmful rumors.
Tie clips finally became a thing of the past in the early 1960s.
Scarf tie
The classic decoration for a schoolchild from the times of the USSR is quite simple to make at home. This is a kind of scarf, which is an isosceles triangle. The result is a neckerchief, which is tied with a special knot. The appearance largely depended on the fabric itself. Flowy, shiny materials looked best.
If you still have an old pioneer tie in your closet, you can straighten it on a flat surface and see that same isosceles triangle. Only its apex forms an obtuse angle.
By the way, they were not always tied in a knot around the neck. At first it was supposed to wear special clips with symbols. But since they were difficult to manufacture, an alternative was later proposed. But at home you can use the idea and buy any clamp you like. It will make it easier to secure the tie around your neck.
Pioneer tie sizes: cutting and pattern
Not everyone knows what the correct size of a pioneer tie was, including those who had to wear the accessory during Soviet childhood. Few people have thought and still think about what the length, width and knot of a pioneer tie should be even today, when the accessory is considered nothing more than a fashionable attribute from the past, intended rather to be shocking.
One way or another, the idea of sewing a pioneer tie with your own hands from time to time visits fashionistas and fashionistas who are ready to go beyond the standards by making extraordinary products to create bright images.
Extract and Soviet GOST on technical specifications for pioneer ties
Pioneer tie then and now: features
If previously, for sewing a pioneer tie, they used mainly silk or satin - fabrics that wrinkled heavily and could not withstand high temperatures, today any fabrics are suitable for its manufacture, including satin, linen, cotton and others. You can tailor the accessory to your taste, making some adjustments to the sizes according to GOST, shape and even color, or you can recreate a complete copy of the Soviet neckerchief - the main symbol of the pioneers.
In Soviet times, a pioneer tie was nothing more than an isosceles triangle. It was a red scarf with a knot in the form of a characteristic pad, emphasizing the connection of the main links:
- pioneers;
- Komsomol members;
- communists.
The colors of pioneer neckerchiefs ranged from bright orange to scarlet and burgundy. In some cases, pioneer leaders wore ties with a yellow border. As for the standard sizes, throughout the use of the accessory they changed several times, but eventually settled on the following marks:
- base - 95 cm;
- sides - 61 cm;
- length - 90 cm.
Newfangled modern ties can be sewn with changes in standard sizes depending on the characteristics of the person. So, for example, the taller the intended owner of the accessory, the longer and wider the tie is made for him.
Initially, pioneer neckerchiefs were not tied at all. It was customary to fasten them with a clip depicting a pioneer flame with various versions of Soviet patriotic slogans. Over time, the clamps were no longer used due to some difficulties in their manufacture.
How to sew a pioneer tie: step-by-step instructions
To recreate a tie known from Soviet times with exact measurements, you don’t necessarily need a paper pattern. In addition to this, you need to prepare:
- scarlet silk with dimensions 60×60 cm;
- threads to match the color and needle;
- sharp sewing scissors.
Manufacturing begins by ironing the prepared fabric on a flat surface. At the next stage, the future tie is folded in half diagonally and cut into two parts. If everything was done correctly, the end result will be a product with angles equal to 90, 45 and 45 degrees, respectively, that is, an isosceles triangle. It is better to finish the edges of the fabric with threads to match the color on a sewing machine.
To achieve maximum similarity of the tie with the pioneer prototype, the angles can be slightly modified. To do this, mark 3 cm on paper or directly on the fabric in the area of the right angle on each side. The points are connected in turn to the opposite acute angle
The result should be an isosceles triangle with an obtuse angle at the apex and slightly beveled edges, which are also important to process with an overlocker or simply hem. In the latter case, the hem should be minimal (up to 4 mm), otherwise the product will look sloppy
mamamoet.ru
How to sew a pioneer tie
“Whenever you tie a tie, take care of it! He and our banner are the same color.” The red pioneer tie has already sunk into history, but still remains in the memory of many people who proudly wore it on their chests, valued it very much and carefully preserved it. The scarlet tie symbolized the continuity of three generations - pioneers, Komsomol members and communists.
You will need
- — scarlet silk fabric 60 x 60 cm;
- - red threads;
- - scissors.
Instructions
- A pioneer tie is a kind of neck scarf, the ends of which must be tied with a special pioneer knot. In industry, ties were made from silk acetate. Currently, you can use any silk fabric that has a beautiful shine and flowing structure. Materials such as satin, silk, crepe satin, and crystal are well suited for this. It is advisable to choose a bright scarlet shade.
- If you straighten the tie on a flat surface, it will resemble an isosceles triangle, and the angle of the apex is obtuse and not straight, as it seems at first glance. In addition, Soviet-era products had slightly different sizes from each other - 61x61x95 cm, 60x60x100 cm.
- To make a tie similar to a real pioneer, you will need fabric measuring 60x60 cm. Iron the fabric and lay it out on a flat surface. Fold the scarlet square in half diagonally and cut it into 2 parts. If necessary, one such piece of fabric will make 2 ties. As a result, its angles will have dimensions of 90° 5°, 45°. Finish the edges of the product with threads, be sure to match the color of the fabric. This can be done either with an overlocker or with a regular sewing machine using a zigzag stitch.
- To bring the shape of the tie closer to the ideal, slightly modify the corners of the product. To do this, on a paper pattern or directly on the fabric in the area of a right angle, measure 3 cm on each side. In turn, connect each point obtained with a line to the end of the opposite acute angle. The result is an isosceles triangle with an obtuse angle at the vertex. However, it is important to take into account that a tie made using this pattern will have slightly beveled edges. This can make them difficult to process; for example, when sewing with a zigzag seam, the edges will “wave”.
- If it is not possible to overcast a tie, you can simply hem its edges. In this case, make the double hem very narrow - no more than 4 mm, then the product will look neat.
handfun.ru
Pioneer tie sizes: cutting and pattern
Not everyone knows what the correct size of a pioneer tie was, including those who had to wear the accessory during Soviet childhood. Few people have thought and still think about what the length, width and knot of a pioneer tie should be even today, when the accessory is considered nothing more than a fashionable attribute from the past, intended rather to be shocking.
One way or another, the idea of sewing a pioneer tie with your own hands from time to time visits fashionistas and fashionistas who are ready to go beyond the standards by making extraordinary products to create bright images.
Extract and Soviet GOST on technical specifications for pioneer ties
Pioneer tie then and now: features
If previously, for sewing a pioneer tie, they used mainly silk or satin - fabrics that wrinkled heavily and could not withstand high temperatures, today any fabrics are suitable for its manufacture, including satin, linen, cotton and others. You can tailor the accessory to your taste, making some adjustments to the sizes according to GOST, shape and even color, or you can recreate a complete copy of the Soviet neckerchief - the main symbol of the pioneers.
In Soviet times, a pioneer tie was nothing more than an isosceles triangle. It was a red scarf with a knot in the form of a characteristic pad, emphasizing the connection of the main links:
- pioneers;
- Komsomol members;
- communists.
The colors of pioneer neckerchiefs ranged from bright orange to scarlet and burgundy. In some cases, pioneer leaders wore ties with a yellow border. As for the standard sizes, throughout the use of the accessory they changed several times, but eventually settled on the following marks:
- base - 95 cm;
- sides - 61 cm;
- length - 90 cm.
Newfangled modern ties can be sewn with changes in standard sizes depending on the characteristics of the person. So, for example, the taller the intended owner of the accessory, the longer and wider the tie is made for him.
Initially, pioneer neckerchiefs were not tied at all. It was customary to fasten them with a clip depicting a pioneer flame with various versions of Soviet patriotic slogans. Over time, the clamps were no longer used due to some difficulties in their manufacture.
How to sew a pioneer tie: step-by-step instructions
To recreate a tie known from Soviet times with exact measurements, you don’t necessarily need a paper pattern. In addition to this, you need to prepare:
- scarlet silk with dimensions 60×60 cm;
- threads to match the color and needle;
- sharp sewing scissors.
Manufacturing begins by ironing the prepared fabric on a flat surface. At the next stage, the future tie is folded in half diagonally and cut into two parts. If everything was done correctly, the end result will be a product with angles equal to 90, 45 and 45 degrees, respectively, that is, an isosceles triangle. It is better to finish the edges of the fabric with threads to match the color on a sewing machine.
To achieve maximum similarity of the tie with the pioneer prototype, the angles can be slightly modified. To do this, mark 3 cm on paper or directly on the fabric in the area of the right angle on each side. The points are connected in turn to the opposite acute angle
The result should be an isosceles triangle with an obtuse angle at the apex and slightly beveled edges, which are also important to process with an overlocker or simply hem. In the latter case, the hem should be minimal (up to 4 mm), otherwise the product will look sloppy
mamamoet.ru
How to sew a pioneer tie
You will need
- — scarlet silk fabric 60 x 60 cm;
- - red threads;
- - scissors.
Instructions
A pioneer tie is a kind of neck scarf, the ends of which must be tied with a special pioneer knot. In industry, ties were made from silk acetate. Currently, you can use any silk fabric that has a beautiful shine and flowing structure. Materials such as satin, silk, crepe satin, and crystal are well suited for this. It is advisable to choose a bright scarlet shade.
If you straighten the tie on a flat surface, it will resemble an isosceles triangle, and the angle of the apex is obtuse and not straight, as it seems at first glance. In addition, Soviet-era products had slightly different sizes from each other - 61x61x95 cm, 60x60x100 cm.
To make a tie similar to a real pioneer, you will need fabric measuring 60x60 cm. Iron the fabric and lay it out on a flat surface. Fold the scarlet square in half diagonally and cut it into 2 parts. If necessary, one such piece of fabric will make 2 ties. As a result, its angles will have dimensions of 90°, 45°, 45°. Finish the edges of the product with threads, be sure to match the color of the fabric. This can be done either with an overlocker or with a regular sewing machine using a zigzag stitch.
To bring the shape of the tie closer to the ideal, slightly modify the corners of the product. To do this, on a paper pattern or directly on the fabric in the area of a right angle, measure 3 cm on each side. In turn, connect each point obtained with a line to the end of the opposite acute angle. The result is an isosceles triangle with an obtuse angle at the vertex. However, it is important to take into account that a tie made using this pattern will have slightly beveled edges. This can make them difficult to process; for example, when sewing with a zigzag seam, the edges will “wave”.
If it is not possible to overcast a tie, you can simply hem its edges. In this case, make the double hem very narrow - no more than 4 mm, then the product will look neat.
Video on the topic
Sources:
- pioneer ties size
www.kakprosto.ru
Accessory Features
The pioneer's tie is a red neck scarf. When extended, this attribute has the shape of an isosceles triangle. The length of the base is 1 m, the height is 30 cm. The size of each side is 58 cm. In the USSR, a red neck scarf symbolized involvement in the pioneer organization. All students had to know how to tie a pioneer tie.
Today, schoolchildren no longer wear a pioneer tie. It is mainly used as a prop for films and plays about the Soviet era. This accessory is also sometimes worn in summer children's camps.
Men's tie pattern: sew it yourself
Anyone who thinks that sewing a men's tie is a troublesome, time-consuming and simply thankless task is mistaken. In fact, 80% of success is the correct pattern of a men's tie, which you don't even need to do yourself. It is enough to use a ready-made pattern on the website, transfer it to paper, and then to fabric.
The result of simple manipulations is a beautiful, neat tie of the required length and width from the chosen fabric with minimal investment of time, effort and money. A man who receives such a job as a gift will be endlessly pleased and grateful for his efforts and efforts.
Fabrics and sizes: where to start?
To make a men's tie with your own hands, you need to decide on the fabric. It can be thick wool, an extraordinary twist, or jacquard silk, which is especially fashionable today. Be sure to use non-woven fabric along with the material for the products - with its help, the tie will take the desired shape.
Consider the option of sewing a classic model of a men's tie made of jacquard silk. Why silk? This is a natural dense fabric that allows you to create spectacular and practical ties. Also suitable as an alternative:
- linen;
- velvet;
- cotton, etc.
The fabric for the tie can be plain or printed. If this is the second option, then when working with the pattern in the future, you need to try to lay it out in such a way that the brightest and most interesting places are visible on the main wide part of the product.
The main secret that allows you to cut a tie really neatly and efficiently is on the bias. This method will require more fabric than the classic straight one, but it is thanks to it that you will be able to achieve the desired effect when tying a tie.
However, it is possible to reduce fabric consumption with a bias cut. To do this, the product is divided into parts (two or three). The longest main part to the corner, taking into account an allowance of a few centimeters, should be equal to the length of the square-shaped piece of fabric for a handmade tie.
It’s good if there is a ready-made accessory model with parameters that meet the requirements. Using it, you can measure the parts of which it consists. As for the width, it can be chosen at the discretion of the master, depending on the design of the product.
Don't forget about the hidden back "pockets" on the tie. Usually these are small triangles of a suitable shade made of lining silk. To sew them, you will need very little fabric, taking into account an allowance of up to 1 cm in the corners.
Features of a DIY tie pattern
In order to sew a men's tie, the first thing to determine is the model and size of the product. Since we are talking about a classic men's tie, its standard length is 150 cm from corner to corner. The width at the base is 11 cm, in the upper zone - 4 cm. If this is a narrow model of a classic tie, then in the lower part it is no more than 4-6 cm, in the upper part from 3 to 4 cm.
Considering that the product is divided into three parts, we can highlight the parameters of each of them:
- part A - 76-90 cm;
- part B - 15-25 cm;
- part C is everything else.
If this is a teenage model, then the length is 10-12 cm shorter.
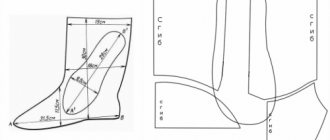
When there is no ready-made tie that can be used as a model for measuring parameters, and ready-made patterns on the website are not suitable for some reason, you can try to make a paper model yourself.
To do this, cut out a strip of thick paper of the required length and try to tie it like a tie in such a way that the lower wide part slightly covers the belt buckle according to the standard, while the narrow part does not reach the level of the belt a few centimeters. Using a paper prototype, patterns are prepared first on paper and then on fabric (you need to design several parts), maintaining the necessary parameters.
When transferring patterns to fabric, it is important to add 1-2 cm at the joints. It is important to place parts on the material obliquely, as already noted
In the same way, a pattern is prepared from non-woven fabric. Two triangles are cut out from the lining for the wrong side, adding an allowance of 1-2 cm along the bias.
How to sew a pioneer tie
“Whenever you tie a tie, take care of it! He and our banner are the same color.” The red pioneer tie has already sunk into history, but still remains in the memory of many people who proudly wore it on their chests, valued it very much and carefully preserved it. The scarlet tie symbolized the continuity of three generations - pioneers, Komsomol members and communists.
- — scarlet silk fabric 60 x 60 cm;
- - red threads;
- - scissors.
A pioneer tie is a kind of neck scarf, the ends of which must be tied with a special pioneer knot.
In industry, ties were made from silk acetate. Currently, you can use any silk fabric that has a beautiful shine and flowing structure. Materials such as satin, silk, crepe satin, and crystal are well suited for this. It is advisable to choose a bright scarlet shade. If you straighten the tie on a flat surface, it will resemble an isosceles triangle, and the angle of the apex is obtuse and not straight, as it seems at first glance. In addition, Soviet-era products had sizes that were slightly different from each other - 61?61?95 cm, 60?60?100 cm. To make a tie like a real pioneer, you will need fabric measuring 60x60 cm. Iron the fabric and lay it out on a flat surfaces. Fold the scarlet square in half diagonally and cut it into 2 parts. If necessary, one such piece of fabric will make 2 ties. As a result, its angles will have dimensions of 90°, 45°, 45°. Finish the edges of the product with threads, be sure to match the color of the fabric. This can be done either with an overlocker or with a regular sewing machine using a zigzag stitch. To bring the shape of the tie closer to the ideal, slightly modify the corners of the product. To do this, on a paper pattern or directly on the fabric in the area of a right angle, measure 3 cm on each side. In turn, connect each point obtained with a line to the end of the opposite acute angle. The result is an isosceles triangle with an obtuse angle at the vertex. However, it is important to take into account that a tie made using this pattern will have slightly beveled edges. This can make them difficult to process; for example, when sewing with a zigzag seam, the edges will “wave”. If it is not possible to overcast a tie, you can simply hem its edges. In this case, make the double hem very narrow - no more than 4 mm, then the product will look neat. chtokak.ru
Legend of the tie
At the time the pioneer organization was founded, its members did not have any distinctive signs. There is a version that during one of the congresses or solemn rallies, working women took off their scarves and tied them around the necks of their children, bequeathing them to keep them and be proud of them, since they are the same color as the banner.
Contrary to this legend, some historians argue that the idea of using a tie as a distinctive sign was borrowed, like everything else in the pioneer organization, from the English scouts. Only the ideologists of that time were able to add some special meaning to the symbolism that the pioneer tie embodied. The USSR thus created the initial stage in the formation of communist consciousness in society.
Difficult decoration
The scarlet tie signified the continuity of three generations. Pioneers, Komsomol members and communists passed the baton to each other. They all contributed to the fight for the cause of the Communist Party. But even those who wore these ties did not always know how to sew them themselves, what the size and cut should be. What can we say about us, because most young people have only seen them in pictures.