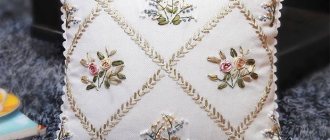
When exactly did bead embroidery appear? It’s unlikely that anyone will remember exactly now. We can only say that this handicraft is newer than simply embroidery. They began to embroider as soon as a needle-pierced base and threads appeared, with which ornaments and designs were created on it. But people knew how to attach shells and drilled stones to non-woven warps, due to the lack of weaving, even earlier? One thing is clear: for bead embroidery, the starting point was the invention of beads. And the invention of this creative material, in turn, is associated with the birth of glassblowing, the cradle of which is most often considered to be Phenicia. Rich clothes embroidered with beads, objects of worship and everyday life were found by archaeologists at excavations of Egyptian tombs, cities of ancient Greece and Rome. African tribes and American Indians embroidered with beads. Noble ladies, while away their boredom, bent over hoops with beaded embroidery, and commoners labored to earn their daily bread. All this experience accumulated over centuries has been adopted by both modern needlewomen and bead manufacturers. By the way, the production of world-famous Czech beads is focused specifically on the needs of embroiderers. Bead embroidery is used to decorate clothing, both everyday and special (stage, national, ritual). Personal accessories (bags, wallets, pouches, belts, etc.) and interior decor items (panels, furniture upholstery, boxes, etc.) are embroidered with beads. We will tell you in detail about the types, techniques, techniques and subtleties of bead embroidery below.
How to embroider with beads: the basics
The most important step in bead embroidery is transferring the design onto the fabric. This is done with a simple pencil (chalk and soap wears off quickly and is not suitable for prolonged contact with the embroiderer’s hands) or a washable marker, which can be purchased at any sewing and embroidery store, as well as in many fabric stores.
If you need to sew a scattering of beads separately from each other, then sew each unit of beads with holes parallel to the fabric level and fasten it on the wrong side.
Important: do not pull the threads through, as the fabric will subsequently deform under the tension of the threads.
A decorative move is also often used, in which small beads are sewn onto larger beads or beads. To do this, you need to fasten the thread and bring it to the front side. Thread a large bead onto the thread perpendicular to the fabric, bring the thread out from the other side and pierce the small bead so that the holes of the small bead are parallel to the fabric, and again insert the needle into the large bead, bringing the needle out on the wrong side. All that remains is to fasten the thread and trim the tip.
Sewing pattern for single beads
Wondering how to embroider a path with beads? There are several types of seams for this. The simplest one is to forward the needle. In this seam, beads are strung on a needle and sewn to the fabric with a small stitch. They adhere well to non-elastic dense fabric, especially coats.
Scheme of a seam forward with a needle when embroidering with beads
For thin, and especially elastic fabrics, we recommend the “lower stitch” stitch. In this seam, in addition to the fact that the beads are attached more firmly, at the end of the row the thread is pierced again through all the beads of the row, thereby fixing the beads into a single system.
Line stitch pattern for bead embroidery
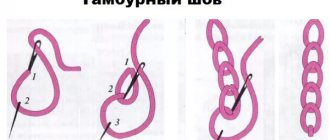
Now let's look at how to embroider a stem stitch with beads. To do this, place two beads on the needle and insert the needle into the fabric, bring out two beads at the beginning of the line and thread them through again, then string one bead onto the needle, insert it into the fabric and bring it out before the previous bead, sew two beads, etc.
Scheme of a stem seam when embroidering with beads
Do you like it when part of the beads “sag” in an arch, but at the same time the beads are attached to the fabric? We suggest learning how to sew an arched seam with beads. To do this, we string from 5 to 20 beads onto a needle and insert the needle into the fabric, fasten the last bead as shown in the diagram and repeat. In this case, the “arches” can either have the same number of beads or vary, creating arches of different heights.
Bead embroidery pattern for arches
For those who want a perfect back side and at the same time an ornate pattern, we suggest learning how to stitch a seam. We fix the first thread on the fabric and string all the beads in the row and place the thread on top of the sewing. The second thread with a needle is secured to the wrong side of the sewing and brought to the front side. In this type of sewing, the second thread does not pierce the beads, but rather grabs the second thread as in a machine seam and fixes it on the wrong side, as indicated in the diagram.
Bead embroidery pattern attached
But if you want to learn how to embroider pictures with beads, or dense patterns, meet the monastery stitch. It appeared in monasteries, because it was there that hardworking women nuns embroidered the most luxurious icons and paintings with beads so that the beads formed dense rows, and through them it was impossible to see the base. Today this stitch is available to everyone, but in the learning process you will have to work hard, since it is not given to everyone and not immediately.
Visually draw a square, the size of one bead. We fasten the thread or fishing line from the wrong side and bring it to the front side (conditionally in the lower right corner). We string one bead and make a stitch in the conditionally upper left corner, from the wrong side we lower the thread to the lower left corner (the same point is the lower right corner for the second bead) and bring the thread to the front side. We continue to sew first in one direction, then in the other as shown in the diagram below.
Scheme of a monastic seam in bead embroidery
Which beads to choose for embroidery?
Theoretically, a bead of any size, shape, or color is suitable for embroidery. If only there was a hole for sewing. However, the already mentioned operational features of the products dictate their own rules for embroiderers: beads suitable for decorating an elegant evening bag or for a wall panel inserted into a frame under glass are completely unsuitable for embroidery on an albeit beautiful, but everyday summer top, which is mercilessly sent away after every dressing. in the wash. So, the first parameter by which beads for embroidery are chosen is its wear resistance.
Beads vary in shape and size. Embroideries using the same pattern, but made with different sizes and shapes of beads are different embroideries. The size of the beads can reduce or enlarge the image scale. The shape of the beads can completely change the design beyond recognition. So, for example, round rocaille beads in cross-section tend to be a regular square with rounded corners, while glass beads are a narrow rectangle, or even a fairly long strip. Accordingly, if the design of the diagram is divided into squares, then attempts to make it with rectangles sewn in the same quantity as indicated on the diagram will lead to deformation of the entire image (longitudinal or transverse, depending on the direction given to the beads during fixation). This does not mean that you cannot use a long glass bead in a pattern that involves a short cutting; it means that you will have to make adjustments to the cutting pattern: instead of three cutting beads, one glass bead is sewn on and, accordingly, with such a replacement, the number of beads in one row decreases.
Czech beads are considered to be the most suitable for embroidery. The fact is that the Czech Republic is one of the historical centers not only of bead production, but also of bead embroidery. Over the centuries, Czech bead production has evolved specifically to meet the needs of embroiderers. Czech beads are quite well calibrated. Not as accurate as the Japanese one created specifically for weaving. But shape errors in embroidery are not as noticeable as in dense weaving. Therefore, in this case there is no particular point in overpaying for perfect caliber accuracy. But as for the color palette, which is so important when embroidering beaded paintings, there are no equal Czech manufacturers on the planet. The palette of Czech beads includes about 1,500 color items! The Japanese have a much poorer color choice. Although Chinese beads amaze you from time to time with unusual shades, they do not guarantee an exact repetition of the same shade in the next batch. But first-class Czech beads are first-class because they have been repeating the items stated in official color cards for decades.
And finally, about the types of beads that you should pay attention to when choosing material for embroidery. Uncoated rocaille is considered the most versatile bead for embroiderers. Firstly, due to the simplicity of its harmonious shape, it easily fits into the design of most schemes. It is enough to choose the same size as indicated in the recommendation, and things will go well. Secondly, this transparent and opaque bead made of colored glass does not lose color under any circumstances, it simply cannot lose it, because it is not the beads that are colored, but the glass mass from which it is made. Thirdly, it is this that has the largest selection of colors. Each of the basic colors (white, black, red, yellow, blue, etc.), as well as complex colors (green, orange, brown, etc.) are presented in an abundance of tones, gradually moving from light to dark.
The Czechs also have plenty of beads with various coating effects: the same beloved “light”, painted from the inside of the hole. And it also looks great in embroidery, giving it extra luxury thanks to the play of light. But it should be remembered that these effects, for the most part, are not durable. Like any luxury, they do not tolerate the hardships of everyday life.
See how much beads cost in HandmadeMart
How to beautifully embroider with beads on clothes: a detailed master class
Once you have mastered the stitches and have trained yourself to hold the needle and beads in your hands, it’s time to move on to decorating your first product. Let's take a regular plain T-shirt and create a unique African-style bead pattern on it. No one will have one like this for sure!
How to beautifully embroider with beads on clothes:
Idea for embroidering a knitted T-shirt with beads
In our work, we can use any shapes and colors of beads, the main thing is that they are bright and contrasting. Take a blank sheet of paper and draw a rectangle, and lay beads on top so that it looks perfectly harmonious. After you lay out the pattern, step aside and look - is everything organic? If not, adjust it. Take a photo of the layout of the pattern, since during the embroidery process you can violate the integrity of the design by using one of the beads, and this way you will have a ready-made pattern.
Layered bead pattern on a sheet of paper
Now we take a T-shirt and strengthen the place where we will embroider (for us it is a sleeve). We place a piece of self-adhesive soft interlining under the bottom (you can buy it at any fabric store) with the adhesive side to the wrong side of the T-shirt and iron it with steam several times so that the glue melts and firmly glues the interlining to the knitwear.
The process of gluing knitted fabric with non-woven fabric
We transfer the pattern diagram onto the fabric. Since the pattern is laconic and small on dark fabrics, you can draw a pattern with chalk or soap and start sewing. We fasten the thread from the wrong side and bring the thread to the front side.
How to embroider with beads: fasten the thread to the wrong side of the fabric
Sew on the beads using one of the stitches above, depending on the density of the pattern.
How to embroider with beads: the work process
Fasten the thread and tuck all ends on the wrong side.
After finishing the embroidery, all that remains is to fasten the thread and thread
Turn the T-shirt inside out and wash to remove any traces of the diagram. In the future, always wash this item inside out to avoid rubbing off the beads.
Ready-made T-shirt embroidered with beads
Did you like our idea? Take it into service!
Features of embroidery on different clothes
The location of the pattern and its density changes depending on what clothing it will be placed on.
Tops and T-shirts are usually made from knitted fabric, so heavy, voluminous patterns will not work - the fabric will sag and become deformed. It’s better to stick to light, small drawings. When working, you need to monitor the thread tension. You can place a piece of thicker fabric on the inside to make the embroidery even.
Embroidery on a dress allows you to show maximum imagination. The bodice and skirt can be embroidered. The pattern can be made in the same color as the fabric of the dress itself, or in a contrasting color. It all depends on personal preferences and the style of the item you want to decorate. Beads are chosen depending on the fabric - on thick dresses you can use large beads and heavy glass beads. For light translucent fabrics, it is better to choose high-quality plastic small beads.
on jeans , since the dense material allows you to use a wide variety of beads and beads. The choice of drawings is unlimited. Contrasting beads are sometimes simply sewn to the fabric in a chaotic manner. Bead embroidery can be done on a separate piece of denim, the edges of which are terry. Then such an applique is attached directly to the clothing. Often beaded patterns on jeans are complemented with sequins.
How to embroider flowers with beads on a shirt: step-by-step guide
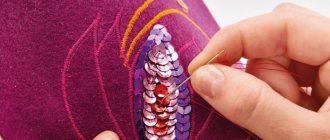
And this section of the article will be of interest to those who want to stand out in the office, at the university or at business meetings. Are you wondering how to embroider a shirt with beads, creating a stylish and laconic flowerbed from it? So, prepare beads, sequins, fishing line and a needle for bead embroidery. And, of course, the shirt itself!
How to embroider flowers with beads on a shirt:
- First of all, lay out your shirt: decide whether you will wear it for graduation or tuck the bottom into a skirt or trousers? If you are going to tuck it in, try it on and mark the place that will go down so that you don’t sew flowers on the belt line and below.
- Now place one bead on one shelf (marking where the flower will be) so that the distance is uniform and harmonious.
- Make a mirror pattern on the second side. Step back and see how everything looks. If you like everything, mark it with a pencil or washable marker and these dots will become the core of the flower.
Step-by-step master class on shirt bead embroidery
- The next step is to place flowers made of beads and sequins on the table so that they are of several types, but are in harmony with each other. If you are just starting your creativity, repeat our options.
- Stretch the shirt over the hoop and sew on the flowers. Thread the thread and carefully cut from the wrong side. Try on the shirt and look in the mirror - do you like everything? If so, fasten the buttons, turn inside out and wash on a delicate cycle.
Try on the finished product and don't forget to show off on Instagram, because we all love approval!
The complexity of bead embroidery on clothing
Beads are a very elegant and beautiful material. Things decorated with it can compete with precious jewelry. The process of how to embroider a dress with beads is no more complicated than cross-stitching. You can learn on your own without attending special courses.
Bead embroidery on clothes
For beginners who want to know how to embroider a dress with beads with their own hands, the advice of professional needlewomen will be useful:
- You only need to get to work in a good mood. Inspiration plays an important role in the process; if it is absent, then the picture will not turn out as intended.
- You need to purchase beads in a volume slightly larger than required for the work. If there is not enough of it, it will be problematic to buy in the same color scheme.
- If you want to embroider a pattern with a large number of small details, then before starting work you need to place interlining under the fabric with the pattern. Thanks to this, the fabric will not wrinkle.
- All beads must be arranged separately by color. To make it more convenient to type them, it is recommended to use a special stand with a recess.
Important ! The key to fruitful work is a well-prepared workplace. Nothing should distract from the creative process.
Bead embroidery process
Selection of threads, tools
One of the important stages of preparation for the embroidery process is the choice of material. Among them should be:
- beads of different shades. When purchasing, it is important to select beads that match each other in color.
- Rhinestones, stones.
- Special needle for beads.
- Scissors, threads, ribbons.
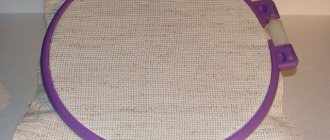
To prevent the design from slipping, it is recommended to use a hoop.
When choosing beads, it is recommended to pay attention to the manufacturer. The best beads are those made in Japan, followed by the Czech Republic and Taiwan. The beads have 18 numbers. For needlework, number 11 is best suited.
You might be interested in this About embroidering icons of the Mother of God using beads
According to their shape, beads are classified into several types:
- beads are round beads;
- bugles are chopped glass tubes ranging in size from 3 to 20 mm;
- cutting is glass beads, but smaller. Its length is about 2 mm.
Embroidery with glass beads and cutting adds a bright shine. But this type of beads has a disadvantage: they have sharp edges that can break the thread. Therefore, it is recommended to combine them with simple round beads.
In order for the embroidery to be not only beautiful, but also durable, you need to sew the design very tightly. For this, special threads are selected:
- kapron 33 and 50;
- cotton-lavsan;
- polyester;
- linen-lavsan.
You need to sew in two threads to ensure strength.
Required materials and tools
Seams for bugles
As a special type of beads, glass beads and cutting require special attention from embroiderers. It is also special because it has a non-standard beaded shape: a tube without a hint of roundness. Even if it is high quality Japanese glass beads with melted edges, it is still uncompromisingly straight. And because it has powerful light refraction effects: the tubes either shine with a colored mirror or play with satin tints.
For embroidery with glass beads, in addition to the stitches that are especially loved by beaders, such as forward/backward needle, half-cross, etc., less well-known ones are also used. But, in fairness, we note that they are less known in bead embroidery, but for satin stitch embroidery the same dashed or double-sided stitches are the main technique for creating a pattern.
So, let's start with the traditional ones.
Using forward seam stitches, the glass beads can be laid not only in a straight line, but also in a zigzag pattern. And these are at least simple drawings. Alone or in combination with other methods of sewing beads, they form large ornaments and look more complex;
The stem stitch in combination with glass beads allows you to draw precise contours. This is how flower stems are embroidered and the contours of their petals and leaves are outlined with glass beads. Anything is possible to draw with shiny tubes, but remember, the smoother the contours, the shorter the length of the glass beads should be, otherwise angular breaks cannot be avoided. The execution of the stem seam is the same as with ordinary beads, but due to the length of the bead, which is much greater than its thickness, the effect is different.
The half-cross seam, in the case of bugles, literally and visually lives up to its name.
It is made using the same border and the same pattern as when sewing with the usual round beads: the stitches are placed in the cells of the border diagonally from corner to corner. But bead balls, selected to fit the border size, almost completely fill the cage, and the same filling is provided by a full-fledged Bulgarian cross in thread embroidery. But the bugles only draw out the only diagonal of the cross. Ornaments made from half crosses are also made. But, if you try to embroider a picture with glass bead half-crosses according to a pattern designed to completely fill the cell with colors, the result will most likely be disappointing.
But this feature of glass beads laid on canvas using a monastic seam provides a completely unique embroidery opportunity, inherent only to this type of bead. Beads laid in different directions in a clear and very elegant “herringbone” do not line up, but bugles do.
To obtain such a simple pattern, it is enough to change the direction of the stitches of the monastic seam to the opposite in each subsequent row of embroidery. The creation of an even Christmas tree on bases that do not have a clear outline pattern is made easier by life hacks invented by needlewomen. For example, it is possible to use a zagzag machine stitch. The size of its stitches should correspond to the length of the glass bead tubes. First, using threads to match the base, a contour sketch is sewn, and beads are already sewn on it and the result is perfectly even.
By the way, it is possible to come up with an infinite variety of ornaments and designs based on the Christmas tree. If you combine it with horizontal or vertical steps of bugles, then even more.
Dense embroidery with glass beads, both on canvas and on other types of bases, is also possible. The tubes are sewn as close to each other as possible. They are sewn on both in rows of stem stitch and in monastic stitches. True, the diagonal stitch of the monastery seam gets rid of the additional burden of holding the bead. Having become a service bead, it moves to the wrong side and ensures the transition to the next bead.
Depending on the location (along or across), the glass beads form a vertical or horizontal beaded tapestry. And the brilliant splendor of such a canvas is incomparable.
Schemes and patterns
There are various pattern options for beginners and experienced craftswomen. Most often, Eastern and Slavic themes are used in the designs. Simple patterns include:
Festoon with pattern
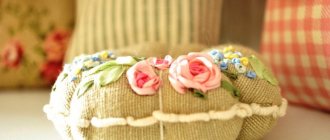
- Leaf and rose - the base is made with large beads, and the middle is filled with small beads.
- Festoon with a pattern - this option is great for evening and wedding dresses. This is a flower arrangement made of glass beads. Non-woven fabric is not required to transfer the pattern.
- The star spiral is a pattern suitable for a formal dress or full skirt.
Most often, bead embroidery patterns on clothes are found in the form of geometric shapes or floral motifs.
star spiral
Hobby as art
Despite the fact that embroidery is an ancient decorative and applied art, today this type of needlework is constantly developing and improving, and at a fairly rapid pace. All kinds of patterns and designs can be embroidered on leather, felt and many other materials. You can also decorate wool, silk, cotton and linen fabrics with embroidery.
Skilled needlewomen work with various materials - pearls, precious stones. However, beads remain at the peak of popularity. Today there is a huge selection of beads for embroidery of different sizes, colors, shapes. Clothes, shoes, bags, wallets, and household items are decorated with bead embroidery. Landscapes, still lifes and portraits are created from bright beads.
Select a pattern
Before you start embroidering, you need to decide on a pattern or ornament. You will also need to plan:
- where the embroidery will be placed;
- what color scheme and size will it be?
Important! All points must be carefully thought out to avoid rework.
T-shirt or top
Bead embroidery on knitwear has a number of nuances. Beginners are recommended to first take a step-by-step master class. Materials and tools you will need:
- t-shirt;
- beads;
- adhesive interlining for lining;
- nylon thread;
- chalk;
- thin needle.
The place for embroidery should be marked with chalk. To prevent the knitwear from stretching during the process, non-woven interlining is attached to the place where the embroidery will be. The drawing is copied with chalk or a washable marker. The bead row should be dense, the beads should be placed close to each other.
You might be interested in DIY embroidery of flowers on a board
Important! If an ornament is being embroidered, then the work goes from top to bottom; if it is a thematic design, then a frame is made and then filled.
The finished product can only be washed in a special bag, first turned inside out to protect the embroidery.
Bead patterns on a T-shirt
Dress
There are many interesting patterns for embroidering a beaded design on a dress. Depending on your wishes, the design can be placed on the neckline, on the shoulders, in the chest area or on the sleeves. There are models with an embroidered top.
Beaded brooch on a dress
Shoulder Pattern
This pattern is made with a special “forward needle” stitch. The space inside the pattern is filled using a needle stitch. The drawing turns out to be very simple, it is important to choose the right colors.
Beaded Shoulder Pattern
Jeans decor
Bead embroidery will perfectly decorate any denim clothing. The originality of this work lies in the combination of the roughness of the fabric with the femininity of the design. With the help of beads, you can make your denim jacket a magnificent product that will highlight your taste and individuality.
Denim clothing with embroidery
Ballet shoes
Bead embroidery can be used to decorate not only clothes, but also shoes. For example, you can give a second life to old ballet shoes. It is important not to glue the beads, but to sew them on.
Bead embroidery on tights
You can decorate the thin lace of tights with an original pattern. This must be done by putting it on yourself or something hard. Work begins from the knee, going down. It is important not to make the pattern too large so as not to tear the thin material.
Embroidered shirts
The national clothing in Ukraine, embroidered shirt, is distinguished by bright and colorful patterns. Most often, floral themes are used as designs; poppies are depicted on clothes. But among the embroidery patterns you can also find geometric patterns.
Pattern on embroidered shirts
What is bead embroidery used for, or choosing a base?
Bead embroidery is practiced on products and surfaces that do not experience increased operational load. This means excessive tension, constant friction, the risk of heavy dust and contamination, and, as a result, washing and cleaning using aggressive chemicals. Anything that can break the threads holding the beads, split the glass from which the beads are made, or erase the colorful coating from this glass does not combine with bead embroidery.
The basis for bead embroidery can be any material on which sewing is generally possible. All types of fabrics, both natural and artificial, leather that can be pierced by hand with a thin needle and its substitutes, felt, felt, thin muslin, etc. Some bases allow you to apply a design on them to be sewn on, others, like canvas, make it easier to execute the design without a preliminary sketch, but beads look organic and luxurious everywhere. Moreover, it peacefully coexists with other needlework techniques, complementing soutache embroidery and satin stitch, shading the braid and accentuating the puffs. The base can be anything, the main thing is that it matches the style and functionality of the finished product. Roughly speaking, a beaded bridal veil is not the same as a beaded sheath.
Transferring the design to clothing
In order for the embroidery on things to be even and neat, you need to prepare a stencil and transfer it correctly to the fabric. The design must be durable and not be erased during the embroidery process. There are several ways to transfer a pattern to fabric:
- Using tracing paper - the drawing must be copied onto tracing paper, to do this, attach the diagram on top. It is then attached to clothing and embroidered according to the design. Then the tracing paper must be carefully removed.
- Using special markers you can apply a design to the fabric. Such a drawing will not be erased during work.
- You can make powder from chalk, then apply a stencil of the design and gently rub the powder into the holes.
You might be interested in this Master class on embroidering roses using ribbons
To transfer the drawing, you can use a transfer pencil and an iron. The paper with the diagram is placed on the fabric, then ironed.
Transferring the design to fabric
Methods for sewing beads
Bead embroidery must be done correctly so that the beads do not fall off and the design is preserved for a long time. There are several types of seam:
- “Forward the needle” - the needle is passed to the front side, a bead is strung on it. At a distance equal to the size of the bead, a puncture is made on the wrong side.
- “Stalked” - it allows you to firmly attach the beads. The bead is strung on a thread that is already attached to the fabric. The needle is then passed into the fabric just behind the bead. Then pass the needle through the same bead and string the second one. The needle is brought out again inside out. The embroidery is very dense.
- “Low stitch” - to make such a seam, you need to thread one bead onto the needle. The needle is inserted behind the bead, then withdrawn at such a distance that another bead can fit.
A crystal bead pattern on clothing, made by yourself, can become a unique work of art and will add unique originality to even the simplest thing.
With our hectic life, we definitely need to find a hobby to calm our nerves and save a penny. Bead embroidery on any clothing - why is it a bad option for mental relaxation? You can embroider anything with beads, rhinestones, and stones: clothes, summer shoes, jeans, children's clothes, cases, bags, and so on. And if you make the decor yourself using complex patterns, it’s simply at the level of art. The main thing is to think through and tastefully place embroidery on clothes. It is not difficult to master the technique of bead embroidery with your own hands - below we provide explanations, diagrams and a master class for beginners.
Bead embroidery will definitely help you decorate things and make them exclusive. The following is a simple master class and work diagrams. For knitwear or knitted items, beads are sewn onto the finished product - it is advisable to sew beads, stones, or rhinestones more tightly while working. Then, even if the thread breaks during wear, all the beads will remain in place and the design can be easily restored. The number of beads is in inverse proportion (for example, beads number 11 are smaller than beads number 8). In terms of quality, Japanese beads are popular, then Czech, and finally Taiwanese beads.
Beads, unlike rhinestones, can be:
- Plastic (considered for children).
- Bugles (chopped parts of glass tubes). If the tubes have an oblique cut, this is called cutting. They have a bright shine.
- Small glass beads (available in round, cylindrical, and square).
- Charlotte (round small).
- Delica (small Japanese beads of the highest quality, angular shape).
- Pony (large elongated beads, made from plastic, clay, and glass).
- Barry (bone beads, butterfly).
- Drops (drop-shaped).
- Twin (extended wide, 2 holes).
- Cubic, square, triangular.
Bead embroidery on a T-shirt, sweater, dress, and other things is carried out in two threads, with a special thread - linen-lavsan, as well as cotton-lavsan, or nylon. The thread must match the color of the clothing, no matter what color the beads are. If the embroidery is large, a synthetic canvas is used, which after work can be carefully pulled out from under the embroidery. Needles for decorating with beads are taken thin - because the holes in the beads are very small. If the embroidery with beads, rhinestones, and stones is large, it is recommended to do it on fabric, and at the end of the work, baste it to the clothes, and remove it for washing.
And a little about what rhinestones and stones are, which are used to decorate clothes along with beads. Rhinestone is a stone, that is, an imitation of precious stones. It is made of glass with a high refractive index (that’s why rhinestones sparkle so much). Rhinestones are also called lead crystal. Nowadays, rhinestones imitate not only diamonds, but also topazes, amethysts, and emeralds. In addition, semi-precious stones can be used in embroidery, such as quartz, lapis lazuli, hematite, obsidian, and others.
Bead embroidery methods
Embroidery on print
The silk-screen pattern already on the fabric is embroidered with beads. Most often, this method is used when creating paintings and icons from factory embroidery kits. But it is also possible to independently make a base for embroidery. The result of such painstaking preparation will be a designer product that combines the techniques of hand-painted fabric and embroidery itself.
Print embroidery can be:
- complete - all drawn elements are covered with beads of the desired color.
- partial - beads are found only on some areas of the pattern printed on the fabric.
Counted embroidery
One of the most common ways to transfer a beaded image from a pattern to fabric. The name was given by the principle of forming bead rows: the number of beads in the pattern is counted and sewn onto the fabric according to the count. Beaded pictures are embroidered in this way, and the same patterns as for cross stitch are suitable for creating them.
Counted embroidery can be divided into:
- horizontal - rows are sewn horizontally, sequentially filling the space from edge to edge;
- vertical - the same, but the rows are created vertically;
- circular - embroidery is carried out in a spiral from the center to the periphery in one continuous row.
Outline embroidery
Beads are sewn along the lines of the pattern applied to the fabric. The method is self-sufficient, but can also be used in combination with others, for example, first we embroider the outline of an apple, and then fill the entire internal space with beads.
Decorative embroidery
It is used to decorate a wide variety of products with beads, from clothing to jewelry and household items. It is also possible to work based on your own model or one previously executed by someone else. But the real skill is in improvisation. In such embroidery, in addition to beads, other materials are often used: beads, stones, rhinestones and rhinestone chains, sequins, soutache, gimp, etc.
How to sew beads
How to sew on beads correctly? This is the main problem for beginners. The main thing is not to rush, to work along the drawn lines.
One bead - sew it to the base with a stitch, or use a smaller bead to make a column.
Stitch forward with the needle. We just string the beads one by one on the needle, stitching the fabric - it’s all very simple.
Line stitch. We pass the needle back and forth - the beads will stand in an even row.
Stem seam. With this method, the work turns out to be tough. 2 beads on the needle, we pass through the fabric from the wrong side at the second bead. We bring the needle to the front between the first and second beads, pass through the second, and so on.
Arched (back needle). Per needle - 2-4 beads at once.
The seam is attached. The beads are strung on a thread, and then with another needle they are sewn to the base with small stitches between the beads.
Monastic seam. Each stitch corresponds to 1 bead. We make a diagonal stitch, the thread goes down into the fabric. On the wrong side we make a vertical stitch, a thread on the front one, and 1 more stitch diagonally along with the bead. On the front side, stitches are made diagonally, and on the back side, stitches are made vertically.
Here are all the basic stitches that may come in handy for beginners. Next, we have prepared interesting master classes for you.
Embroidery of a blouse (master class)
The work is done on a hoop. We embroider the blouse with beads, cutting, sequins, and bugles of the same color. The master class is simple and understandable for beginners.
Decorating a T-shirt with beads (master class)
A good option for decorating clothes is decorating a T-shirt, dress, or blouse with beads. For a dress, you can decorate the collar in this way; for a blouse, you can embroider the corner of the collar with one element of the pattern. The drawing and master class are very simple, suitable for beginners and not very experienced craftswomen. This decor can be done in a couple of evenings, without rushing. If you took beads of light colors, it is better to choose a dark T-shirt, and vice versa. Then the drawing will stand out well. Don’t try to choose just such beads, let them be similar, the main thing here is the combination of colors.
For the master class you will need:
- T-shirt.
- Beads (see photo). Glass and wooden beads are used.
- Thin adhesive interlining.
- Iron.
- Chalk.
- Threads to match the color of the clothes (preferably nylon).
- The needle is thin.
Next, we need to prepare the fabric for decoration. Using chalk and a ruler, mark a straight vertical line on the shoulder. It’s not very clear in the picture - the line should be a continuation of the shoulder seam! From here we will start making decorations with our own hands.
To ensure the strength of the embroidery, we need to glue interlining to the wrong side of the T-shirt. Cut off 2 pieces of non-woven fabric (look at the area of the picture). Place the interlining on the wrong side of the T-shirt, adhesive side down. Glue it. We do this using a hot (not very hot) iron.
Measure an equal distance on the sleeves of the product. Mark the location of the drawing with chalk. It is more convenient to do the ends of lines (corners) with a sharpened pencil. Using a ruler and pencil, draw out the area of the drawing (squares). Focus on the center of the picture. The center of one motif is at the intersection of the sleeve cap and the shoulder. This is one element, you can make your own motif.
We take a photo of the drawing so that it is at hand. Take 0.5 m of thread and insert it into the needle. Turn the sleeve inside out and make a knot stitch at the top of the sleeve. This is the top point of the embroidery.
Sew the first bead to the fabric. We try to enter and exit stitches as close to the beads as possible. Tip for beginners: work with the stitches that are most comfortable for you. It is most durable to embroider with a lowercase or stem stitch.
We look at the photo: each bead needs to be sewn into its place, securing it. The pattern begins just above the sleeve cap.
Make 2 of these motifs. If the T-shirt is long sleeved, there will be more motives. At the end of the work, fasten the thread, trim off the excess thread from the wrong side. The master class for beginners is over.
Washing rule: wash the product inside out, preferably in a special laundry bag.
Decorating clothes with beads, seed beads and rhinestones: 33 ideas
1. Light gray and pearl pink look great together.
For this embroidery, take beads of the same color, but different sizes. Sew the largest ones first, then the smaller ones. 2. Decoration made from pearl beads can be complemented with rhinestones. Also, large beads can act as buttons.
3. You can use rhinestones and beads to decorate the “collar” on a cardigan with a round neckline.
4. Another version of a “collar” made of beads, this time in contrasting color to the color of the cardigan.
5. It is better to first draw such a pattern on a jumper, and then embroider it with beads.
6. In the same way, you can decorate a denim jacket with rhinestones and beads.
7. Pearls look especially delicate on angora or cashmere. Try embroidering the sleeves on a raglan model - beautiful and unusual.
8. Another option for decorating a model with a raglan sleeve: rhinestones along the seam will make an ordinary knitted sweatshirt look elegant.
9. Rhinestones and beads will add shine to a sweatshirt or T-shirt with a painted crystal (by the way, you can also draw a picture yourself using acrylic or fabric markers).
10. You can embroider a “necklace” on a T-shirt or tank top using beads and rhinestones.
11. Option for decorating a blouse or T-shirt: “epaulet” + sleeve decoration
12. Another version of the “epaulet” made of shiny elements. In this case, the shoulder line is further emphasized by beaded pendants.
13. A simple T-shirt can be turned into an outfit for going out using beads and rhinestones.
14. You can embroider an entire T-shirt or jumper with beads.
15. You can use rhinestones to lay out a pattern on the front of a shirt - for example, a denim one.
16. An option is to glue or sew them to the corners of the collar of such a shirt - this option will look especially elegant with a necklace made of similar beads.
17. More strict and restrained decor - for a silk or chiffon blouse.
18. A bright, eye-catching option for a classic white shirt.
19. A modest but very cute decoration for a linen or cotton summer shirt.
20. Another simple and cute option for decorating a blouse collar.
21. The most delicate decoration - for special occasions.
22. Another elegant decoration option - this one is suitable for a blouse made of fine noble fabric.
23. By the way, you can also embroider the cuffs of a classic shirt - for example, “lining” them with a layer of beads.
24. Decoration made from braid or embroidery on the collar of a denim jacket or shirt will perfectly complement the “fringe” of beads and beads on the pocket flap.
25. You can decorate with beads only the yoke of a jeans or shirt.
26. An exceptionally elegant option that can even be used to decorate a wedding dress. At the same time, this decor is done quite easily.
27. An option for decorating a smart blouse - for experienced needlewomen.
28. Another option that is not the simplest, but gives a luxurious result. Please note: not only the cuffs are embroidered, but also the edge of the frill.
29. The skirt can be embroidered with rhinestones, beads and seed beads almost entirely.
30. An option for decorating a denim jacket - for those who have enough time, patience and supplies of beads and beads.
31. Pearl jeans are a little easier to make.
32. Embroidery on jeans can be complemented with bead decoration.
33. Another option for decorating jeans with beads: this time the pearls are “concentrated” around the pockets. Attention: when decorating skirts, trousers, shorts and jeans, avoid sewing large beads on the back of the hips (otherwise you will find it extremely uncomfortable to sit in these things).
Source