Even household sewing machines now surprise with their huge range of functionality and the ability to quickly and efficiently form seams for various purposes.
Not all of them are really needed when sewing; even experts say that you can use a sewing machine effectively if you confidently understand several types of seams, the most reliable ones.
Stitched seams
They are used to connect side, shoulder and other sections of product parts. Stitched seams can be pressed, pressed and ribbed.
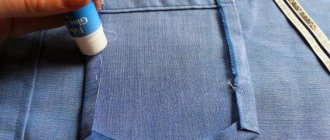
Pressed seam
To make a seam, fold the two parts right sides inward, aligning the reference lines and aligning the cuts. We sew the parts along the reference line or with a seam equal to:
- 10 mm – when sewing the main parts (shelf, back)
- 12 mm - when sewing the main parts for products made from fraying fabrics in outerwear and non-fraying fabrics - in light clothing
- 15 mm - when sewing the main parts for products made from fraying fabrics in light clothing
- 5 mm - when sewing extensions for items made of non-fraying fabrics in outerwear
- 7mm - when attaching extensions for items made of fraying fabrics in outerwear and non-fraying ones - in light clothing
- 10 mm - when sewing extensions for items made of fraying fabrics in light clothing
We spread the seam allowances in different directions and secure the seam in this position with an iron, that is, iron it out.
Pressed stitch seam
It is performed in the same way as an open-iron seam. The difference is that we bend the seam sections to one side and secure them in this position with an iron.
Stitch seam on edge
It is performed in the same way as a pressed seam. Only iron the seam sections away from the fold.
Machine connecting seams
If you have already mastered the technique of making hand seams, you can safely move on to learning machine ones.
A machine seam is the joining of two or more layers of materials with stitches.
According to their purpose, machine seams are divided into connecting, edge and finishing.
Let's go in order and get acquainted with machine connecting seams. Let's consider their purpose and some parameters and conditions of use.
The stitch seam is the main one in the manufacture of clothing. It is used to connect parts of the product, for example parts of shelves, back, sleeves. It can be done open-ironed, pressed and with overcasting of sections. The width of the seam (the distance from the edge of the part to the stitching) depends on the properties of the fabric and the area of the product.
The topstitch seam is a type of stitch seam. We use it as a decorative and finishing material. We sew two parts, bend the seams in different directions and lay finishing lines parallel to the stitched seam. The distance from the stitching line to the embroidering lines according to the model (arbitrary). The distance from the cuts to the embroidery line is 0.2 - 0.5 cm. Used in sportswear and leather goods.
Adjustment seam with open cuts - used for joining clothing parts made of cotton, raincoat fabrics, suede and leather. For example, we adjust the yoke onto the shelf of the product. The distance from the stitching line to the sewing line is according to the model. The distance from the stitching line to the cut parts is 0.2 - 0.7 cm.
An adjustment stitch with one closed cut is similar to an adjustment stitch with open cuts. The only difference is that one of the cuts remains inside, behind the stitching line. The distance from the stitching line to the sewing line is according to the model. The distance from the stitching line to the cut of the bottom part is 0.2 - 0.7 cm.
Overlay seam with open cuts - used to connect gasket parts, join parts. The distance from the cuts to the stitching is 0.3 - 1 cm.
Overlay seam with a closed cut - used when sewing details: pockets, yokes, trims. The distance from the folded edge to the stitching is according to the model. The distance from the stitch to the cut of the part being adjusted is 0.5 - 0.7 cm.
An overlay seam with two closed cuts is used to connect a section of a product left for turning out: connecting lining parts (parts of the front seam of a sleeve), when sewing pillows and blankets. The distance from the folded edges to the stitching is 0.1 - 0.2 cm. The distance from the stitching to the cuts of the parts is 0.5 - 0.7 cm.
Butt seam - intended for joining parts or sections made of base and interlining materials, for sewing strips of fabric under finishing seams. The width of the zigzag stitch must be at least 0.5 cm. The distance from the stitches to the joining line of the parts is 0.5 - 0.7 cm. The width of the fabric strip is according to the model (arbitrary).
Sewing seam - used for joining parts of linen, workwear, suits without lining. The distance between lines is 0.4 - 1 cm. The distance from the folded edge to the line is 0.1 - 0.2 cm.
Lock seam - performed with a double needle to join parts in unlined or light clothing. The distance between the lines is 0.4 - 0.7 cm. The distance from the folded edge to the line is 0.1 - 0.2 cm. The width of the seam on the side of the upper part is equal to the width of the seam on the side of the bottom part.
Double seam – used for stitching the lining of pockets, connecting parts in products without a lining or with a lining that does not reach the bottom of the product. The distance from the cuts to the first line is 0.3 - 0.5 cm. The distance from the edge of the part to the second line is 0.5 - 0.7 cm.
These were the basic machine joining seams. In most cases, before joining the parts of a product on a machine, we join the parts with hand stitches. This will make it easier to lay an even machine stitch; the fabric will not move or warp.
I wish you success in mastering machine joining stitches! And I recommend doing each seam on a small piece of fabric, to consolidate theoretical knowledge with practice.
If you have any questions about machine connecting seams, ask them in the comments, by email or by private message on VKontakte. All my coordinates are on the Feedback page
© Olga Marizina
All articles
Adjustment seams
They are used for connecting and fastening seams in products with difficult-to-fit WTO, as well as for finishing. There are two types of adjustment seams: with open cuts and with one closed cut.
Closed bevel adjustment seams
Such seams are made in the same way as topstitched ones, but the allowances are folded to one side, that is, ironed. A finishing stitch is laid on the front side.
Adjustment seams with one closed cut
To make a seam, fold the parts with their right sides inward, releasing the cut of the bottom part to the width of the finishing stitch.
Open seam adjustment stitch
| Home page Featured articles Random article Educational articles New additions Feedback We will help you write your papers! CATEGORIES: Archeology Biology Genetics Geography Computer Science History Logic Marketing Mathematics Management Mechanics Pedagogy Religion Sociology Technology Physics Philosophy Finance Chemistry Ecology We will help you write your papers! TOP 10 on the site Preparation of disinfectant solutions of various concentrations Low straight ball serve technique. Franco-Prussian War (causes and consequences) Organization of work in the treatment room Semantic and mechanical memorization, their place and role in the acquisition of knowledge Communication barriers and ways to overcome them Processing of reusable medical devices Samples of journalistic style text Four types of balance changes Problems with answers for the All-Russian Law Olympiad We will help you write your papers! DID YOU KNOW? The influence of society on humans Preparation of disinfectant solutions of various concentrations Practical work on geography for 6th grade Organization of work in the treatment room Changes in inanimate nature in autumn Cleaning the treatment room Solfeggio. All rules for solfeggio Beam systems. Determination of support reactions and pinching moments | Home Favorites Random article Educational New additions Feedback FAQ ⇐ PreviousPage 7 of 7 |
1 Mark a stitch line on the wrong side of one piece at a distance of 1.5 cm from the edge of the piece
2 Fold the two parts right sides inward, align the cuts and pin together
36
| Continuation of the table. 6 | ||
| № | The content of the work | Sketch |
| p/p | ||
| 3 | Baste pieces with straight stitches | |
| length from 0.7 to 1.0 cm at a distance | ||
| 0.1 mm from the intended line to the side | ||
| part cut. Make the tacks | ||
| at the beginning and end of the line | ||
| 4 | Machine stitch parts | line |
| along the intended line. Do | ||
| bartacks at the beginning and end of the stitch | ||
5 Remove running lines
6 Iron the edges and then iron them to one side
37
| Continuation of the table. 6 | ||
| № | The content of the work | Sketch |
| p/p | ||
| 7 | Place a finishing stitch with a | |
| front side of the part at a distance | ||
| 0.7 – 1.0 cm from the stitching seam, scraping | ||
| beer between each other the top part | ||
| and seam allowances | ||
Adjustment stitch with one closed cut
1 Mark a stitch line on the wrong side of one piece at a distance of 0.5 cm from the edge of the piece. 2 Fold the two pieces right sides inward, positioning them so that the cut of the bottom piece protrudes beyond the cut of the top piece by 1 cm (by width of the finishing stitch) and pin together 3 Baste the parts with straight stitches 0.7 to 1.0 cm long at a distance of 0.1 mm from the intended line towards the cut of the part, making fastenings at the beginning and end of the stitch 4 Stitch the parts with a machine stitch along the intended line. Make bartacks at the beginning and end of the stitching38
| End of table. 6 | ||
| № | The content of the work | Sketch |
| p/p | ||
| 5 | Remove running lines | |
| 6 | Iron the cuts and then iron them | |
| on one side so that the smaller one | ||
| the allowance was inside the larger one | ||
| 7 | Place a finishing stitch with a | |
| front side of the part at a distance | ||
| 0.7 – 1.0 cm from the stitching seam, scraping | ||
| beer between each other the top part | ||
| and seam allowances |
Practical work 6
Making samples of machine overlay seams
Goal of the work
Mastering the techniques of working on a sewing machine, mastering the technology of making an applied machine seam.
The content of the work
1. Studying the types of machine stitches.
39
2. Making samples of an applied machine seam.
3. Analysis of work results.
Guidelines
The sequence of execution of overlay machine seam samples is presented in Table. 7.
Table 7
Instruction card for completing sample invoices
Machine seam
| № | The content of the work | Sketch | ||
| p/p | ||||
Overlay seams
They are used to connect the components of cushioning parts, to connect straight and figured yokes and pockets.
Overlay seams with open edges
To make a seam, we place a cut of one part on the cut of another so that the cuts are 6-10 mm on top of each other, and connect them with machine stitching at a distance of 3-5 mm from the cuts.
Overlay seam with 1m closed cut
We bend the cut of one part towards the wrong side to the width of the finishing stitch and sweep it. Iron the fold. Place the piece with the folded cut on the front side of the other piece, right side up, aligning the cuts. We baste one part onto another and adjust it at a distance from the edge equal to the width of the finishing stitch.
Video: sequence of seams
Double seam
When you are working with fabric that has frayed edges, a double or French seam is appropriate. It is performed in several stages.
- 1.Fold the parts of the product inside out.
- 2. Having aligned the edges, sew the first line, with a distance from the edge of 0.3 - 0.4 cm.
- 3. Iron the edges in different directions.
- 4. Bend the product so that the face is inside.
- 5. Sew the parts at a distance of 0.5 - 0.8 cm from the edge.
The first line ended up inside the second. No additional stitching is required.
Butt seam
Used for joining parts made of cushioning fabrics where a minimum seam thickness is required. To make the seam, we cut out an additional strip of cotton fabric with a width of at least 20 mm and a length equal to the length of the parts being joined. We place the sections of the parts end-to-end on a strip of fabric and adjust them onto the strip at a distance of 5 mm from the sections. We connect the sections with a zigzag machine stitch.
Covering seam
We fold the two parts with their right sides inward, cutting out the bottom part by 8 mm. We bend the cut of the lower part with the lower part and grind them down at a distance of 2 mm from the cut. Iron the seam on the side of the top part and stitch the parts with a second machine stitch at a distance of 2 mm from the seam. Note: the sewing seam is used in the manufacture of bed linen and workwear. When cutting, the seam allowance on the side of the top part is equal to the width of the finished seam. That is, 6mm, on the side of the lower part - double the width of the finished seam + 2mm.
Types of connecting seams
They are used when processing cuts of the neck, sides, bottoms of the product, sleeves in order to protect the cuts from shedding. Edge seams include hem seams, overcast seams, and edge seams.
Blind stitch by hand
Blind seam
It is performed on toys, pillows and other things that are filled and then seamlessly sewn together.
Pre-iron seam allowances on fabric. If the seam will bear physical stress, perform it in two folds of thread. Insert the needle from the wrong side into the bend line, then into the opposite part, exactly opposite the previous one. Make a stitch of 0.2 - 0.3 cm, and continue to the end. To secure, insert the needle under the last stitch, wrap the thread around, pull it out and tighten the knot.
It should be remembered that the smaller the stitches, the neater and stronger the seam will be.
Hem seams
They are used when processing internal cuts of hems, neck and armhole facings, as well as when processing the bottom of the sleeves of a product. There are two types: closed and open cut.
Hem seams with open cut
To make a seam, bend the section of the part to the wrong side by 5-7 mm and stitch it at a distance of 1-3 mm from the fold.
Closed hem seams
We bend the parts to the wrong side by 7-10 mm and sweep them. Then we bend it a second time by the amount provided by the model (along the control line), cover it with a second line and stitch it at a distance of 1-3 mm from the fold.
Overlock seams
They are used for processing sections to protect them from shedding. There are three types: edged, framed, split.
Overcast seam in piping
We fold the two parts right sides inward, aligning the cuts. We connect them with machine stitching at a distance of 5-7 mm from the cuts. We turn the parts right side out and sew out the resulting edging measuring 1-3 mm.
Overlock stitch in frame
Performed in the same way as in edging. When basting the hemmed edge, we form a frame measuring 4-6 mm.
Split overcast seam
Performed in the same way as in edging. When basting the hemmed edge, place it on the fold.
Edge seams
They are used to finish sections of parts and to protect them from falling off. There are three types: with open cut strips, with closed cut strips and edging tape.
Edge stitch with open cut strip
To make a seam, a strip of fabric is cut out from the main or finishing material with a width equal to the edging width of 3-5 mm. We place it on the front side of the part, aligning the cuts, and stitch it with a seam equal to the width of the edging. We bend the seam sections with a strip, forming an edging, and secure it with a machine stitch, placing it in the stitching seam of the strip.
Edge seam with closed strip sections
To make a seam, a strip of fabric is cut out from the main or finishing material with a width equal to the width of the edging (3-5) * 2 mm. Fold the strip in half lengthwise, inside out, and iron it. We place it on the front side of the part, aligning the cuts, and sew it with a seam equal to the width of the edging. We bend the seam sections with a strip, forming an edging, and secure it with a machine stitch into the stitching seam of the strip.
Edging seam with braid
We fold the braid lengthwise in the middle so that the lower edge of the braid extends 1-2 mm relative to the top. Iron the braid. Inside the prepared braid we put a cut of the part that needs to be edged and machine stitch it along the upper edge of the braid at a distance of 1 mm from the edge of the braid.
Types of edge seams
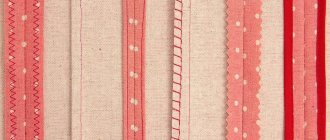
Used for finishing and decorating products. These include reliefs, edging seams and folds.
General classification of seams
In accordance with their functional purpose, they are presented in three classes:
Working seams are the main seams that make it possible to obtain a strong, durable, functional product. They are characterized by precise thread tension and ideal stitch configuration. Of course, their quality greatly depends on the specific model of the sewing machine; when choosing a device, you need to pay special attention to this at this point.
Decorative seams are used much less frequently than workers; their task is to decorate the product and create an unusual ornament. Practice shows that in everyday life a large number of decorative seams is not needed; a device with several different designs is sufficient.
Specialized. Each seam is designed to perform a specific task. For example, it may be designed to work with a specific type of fabric, forming a blind stitch or zigzag.
Reliefs
There are stitched ones and with a cord.
Progressive reliefs
We outline the location line of the relief on the front side of the part. We bend the part along the marked line with the wrong side inward and stitch it at a distance of 1-3 mm from the fold.
Reliefs with cord
To make the seam, we cut out an additional strip of fabric, the width of which is equal to the thickness of the cord + 10-15 mm. On the front side of the part we mark the location of the relief with 2 lines, the distance between which is equal to the thickness of the cord. Next, we transfer the lines to the wrong side. Then, on the wrong side of the part, we apply a strip of fabric so that the sections of the strip extend beyond the marked lines at the same distance (5-7 mm).
We chop off the strip and the part in several places with pins. We adjust the part to the strip, laying finishing lines on the front side of the part along the marked lines. We thread the cord with a pin between the two lines.
Lesson plan: Overlay stitch
Lesson 3.15 – 3.16 Class: 5 Date of delivery: Mishchenko M.A. labor training teacher
Subject:
Overlay seam.
The purpose of the lesson:
Learn how to perform an overlay stitch with an open and closed cut.
Tasks:
Educational:
- To familiarize students with the types of machine seams and their implementation, to develop the skill of making machine seams.
Developmental
:
- Instill a love of work, develop observation and eye.
Corrective:
- Correction of the development of fine motor skills, synchronous work of the hands when performing work.
Equipment and materials:
working tools and devices, cutting, threads, projector, lotto “Machine Stitches”, 5th grade textbook, sewing machine, cards.
Lesson type:
combined
During the classes
I
– Organizational Moment
II
– Updating of basic knowledge.
Checking readiness for the lesson and the condition of workplaces.
In front of the students on the desk are cards with the name (picture) of the main parts and parts of the sewing machine, the names of which the children must lay out the pictures in a column on the desk in the order they appear on the screen. (Ivshina S. lays out the pictures). If they don’t know, then they skip starting the next column. Attention to the screen!
- What types of machine seams do you know?
- What types of seams are double seams?
- What is double stitch used for?
- Why is a double seam used when sewing linen?
- What does it mean to straighten a seam on the edge?
Student answers.
-Today in the lesson we continue to get acquainted with the types and technology of making connecting seams. Depending on the properties of the fabric, the purpose of the product, and the design of the model, different types of seams are used when sewing. The topic of today's lesson is “Overlay seam”
Overlay seam table
III – Explanation of new material.
Guys, look at your clothes, what we see: there are patch pockets, there are yokes, there is a belt - a patch seam is used here. The overlay stitch is also used to join parts together and to finish shoulder and elbow seams (the screen shows where else the overlay stitch is used). When making a seam, one of the parts is placed with the wrong side on the front side of the other part. The overlay seam comes with two open cuts, one open cut and two closed cuts. Seam width from 1 – 3 mm. The width of the overlay seam is controlled along the front side: from the folded edge or open cut to the machine stitching.
Demonstration of samples of overlay seam.
An overlay seam is used to fasten parts of parts that are invisible from the front side of the product, parts of the side gaskets, the collar stand with the neck of the jacket, etc. Fold the pieces right sides up so that one piece overlaps the other by 1cm, and sew a straight or zigzag stitch.
A closed-cut patch seam is used to connect patch pockets, yokes, cuffs, etc. to the main parts. Fold the edge of the part to be adjusted inwards according to the marks, sweep it, iron it and place it on the main part, aligning the folded edge with the marks of this part. On the front side, place a finishing stitch, departing the required distance from the fold line.
IV – Practical work “Performing an overhead seam.”
Induction training:
Before starting work, we need to review the safety rules and find out what tools, devices and materials we will need.
Reading aloud: method of expository reading textbook p. 92.
After we have found out what is needed for the work, we need to familiarize ourselves with the progress of the practical work.
Reading aloud the progress of the work, demonstrating the execution of operations by the teacher.
Do you have questions about completing practical work? If there are no questions, we proceed to the practical work.
Ongoing teacher briefing. While working, walk around workplaces and provide assistance as needed.
Explanation step by step for Ivshina S.
Analysis of the work performed, typical errors and identification of their causes.
V - Consolidation of new material.
Let's test our knowledge and answer questions.
- What is the overlay stitch used for?
- What types of overlay seam have we learned?
- How to check the quality of an overlay seam?
- What is the role of wet heat treatment when performing an overlay seam?
VI
– Summing up the lesson, grading
Today we got acquainted with the technology of making an overlay seam. Negligence and sloppiness in work must not be tolerated.
- Analysis of completed work.
- What work did we do today?
- What difficulties did you encounter while performing the work?
- Report ratings.
- Cleaning of workplaces,
- Cleaning the classroom
Finishing seams with edging
They are used in the manufacture of uniforms, as well as for decoration. These include a topstitch with edging, a facing seam with edging, and an overlay seam with edging.
Stitched seam with edging
To make a seam, we cut out a strip of fabric with a finishing material of width (edge width + L) * 2, where L is the width of the seam for stitching the parts (10, 12, 15 mm). We bend the strip along the middle with the wrong side inward and iron it. We apply a strip to the front side of one of the parts, aligning the cuts. We sew the strip to the part with a seam of width L from the side of the strip. We fold the two parts with the right sides inward, aligning the cuts, and grind the parts, placing a machine stitch in the stitching line of the strip. Iron the stitching seam.
Overlock seam with edging
The seam is made in the same way as a stitched one, with the only difference being that after joining, we turn the parts right side out, placing the seam on the fold.
Overlay seam with edging
This type of seam is performed in the same way as a stitched one, with the only difference being that after joining, we turn the parts right side out, ironing the media in one direction. We adjust the cuts on one side.