Features of working with velvet
It is not recommended to store the cuts folded to prevent creases from forming. It is better to use hangers with clothespins.
When working with velvet, you should use only proven patterns. If you are in doubt about the cut, it is advisable to cut the product from waste fabric and baste it. Try it on and make adjustments. And only then start cutting the velvet. The fact is that you cannot redo the seam on this material; traces of the previous stitch will always remain.
As with all other pile fabrics on velvet, you need to take into account the direction of the pile. The color of the fabric along and against the pile is rich in saturation.
After cutting, it is advisable to immediately process the cuts with an overlocker, since the fabric frays very much.
To prevent the fibers from getting wrinkled when ironing, you need to pass the iron along the wrong side, and place a terry towel under the front side. This fabric should only be ironed with steam at low temperature.
If, after all, the lint “lays down”, you can try to correct the situation by holding the cloth over a boiling kettle and then combing the lint with a toothbrush.
You need to work with velvet with thin needles and thin threads.
When performing machine stitching, in order to avoid displacement of the layers of fabric, it is advisable to make basting stitches on both sides of the stitching. After completing the stitching, the basting is immediately removed so as not to crush the fibers.
Wrap dress
To sew a model you need:
- pile fabric – velvet, velor – 2 m;
- doublerin;
- hidden zipper;
- belt cord;
- threads to match the color of the fabric, sewing tools.
Pattern modeling
We begin modeling by constructing a dress pattern with a semi-fitting silhouette. If you don't want to spend time on this, you can find basic dress patterns for any size on the Internet. All you have to do is print it in full size.
In addition, we will need a sleeve pattern with one seam with the same allowances for a loose fit as the dress silhouette.
Let's transfer the patterns onto a new sheet of paper, noting the levels of the chest, waist, hips, and control points of the armhole.
Let's draw a new waist line - one and a half cm higher than the base one. Let's cut the pattern along this line.
Let's get some details.
Next, let's work on the back bodice.
Let's reduce the shoulder dart opening to 1 cm, move it to the center of the back to 0.6 cm, the rest goes into the armhole line.
We draw new contours of the pattern along the shoulder and armhole.
Since our shoulder line has increased by 1 cm, and we don’t need this, we will reduce its length by this amount. In addition, taking into account the shift of the center line of the back by 6 mm, we shift the shoulder line by the same amount. Draw a new neckline.
Let's remove the dart at the waist, reducing the size in the side cut by this amount. Let's expand and deepen the rollout by 1-2 cm and 0.5-1 cm, respectively.
The result is a pattern - see drawing.
We will temporarily stop working on it and work on the bodice of the shelf.
Draw a circle from the center of the chest. Its radius is equal to the radius of the chest.
Then we build darts:
- No1 – prevent “decolletage lag”;
- No4 – fit under the bust;
- No5 – taking into account the concavity of the chest.
Draw a line for the yoke at the level you determine.
We cut a pattern along it.
Along the lower part (yoke) we connect all the darts, forming a solid pattern.
We align the upper cut of the yoke, shaping it with a concave (deflection up to 5 mm) line.
Considering that on the back bodice we expanded the armhole by part of the dart, then on the front bodice pattern we expand the armhole by the same amount. From the top of the chest dart we draw a straight line to the armhole 1-2 cm above the reference point. Along this line we cut the pattern and spread it by an amount that coincides with the amount of magnification on the back armhole. The rest of the value, like darts No. 1 and No. 5, will be transferred to the waist line.
Let's create a new armhole line with a smooth curve. To match the rollout of the front with the rollout of the back, set aside 1-2 cm from the top point and connect this point with a point on the center line of the front of the bodice. The rollout in this case will have a V-shape.
Draw a straight line parallel to the shoulder line at a distance of 3-5 cm. Cut the pattern.
From the center of the chest we draw a line parallel to the rollout to the line of the shelf.
We cut the pattern along it and close the dart, moving it upward.
Since in our model the darts are replaced by folds, we will not make darts. We make even cuts on the shelf at the top and bottom.
You can optionally decorate the lower cut with a convex line of 3-5 mm. This will give a slight overlap for the shelf.
Another option for this detail is to increase the volume across the chest. It can be created by making several cuts along parallel lines and moving the parts of the pattern apart by equal amounts.
Important Note
When modeling, especially when transferring darts, you can lose the direction of the grain thread. To prevent this from happening, focus on the lower part of the armhole profile. It remains unchanged and can serve as a guide.
Let's return to modeling the back bodice.
Let's attach the cut-off part of the front bodice flap to its shoulder line.
The back bodice pattern is ready. It is imperative to show the natural shoulder line - the line of connection of the parts.
Let's draw the contours of the facings for processing the neck. To do this, we repeat its outline after 3-5 cm on the patterns of the back and front.
Let's connect them into one piece, joining the shoulder sections. At the same time, indicate the direction of the grain thread.
Let's start modeling the skirt of a velvet dress. Since our skirt will be flared, we remove the additional dart at the waist. We transfer its solution to the side seam - 1⁄2 for each part. Draw new lines for the side seams. If you don’t have an additional waist dart on your basic pattern, then you skip this modeling point.
From the lower points of the darts we draw perpendiculars to the lower section of the skirt. We cut the patterns along these straight lines.
We close the darts at the waist, forming a flare at the bottom of the skirt panels. Since the dart on the back piece is smaller, the expansion of the back panel will also be smaller. This needs to be corrected by artificially increasing the flare of the rear panel by an equal amount to the front.
If, taking into account the characteristics of your figure, you want to reduce the extension of the skirt at the bottom, then you need to cut it by half or two-thirds from the side seams.
This completes the modeling of the back panel of the skirt. Don't forget to indicate the direction of the grain thread.
To model the front part of a wrap skirt, we complete the symmetrical part of the panel.
Arbitrarily, at our own discretion, we draw the outline of the smell. We start it from the lower side point and bring it to the desired level.
We check the correspondence of the lengths of the side cuts on the front and back panels, and if necessary, make adjustments. Be sure to mark the middle line on the pattern. This completes the modeling of the front panel.
Let's draw the contours of the facing to process the lower edge of the skirt. To do this, repeat its outline after 3-5 cm on the pattern.
Next, let's start modeling the sleeve.
Let's determine the required height for it and draw a line at this level.
We draw several parallel lines on the pattern. The area for constructing these lines on the upper contour of the part is limited by control points so that the lower part of the bevel does not change the profile. Let's make cuts and move the pattern apart to the required amount, expanding it.
Raise the upper contour by 1-2 cm, draw the lower cut with a smooth line.
The modeling is completed, we have received patterns of all the necessary parts.
Variety of velvet dresses
The most popular models of dresses made from this material:
- evening: these are usually long dresses. They are decorated with sparkles, embroidery, and sequins. Skirts in such models are made to fit at the hips and flow downwards, with a train. For young people, designers offer cocktail dresses with a deep neckline and open shoulders. The combination dress looks very modern. It uses a combination of velvet and lace to lighten the heavy velvet;
- dresses for daily wear: made of moderate length and with a fitted silhouette. Skirts are usually made wide;
- business dresses: this style emphasizes independence, self-sufficiency and taste. The combination of a classic style and luxurious material will always attract the admiring glances of colleagues.
Stages of preparing material for cutting
As soon as you have purchased a piece for your future creation, do not rush to start sewing. Prepare the canvas for laying out patterns and cutting out jewelry. To do this, you need to follow some rules.
If the textile is expensive or delicate, it should be ironed with a spray bottle through gauze. It is recommended to “go through” parts and allow them to shrink.
- First of all, make sure you have enough fabric. Make the necessary measurements, be sure to reserve.
- Check the textiles for defects: defects, tightening, unpainted areas. This will help you avoid an unpleasant “surprise” during sewing.
- It is recommended to decate all future creations before sewing them. Soak, dry and iron with the lining so that after washing the item does not tighten. Cotton, linen, staples can be soaked in hot water, wrung out and hung so that the grain and weft threads are in an even position. It is better to wrap wool and combined materials in a wet sheet, roll it up and cover with film for a couple of hours.
- If you are going to make clothes from combined textiles, then you should sew 2 flaps together and dip them in liquid for an hour. So we will check them for “shedding”.
- Correctly determine the front and back sides. Wool is usually wrapped "face" inside the roll, and silk - vice versa. If they are identical, the front side is of higher quality.
- If the raw material has a pile, it is necessary to determine and mark its direction with chalk.
- On patterned textiles, you need to indicate the location of the pattern.
When buying expensive linen (for example, Italian), check with the seller for the shrinkage percentage. Since some “capricious products” shrink, become deformed and decrease in size.
Now we can transfer the paper diagram.
How to sew from velvet correctly
To make the product beautiful and look attractive, you need to know a few cutting secrets. Rules and recommendations on how to cut velvet:
- How to properly sew knitwear on a regular sewing machine, why does it skip stitches, what threads are needed?
Cutting rules
- When preparing patterns for individual parts of one product, you should pay special attention to the direction of the pile. All parts must be formed so that the fibers are located in the same direction.
- In order not to confuse the direction of the pile, you need to draw all the marks on the wrong side of the fabric with a piece of soap.
- To stitch together parts of one product, it is better to use a temporary adhesive spray. This will allow you to “glue and re-glue” seams without making holes with a needle and a long basting process.
- When working, do not use an overly sharp tool such as a curly knife or a wheel for cutting fabric, blades, or too thick (dull) threads.
- To prevent the surface of the parts from slipping while sewing on the machine, you need to loosen the thread tension as much as possible, use a Teflon foot with a gradual step, the fabric needs to be tensioned at the time of stitching.
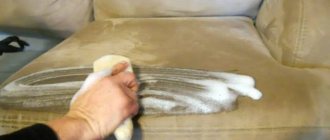
- Ironing textiles of this type is strictly prohibited. Only steam can be used. In this case, it is advisable to lay the material on a board coated with the same fleecy base.
- Picking up the hem or other part is done manually. Typically a bias stitch is used. Thanks to this technique, the canvas does not deform.
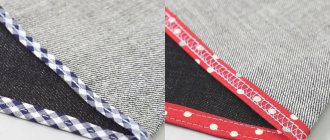
- If you need to create embroidery, you need to use a special Luneville hook, which will not damage the fibers of the fabric.
You might be interested in this Basic rules for forming a chest dart
Example of hand embroidery
Important ! Before you begin the final stitching of the parts, you need to make a few stitches on a small piece of fabric to evaluate the quality of the settings.
If hand or machine embroidery is done on velvet, the procedure is carried out in accordance with the same rules.
Knitted panvelvet dress
Knitted panvelvet was used to sew this model.
Pattern modeling
The pattern of a straight dress is used as a basis. You can create such a pattern yourself or download it for free on the Internet. Since knitted material is very elastic and stretchy, there is no need to include allowances for a loose fit when creating a pattern.
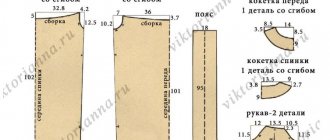
On the pattern for the front of the dress, we remove the dart at the waist, reducing the size at this level by this amount. Setting aside 12 cm along the side seam from the bottom point of the armhole, draw a horizontal line. Extend the line of the bust dart downwards. Cut off the bodice - see the red lines in the drawing. Closing the chest dart.
We retake the bodice onto a new sheet of tracing paper. From the bottom point of the shoulder we set aside 1 cm, then we measure the length of the shoulder - 10 cm. Along the center line we set aside 4 cm from the bottom, draw a horizontal line. We measure 2 cm along it to the left. We connect this point with the top point of the shoulder. We decorate the lower section of the bodice with a smooth line. All constructions are shown with a red dotted line in the drawing below.
On the back pattern, remove the waist dart, reducing the size along the waist line by this amount. We measure 1 cm from the bottom point of the shoulder, then set aside the length of the shoulder (= 10 cm). Let's draw a new rollout profile.
Cutting and sewing tips
For this model, we provide minimum seam allowances of 5 mm. We make an allowance of 4 cm along the bottom edge of the dress.
On knitwear, loops can unravel, so after cutting the parts, all cuts on them need to be processed with an overlocker or a zigzag stitch (stitch length 3-4 mm, width 2 mm).
It is better to sew such fabric with an overlock or a narrow zigzag seam. If this is not possible, then we perform a regular stitch, but sew with special long-fiber polyester threads.
To prevent the needle from piercing the knitted fabric, we use a special needle with a rounded tip for knitwear. She will gently push the threads apart without injuring them.
The fabric can stretch along the armholes and neckline. To prevent this, we sew the edges of the allowances with a machine seam with a stitch length of 2.5-3.0 mm. The second method is to glue the allowances with an adhesive pad cut on the bias.
Cotton tape is inserted into the shoulder seams to prevent stretching.
We sew the bottom edge of the dress with a double seam. For it we use a double needle and three threads (two upper, one lower). As a result, we get two lines on the front side with an interval of 4-5 cm, and on the back side we get a zigzag line.
Material characteristics
This textile is associated with luxury, jewelry and royal boudoir. This idea was formed due to the royal history of use and manufacture. Velvet material is a unique fabric that has a lot of positive characteristics. But there are also disadvantages.
Appearance
The advantages of this type of material are the following characteristics:
- The most expensive types are made from natural materials. This type is considered completely hypoallergenic.
- High-quality canvas has an aesthetically attractive, elegant and expensive appearance.
- You can embroider on the canvas with ribbons, beads, and silk threads, which will further improve the appearance.
- Each lint will be placed in a dense layer of soft coating, which is pleasant to the touch and has a glossy shine.
- The fabric is not electrified. Does not stick to the body. Therefore, it does not cause irritation or allergic reactions.
- Retains an attractive appearance for a long time, wear-resistant textiles.
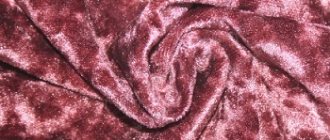
Variety of textures and colors
Please note ! Many people classify velor, suede, plush and other similar fabrics as this type, but this is a completely different type of material. Even corduroy is a “distant relative” of this material.
The disadvantages of this type of textile are:
- The machine-made version of the fabric does not differ in quality, does not last long and is bad for the skin.
- The canvas strongly absorbs odors, collects dust, threads and small debris stick to it.
- To improve the density, it is imperative to use lining fabric to form an attractive product.
- It is difficult to work with, so sewing at home can only be done by an experienced craftswoman.
Preparatory activities
Preparing fabric for cutting takes place in several stages, each of which is important, so they should not be skipped.
Stage 1. Decating
This is a procedure that pre-shrinks the fabric. Decatting helps to avoid significant changes in size when washing or wearing the finished product.
The procedure is used only for natural materials such as cotton, wool or linen. Synthetics are not prone to significant deformation, so decating such a fabric is pointless. You also need to know that the technique is not applicable to silk, since the delicate fabric does not like moisture and high temperatures.
Decating
To check the material for changes in size, it must first be steamed, then dried and ironed - carrying out such a set of measures is enough to ensure that the fabric shrinks before sewing and does not deform greatly in the finished product.
Steaming fabric
Stage 2. Check for defects
By shining the fabric through a lamp, you can notice all the weaving imperfections that were made during its creation - holes, stains, changes in fiber thickness, different dyeing intensities. During the inspection process, such defects are highlighted with chalk in order to exclude them when cutting or to use them where they will be least noticeable.
Stage 3. Determine the face and back
Oddly enough, novice needlewomen most often make this very mistake - cutting from the wrong side. All marks and seams are made from the inside out. If you forget about this, as a result, the beautiful side of the fabric will end up inside the product, so the front side is noticed at the preparation stage and marked with chalk or a sticker.
Wrong side of fabric
Stage 4. Isolation of the lobar thread
The warp threads in the pattern are placed along the length of the product - this way the finished masterpiece is less deformed during use. Sometimes rolls of fabric have the abbreviation DN, which means “shared thread” - this greatly simplifies the task of determining the line of length and width of the product. Another little trick to finding DN is to pay attention to the roll of fabric. The base is always located along it.
Stage 5. Edge
Some materials are sold with a finished edge, which protects the fabric from fraying during transportation. Sometimes the quality of the stitches is good, and sometimes they tighten the fabric. In the latter case, the edge will have to be trimmed before cutting begins to eliminate possible errors.
Cutting a pattern
Combination with other fabrics
An experienced craftsman accurately determines which fabrics can be successfully combined within one product. Beginning craftswomen may encounter the problem of combinations. What does velvet go with:
- atlas;
- guipure;
- satin ribbon;
- lace;
- leather;
- silk.
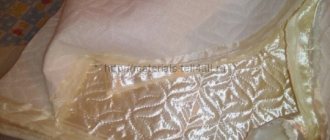
A companion fabric option for velvet.
Embroidery on velvet with beads, sequins, and shiny threads looks interesting. The Easter version of textiles, which is used for making “paints,” is especially suitable for embroidery.
- How to learn to sew and cut for a beginner
How to position the pattern
Often, inexperienced or inattentive seamstresses make mistakes at the stage of laying out the sample: they lay it out incorrectly along with the fabric.
General rules
First you need to model the reliefs on paper (depending on the style) and cut them out.
Reliefs are vertical lines in things that run from cut to cut.
First of all, you need to arrange the details of the drawing in decreasing order:
- back;
- sleeves and shelves;
- cuffs, pockets, etc.
Be sure to leave a seam allowance of 2-3 cm at the edges. Pay attention to the corner cut and the right angle of the pattern: they must match each other.
Indicate the location of the grain thread both on the material and on the paper. They must match.
Next, you need to outline all the details with chalk and pin them.
Do not lift the fabric when pinning the patterns with pins - it will become deformed and all indicators will be lost.
Types of fold
When choosing a pattern layout, focus on the style of the item, structure and pattern. Textiles can be bent in several ways: transverse, longitudinal, in two folds, partial, in a spread.
2 ways of laying fabric:
- Layering in a fold - the fabric is folded in half lengthwise, right side inward, aligning the edges. This method is used when cutting wide fabrics.
- Laying in a spread - the fabric is laid out in full width, face down, or in 2 layers, with the right side inward.
- When folding transversely, the material is folded perpendicular to the grain thread, cut to cut, with the front side inward. In the place where the cut is folded, the parts are laid out. This type is suitable for making blouses and shirts from thin raw materials with elastane.
- The longitudinal method is the most universal. It is necessary to fold the fabric with the right side inward and connect the edges.
- In two folds - laying the fabric with the right side inward along the warp thread to the middle of the fabric.
- Partial folding is a method in which textiles are folded along the grain thread on only one edge.
- The spread method is suitable for skirts and dresses with bias hems. The future creation is placed in one layer on either side and is not folded.
The material with oblique threads is more stretchable and the fabric lies differently. This cut is much more complex, so the “turnaround” fold is the only successful option.
Transferring the scheme depending on the pattern
A talented tailor is not only a person who makes perfect drawings and sews carefully, but also a true esthete. She knows how to combine prints and make sure that the pattern matches harmoniously in the right places.
There will be no problems with monochrome shades. Schemes can be placed anywhere. The only condition: observe the direction of the fibers. The situation is the same with a non-directional pattern - the parts are placed at any angle. They are often distributed with jacks. This way you can save a lot on the amount of textiles.
A large directional pattern is symmetrically connected and secured with pins. At the same time, it is worth deciding where you want to direct the drawing: to the bottom or to the shoulder.
In checkered asymmetrical fabric, it is important to combine the cell lines in the transverse and longitudinal seams. This needs to be constantly monitored, marked with chalk and secured.
When transferring the pattern to striped fabric, it is worth placing the strip along the center. When laying out, the longitudinal seams are carefully connected and care is taken that the strips match perfectly.
The correct indentations, folds, and adherence to the rules for transferring the sample to the fabric will help you avoid troubles during the manufacture of the outfit.