Flirty and charming, 50s styles are classics that never go out of style. The feminine hourglass silhouettes of the dresses highlight the bust, waist and hips. Using the patterns of dresses from the 50s presented in this article, you can easily sew yourself an original vintage dress.
Silhouette Features:
- As a rule, it is an hourglass silhouette, with a fitted bodice, often in the form of a corset. The skirt is most often very full, although there are also narrower versions in the style of Marilyn Monroe.
- The waistline of many models is high.
- The length of the dresses is slightly below the knee.
- Sleeves - lantern, three quarters, long. Sometimes the dress was made without sleeves at all.
- The shape of the rollout could be very different - boat, triangle, heart-shaped, square. Collar – turn-down or sailor.
- The fabric used for sewing was natural - linen, cotton, satin, silk, satin. For full skirts - crinoline or its analogues.
- The colors are very different. Geometric patterns are popular - peas, stripes. Color combinations are contrasting, for example, black and white, red and yellow. Business-style dresses were often made from a single-color material.
Turn-down collar dress
The model is made of fabric with a small pattern and is cut at the waist. The front bodice has a semicircular neckline and a button placket in the center. The turn-down collar is made of plain fabric. Its ends are passed under the decorative strip at the front. The skirt is with trimmed barrels, slightly widened at the bottom. Welt pockets are made along the line of attaching the barrels. The waistline is emphasized with a belt.
Making a pattern
To sew a dress or suit in the style of the 60s, you will need the main pattern of the dress - more precisely, its upper part. The skirt is cut directly onto the fabric. It is better to choose the simplest style - a fitted bodice with a long zipper at the back, a semicircular neckline, short sleeves. When you made the main pattern, you already took measurements. But now you will need a few more: - total length of the product; - length of the skirt from waist to bottom; - waist circumference; - the length of the sleeve. Cut the front and back patterns along the waist line (the waist darts are divided exactly in half). On the sleeve template, mark the length of this part, draw a straight line parallel to the bottom line. The top pattern is ready.
The dress could be with long sleeves, or even without sleeves at all - there were a variety of styles. In the latter case, you need to slightly widen the armhole.
Yoke dress with belt
An example of comfortable casual clothing. If you use elegant fabrics for production, decorate the dress with lace and guipure, you will get a spectacular evening dress.
This model features the feminine shoulder line characteristic of the 50s and 60s and emphasizes the waist.
The bodice is made with a yoke, the dress is continuous at the waist, and the sleeves are set-in. The waist is emphasized by a wide belt, which is fastened with a buckle. The front and back parts are gathered along a guipure yoke. Sleeves - 3⁄4, decorated with guipure cuffs.
To sew this model, you need to prepare two lengths of the dress plus 0.2 m. Do not forget to provide allowances for the seams and the hem.
Who is this model suitable for?
Recommended for women with any figure, including plus size. A guipure yoke will emphasize the chest, making the décolleté area more harmonious. The belt will balance the figure by highlighting the waistline.
For women with narrow shoulders and wide hips, this model will be the ideal solution. A horizontal yoke will visually make the silhouette more proportional, as it will widen the shoulders. This effect can be enhanced by using a yoke made of contrasting fabric.
Are you one of those millions of women who struggle with excess weight?
Have all your attempts to lose weight been unsuccessful?
Have you already thought about radical measures? This is understandable, because a slim figure is an indicator of health and a reason for pride. In addition, this is at least human longevity. And the fact that a person who loses “extra pounds” looks younger is an axiom that does not require proof.
Therefore, we recommend reading the stories of our readers who managed to lose excess weight quickly, effectively and without expensive procedures.. Read the article >>
Evening dress with a full skirt
A very elegant dress with a low waistline. A striking detail of this model is the voluminous shawl collar. Its details are cut out together with parts of the bodice. Near the rollout of the back there are darts that turn into collar folds. It is due to them that volume is formed. Sleeves - flashlight. The skirt, cut along the bias thread, is folded into small bow pleats along the stitching line with the bodice.
The proposed pattern is designed for size 48. When cutting, it is necessary to provide seam allowances of 1...1.5 cm. Allow 4...5 cm for the bottom edge of the skirt, 3...4 cm for the bottom of the sleeves. To sew this model, you need 4.4 m of fabric with a width of 1.1 m.
Dress with bob neckline
Elegant model of a dress with a seam at the waist. The fitted silhouette is created by darts on the front bodice and pleats on the back bodice. The zipper is sewn into the left shoulder seam. The neck rollout is made in the shape of a square.
Short one-piece sleeves end in cuffs.
The skirt is cut in one piece with a seam in the center of the back panel. A button fastening is made along this center line. The upper edge of the skirt is folded.
The proposed pattern is designed for size 48. When cutting, it is necessary to provide seam allowances of 1...1.5 cm. Allow 4...5 cm for the bottom edge of the skirt, 3...4 cm for the bottom of the sleeves. To sew this model, you need 1.5 m of fabric with a width of 1.4 m.
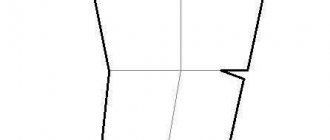
Transformable dress from the 50s
The fifties are back! A very original dress model from the 50s looks modern and fresh. No wonder they say that fashion is cyclical and returns every 25-30 years.
For such a vintage dress, you need to choose matching fabrics.
The photo below schematically shows the modeling of this style.
You need to cut out and sew two mirror pieces.
Using this principle, using your imagination, you can sew various versions of cute dresses.
Choosing material
You can sew a beautiful dress for summer in the style of the 50s from any fabric. It is better to choose a material that was popular in those years - silk, staple, satin. The fabric calculation depends on the width of the cut and whether your dress has a circle or semi-skirt. For the top and sleeves with a cut width greater than the full chest circumference, you will need 1 length, plus a few centimeters for processing. For a circle skirt you need 4 of its lengths, for a half-circle - 2.
A dress in the style of the 60s can be made from two types of fabric, making the top from one fabric, and the sleeves and skirt from the other.
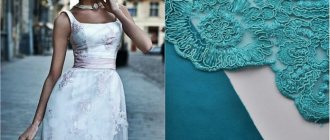
New look dress
A very modern model from our grandmothers' magazines. A full skirt creates a slender silhouette. To make the skirt more full, it is recommended to make a petticoat. To emphasize the waistline, you will need a belt. It can be made from the main fabric or used ready-made. The proposed patterns include a skirt in the “sun” pattern. If you want to get gathers in the waist area as in the photo above, then you need to cut out two panels for the skirt with a width of 1.4...1.5 m of the required length.
Free patterns are made for size 46 (OG = 92 cm, OT = 74 cm, OB = 100 cm) and size 50 (OG = 100 cm, OT = 82 cm, OB = 108 cm).
To sew this model, thin dress fabrics that hold their shape well are suitable - gabardine, satin, crepe.
Non-woven fabric is used to strengthen the parts.
How to cut
From the main fabric you need to cut:
- middle part of the front - 2 parts;
- front side – 2 parts;
- middle part of the back - 2 parts;
- back flank – 2 parts;
- sleeves - 2 parts;
- collar – 2 parts;
- selection – 2 parts;
- skirt panel - 2 folded parts.
From non-woven fabric you need to cut out:
- selection – 2 parts;
- collar – 1 piece.
For parts cut from the main fabric, we provide a seam allowance of 1.5 cm. We provide an allowance of 3 cm along the lower edge of the middle parts of the front, back and barrels, and 7...10 mm along the neck rollout. We cut out the collar part with allowances of 7...10 mm. We cut out non-woven parts with an allowance of 3...5 mm.
Sewing
We strengthen the parts with non-woven fabric. Having folded the side and central parts of the front with the right sides facing each other, we chop off the relief seams and sew them. We overlock the edges of the seam allowances, turn them to the center of the front, and iron them.
We sew the central seam of the back, process the edges with an overlocker, and iron the seam allowances in different directions.
Having folded the side and central parts of the back with the right sides facing each other, we chop off the relief seams and sew them. We overlock the edges of the seam allowances, turn them to the center of the front, and iron them.
We sew the seams on the shoulders, overcast the allowances, turn them onto the shelf, and iron them.
We sew the side seams, leaving an open area on the left side for sewing in the zipper. We overcast the allowances and iron them.
Having folded the collar pieces with the right sides inward, we pin them together and sew them together. We cut out the corners, turn them inside out, wash them, and iron them.
Apply the collar to the neckline, aligning the center line with the center back seam. We overcast the hem and place it right sides down on the parts of the shelf, stitching. Using one seam we sew the hem to the front and sew in the collar. We cut out the corners and turn the edges to the wrong side. We sew and iron the roll-out and collar sections. We attach the hem to the shoulder seams using a hand stitch.
We sew the sleeve seams, overcast the allowances, and iron them. Turn up the bottom edge of the sleeves.
We sew the sleeves into the armholes and overcast the edges.
We sew the side seams on the skirt, leaving an open area on the left for sewing in a zipper. We overcast the allowances and iron them.
Having folded the bodice and skirt with their right sides facing each other, we cut off the parts of the dress. We stitch together, overlay the seam allowances, tuck them onto the bodice, and iron them.
We insert the zipper, having previously basted it.
Fold up the bottom of the dress.
We mark the position of the loops and perform them. Sew on the buttons.
Simple pattern with patterns for several sizes
To sew this model you need:
- polka dot fabric - with a width of 1.5 m, 4.3 m will be required;
- hidden zipper – 56 cm.
The pattern is made for sizes 8 to 20 (English)
You can choose the right size by checking the parameters table.
How to cut
We need to cut out:
- back bodice – 2 parts (one for lining);
- back bodice – 2 parts (one for lining);
- front center panel of the skirt – 1 piece;
- side front panels of the skirt - 2 parts;
- back panels of the skirt - 2 parts.
We cut out the parts with allowances of 1.5 cm (unless otherwise indicated).
We print the pattern taking into account the scale and glue it into a common format. Cut out the pieces to your size.
How to sew
We sew the darts starting from the base. We iron them in the direction of the middle lines of the front and back. Place the bodice pieces right sides together, pin and stitch the seams on the shoulders. Iron the seam allowances.
We fold the outer and inner parts of the bodice with the right sides inward, align the cuts, and pin along the rollout and armhole lines. We sew along the rollout and armholes, cutting off the allowances to a minimum.
We turn the bodice inside out, sew along the armholes and neckline, and iron. We combine the side cuts, pin, stitch, iron.
We make vertical seams on the skirt (except for the one into which we will sew a zipper), overlay the sections. Along the top edge we sew a stitch with a large step for gathering. By tightening the bottom thread, we align the length of the skirt cut with the length of the bottom cut of the bodice. We pin the skirt to the bodice and attach it.
We sew in a zipper and stitch the rest of the seam.
We overlay the bottom edge of the dress, turn it in 1 cm and stitch.
Master class on modeling patterns and sewing dresses in the style of the 50s
For sewing you will need:
- fabric – thick satin, 2 m;
- non-woven fabric - about 1 m;
- hidden zipper – 50...60 cm;
- threads, sewing tools.
Description
First of all, we need to make a dress pattern. To do this we need a basic pattern of the required size. Let's retake the patterns for the front and back bodice.
To transfer the dart to the side seam, set aside 5 cm from the edge of the armhole along the side seam line and draw a straight line to the edge of the dart. We make a cut along it, close the chest dart, opening it in the side seam.
On the pattern, measure the shelves along the shoulder seam 6 cm from the highest point, widening the neck. Then we sequentially set aside the width of the shoulder seam - 4 cm. From the bottom of the neck down, measure 9 cm, mark a point. From it to the left we measure 8 cm. We draw a new shape for the rollout of the neck.
On the back template, we put 6 cm and 4 cm along the shoulder line in succession. Along the middle line, we measure down 10 cm. We draw a new line for rolling out the neck of the back at an angle.
We cut off the excess, obtaining ready-made patterns.
For the circle skirt, we make a standard pattern using 1⁄2 or 1⁄4 patterns. If desired, you can increase the length of the upper cut by 20 cm for gathering.
We cut out all the details, not forgetting to allow 2 cm for allowances. We have done the basting according to the markings, you don't have to do this.
Blank for the front - see photo.
Blank for the back - see photo.
We sew up the darts (four on the front and two on the back), and sew them together.
Remove the basting threads and iron.
We process the side cuts with an overlock
and shoulder seams.
We connect the bodice parts along the side seams with basting and stitch together. Remove the basting threads and iron the seam allowances.
Next, we cut out facings for processing the armholes and neckline. For beginning seamstresses, it is better to first make a facing pattern on paper. More experienced people can mark the facing directly on the fabric.
We lay out the bodice on the fabric (or paper), unfolded along the armhole. We mark the outline. Parallel to the contour, draw a second line at a facing width of 4 cm. In the next photo, the second line is indicated by arrows. Similarly, we make the facing for the second armhole and neckline (one piece for the front and two pieces for the back). Don’t forget to allow allowances on the shoulder seams that are equal to the allowances on the back and front.
We have to cut out only 5 facings. We cut out the same parts from non-woven fabric. Glue the interlining to the wrong side of the facings.
Baste and sew together the shoulder seams on the bodice. Remove the basting and iron the seam allowances. Sew the shoulder seams on the facings in the same way.
We also remove the basting and iron it.
Place the facings face down on the front side of the dress and sew with a basting stitch along the edge of the front and back neckline. We sew a machine seam. When performing this operation, it is important to ensure that the shoulder seams on the facing coincide with the shoulder seams on the bodice.
We cut the allowances.
Check the width of the facings and trim if necessary. We overlock the edge of the facing.
On the front side we sew the facing at a distance of 3...5 mm from the stitching seam. The decorative stitching should not reach 5 cm from the back cut. This is necessary for conveniently attaching the zipper.
Next, let's make the skirt. Place a stitch along the top edge with the maximum stitch length and minimum thread tension.
By pulling the bottom thread, gather the edge of the skirt to a length equal to the length of the bottom cut of the bodice. We sew the top and bottom of the dress, overlock the edges, and iron the seam.
All we have to do is complete the middle seam on the back of the dress. First we baste one strip of the zipper, starting from the neck. We attach using a special foot.
We close the zipper. We apply the mirror part of the back to the second zipper strip, making sure that the horizontal seams on both parts match. We chop off the back bodice piece with the zipper braid. Open the zipper and sew a basting seam.
Close the zipper again and check the alignment of the horizontal seams.
We attach the second braid.
We attach the facing to the zipper, trim off the excess fabric, and turn it inside out.
We sew up the middle seam of the back along the remaining length and stitch together. Remove the basting threads and iron the seam.
To level the bottom edge, hang the almost finished dress on hangers or put it on a mannequin. Since the direction of the grain thread along the panel of the skirt is different in different areas, the stretch of the skirt will also be different.
After 12 hours, we adjust the length of the skirt, measuring it from the floor.
We cut off the excess and finish the edge with an overlocker. We make a 2 cm turn and iron it.
We lay a basting seam.
We sew the bottom of the dress, remove the basting threads, and iron it.
All we have to do is secure the lower edges of the facing of the armholes and neckline. We fix them with pins.
Sew the bottom edge of the facings by hand using blind stitches.
The dress is almost ready!
For the belt, we cut out two strips 4 cm wide, the length is the size of the waist plus 0.5 cm for each seam and plus 2...3 cm for the fastener. In addition, we cut out two strips 4 by 20 cm. We reinforce them with non-woven fabric. We baste, stitch, remove the basting, turn it inside out.
We got two parts of the belt - short and long. We iron them.
We make a bow from a short strip by folding it and sewing it in the center - see photo.
We cut off the excess fabric. We make a jumper and sew it onto the bow. Sew a bow to the middle of the large part of the belt.
We fold the open sections of the belt inwards and sew them together by hand.
At the left end of the belt we make a loop,
on the right - sew on a button.
Ironing the finished dress!
Uncover
New cotton material should be washed or ironed through a damp cloth before cutting. It’s easier to cut the piece. Leave one piece for the front, back and sleeves, the second for the skirt. Fold the section intended for the skirt in half lengthwise. Find the middle of the fold line and make a mark. Draw 2 semicircles centered at this point. The radius of one is equal to the waist circumference divided by 6.28, the radius of the second is this measurement with the length of the skirt added to it. Don't forget to add a couple of centimeters to process the bottom. You also need to leave an allowance on top. To prevent the dress from being tight, the seam allowance must be cut in 3-4 places. The piece intended for the top and sleeves is also folded in half lengthwise. Align the middle of the shelf with the fold, and place the back and sleeve parts nearby. Mark the control points on the armhole and the hem; they are on any correctly made pattern. Trace the details along the contour, and then again, adding 1 cm to the seams on each side. By the way, in the photos of those years one could see a variety of sleeves. The flashlight was especially popular.
The circle skirt can have a seam. You can also make a dress with a long full length, from the back of the head almost to the hip line, this was also very fashionable.