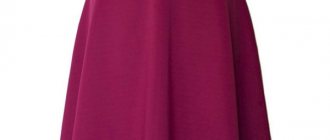
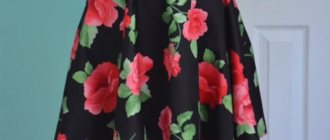
A skirt is one of the most popular items in a woman's wardrobe. Thanks to the variety of styles, every woman can choose something that suits her taste. Sun, pencil, tulip, godet, Tatyanka skirt - all these models are able to correct a woman’s figure, emphasizing her advantages and hiding small defects. The latter style is especially in demand by designers, as it makes the silhouette even slimmer.
Tatyanka is a fluffy skirt with different types of folds, having an elastic band, belt or yoke. This is a universal option that can organically fit into most styles and looks. The classic version is the skirt with elastic. When sewing such a model, easily draped materials are most often used: silk, chiffon, viscose. The elastic belt can be placed both inside and outside, depending on the features of the model. This style is often chosen by beginning needlewomen due to the ease of its execution.
Skirts with a belt are more formal. They fit well into a business dress code in combination with a classic blazer or cardigan. A contrasting belt or ribbon can be used as an accent. The latter will fit perfectly into a romantic image. The belted style suits those with an hourglass figure.
The wide yoke ensures a comfortable and beautiful fit of the product. A rigid wide belt allows you to define the waistline, as well as its smooth transition to the hips. This is one of the most feminine models. A skirt with a yoke is made from denser materials that allow it to keep its shape, so it turns out a little more voluminous. This factor must be taken into account when choosing a model for an image.
Various types of folds give the necessary pomp to the tatyanka. Their size and quantity depend on the material, as well as on the method of sewing the product. Models with a yoke have less pronounced gathers than, for example, options with an elastic belt.
The Tatyanka skirt can be presented in both summer and winter versions. It all depends on what kind of fabric is used in its manufacture:
- Cotton. Natural material with properties such as breathability, hypoallergenicity and hygroscopicity. Ideal for summer.
- Viscose. A synthetic type of fabric obtained by processing wood. The material is affordable, drapes well and looks impressive.
- Silk. Fabric of natural origin with a high degree of air exchange. Suitable for hot summers, pleasant to the body, and has a noble shine.
- Chiffon. Easily draped, thin material. Suitable for sewing a gathered skirt, however, due to its transparency, it requires lining or multi-layering. There are types of chiffon with the addition of synthetic and natural fibers.
Tatyanka also looks great when using knitted fabric, thin denim or wool, or lace fabric. In addition to the material, a novice seamstress should prepare the following tools before work:
- elastic band (if provided by the model);
- sewing (safety) pins;
- cutting scissors;
- sewing centimeter;
- needle and thread;
- ruler;
- chalk or a piece of soap;
- iron;
- sewing machine
According to the most common version, the skirt got its name in honor of the main character of the novel “Eugene Onegin” Tatyana Larina.
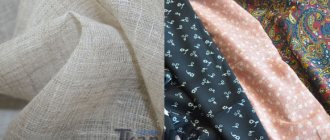
Viscose
Cotton
Silk
Chiffon
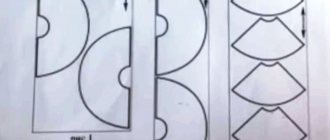
The folds on the skirt differ from each other in the direction and method of laying:
- One-sided. The classic type of folds, laid in any direction, depending on the style (usually to the left).
- Counter. A type of one-sided folds laid towards each other.
- Bow ones. Assemblies laid from the middle in different directions.
- Fan. Multi-layered application of one fold to another to form a fan when pulled. If the skirt turns out to be too voluminous, this can be corrected by simply ironing it.
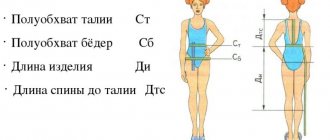
Tatyanka is one of the most elementary models. You can sew it by spending only 1.5-2 hours of your time. It is cut simply. First you need to take the following measurements:
- hip circumference (H);
- waist circumference (WT);
- product length (DI).
Then the type of folds is determined. The most popular options are bow and one-sided. The last option is recommended for beginning needlewomen. The width of the fold most often varies from 3 to 7 cm.
The main indicator when calculating the number of gathers is the hip circumference. An allowance is added to it, and then the resulting number is divided by the selected fold width. The best way to explain this is with an example. Initial data: OB – 86 cm, fold width – 5 cm, allowance – 4 cm. Then the formula will look like this: quantity = (OB + allowance) divided by the width of the fold, it turns out (86 + 4): 5 = 18 pcs.
Regardless of what type of assembly is chosen for the skirt, the material consumption is the same. The depth of the fold is twice its width, so the amount of fabric required will be calculated using the formula: (OB x 3) + 4 cm (allowance).
Types of folds
To sew a gathered skirt, a pattern is not required, since cutting can be done directly on the fabric. The model does not need undercuts. The cutting shape has the form of a rectangle, where the length of the product is marked along the longitudinal thread, and the width along the transverse thread.
When sewing a model with ruffles, the hip circumference is multiplied by a special coefficient, which is responsible for the fullness of the future skirt. It varies from 1.3 to 3.5 and more. The denser the fabric, the lower the fluffiness factor.
It is necessary to add seam allowances to the length of the product: 1.5 cm along the waist and sides, 6 cm along the hem. The model with an elastic belt requires an additional increase in the width of the drawstring. When sewing other styles of skirts, the yoke or belt is turned separately. Having decided on the width and number of folds, you need to make markings directly on the fabric. The result is a canvas divided into vertical stripes of equal width.
Before making folds, you need to hem the bottom edge of the product.
To make it clearer how to make simple one-sided folds, let's look at an example. Initial data: width of folds – 5 cm, quantity – 17 pcs., OB – 90 cm, OT – 56 cm.
- Any skirt tapers at the waist, so for the best fit you need to calculate the tapering rate. Subtract the waist circumference from the hip circumference: 90 – 56 = 34 cm.
- Divide the resulting number by the number of folds: 34: 17 = 2 cm.
- Since the fold has 2 sides, then 2:2 = 1 cm.
The result is the amount by which the depth of the elements located at the waist will increase. Thus, the width of the folds at the top will be 7 cm, and at the bottom – 5 cm.
The Tatyanka skirt is easy to make, which is why this model is most often sewn at home. You don't need to have any sewing experience. Any girl can handle such a product, the main thing is to follow all the instructions of the master class.
What it is
Tatyanka skirt is a wide, fluffy skirt with gathering made of various materials and trims, which is attached at the waist with a yoke or elastic band. The style has existed for a very long time and has not at all lost its relevance and need among women of all ages. The skirt has a very interesting name, but no one knows where it came from. According to the most popular version, the model got its name thanks to the main character of the novel “Eugene Onegin”, Tatyana.
The “Tatyanka” model is very similar to the half-sun, flared sun.
How to sew a belt and loops
The belt must first be prepared, glued with adhesive fabric and ironed in half. Then stitch along one of its sides, being careful not to undercut the fabric. Now bend the belt up and fix this position with an iron. Next, all that remains is to make a hem and add a finishing stitch along the front side. But the truth is, first you need to make a ledge for the belt, the area where the button will be sewn. It is small, but requires carefulness. To make a ledge, you simply need to turn the belt inside out at that point (face to face), secure the cut edge, and then turn it back inside out. Straighten the seam with a ruler, fix it with an iron together with a hem, and add a finishing stitch.
If your full skirt will have belt loops, then in this photo you can see the easiest way to make them. And if you need to learn more about the technology of making belt loops, read this article Processing Belt Loops.
How to make a one-piece belt with a wide elastic band for a children's skirt or pants.
Who to wear
Although “Tatyanka” is positioned as a universal model, it is not suitable for all body types. For example, ladies with inverted triangle, rectangle and hourglass silhouettes will perfectly highlight their assets thanks to this style. And all because of its flared cut, which visually reduces the waist and emphasizes the hips, smoothes them and makes them more feminine.
However, girls with apple and triangle shapes are not recommended to wear such clothes, otherwise this cut will not only visually make the bottom heavier, but will also add a few extra pounds to you, which you obviously won’t be happy about. In this case, it is better to look at less voluminous models.
What are the different lengths?
By length, such skirts are divided into short, medium and long models. The first 2 options can be used at least every day. A full-length skirt is more suitable for a formal event. Long models immediately attract attention, attracting the eye with lush folds.
Short
Shorter skirt models may be preferred by very young girls. Such a thing will highlight the youth and elegance of the fair sex. Short skirts made from flowing fabrics look interesting. This model will fit perfectly into a girl's summer wardrobe. Young representatives of the fair sex can complement the look with a shortened “Tatyanka” T-shirt, sneakers and a cross-body handbag.
Midi
A medium-length Tatyanka skirt is considered a universal item. Both girls and older women can take a closer look at such models. If the midi skirt is made from fabric of a neutral color and strict texture, then it will fit perfectly into the dress code at the workplace.
Models
With elastic band
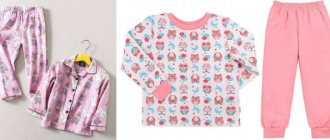
The most convenient and versatile option, which is most suitable for summer walks. Nothing restricts movement. “Tatyanka” with an elastic band is often worn either by children or young people who value comfort and convenience. Therefore, this skirt is used as a school uniform.
This style is especially easy to sew, since the elastic can allow you to make a mistake in the size, and then correct everything. Therefore, novice needlewomen are recommended to use this option.
With pleats
The model is very curvy, and all because of the gathers that come from the wide belt. This style looks very nice in midi or mini length and in combination with sandals. For production, easily draped and lightweight fabrics are used, for example, cotton, chiffon, thick knitwear. The number of folds depends on the choice of material and the sewing method.
On the yoke
The traditional “tatyanka” comes with a wide, rigid yoke belt. Thanks to the rigid, fixed belt, the waist is visually reduced, and then a smooth transition to the hips begins. The pleated style smoothes out all the angular features of the silhouette and makes it more feminine and graceful.
The skirt can be used both to create a business look and a romantic, evening look. The fabrics used are different, but basically they are all dense, which is what makes a fuller skirt. For a change, you can wear a contrasting strap that will liven up your look.
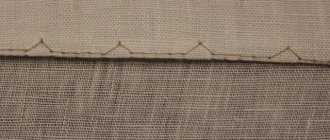
How to put pleats (gathering) on a skirt
This photo shows how to make pleats using pins. But if this method does not seem very reliable to you, and you are afraid that the folds will move under the foot of the sewing machine, then sew a stitch and fix them. Remember to remove the pins in time, otherwise the needle may hit the pin and break.
I hope you can figure out how to evenly lay the folds around the entire circumference of the skirt, but I’ll tell you how to make a gather on the skirt. You don’t always need such large folds, and even more so, they don’t suit everyone, but a neat gather around the skirt will suit every woman. To ensure perfect gathers on the skirt, set the stitch length on your sewing machine to 3-5mm. Now, along the edge of the upper edge of the skirt (from the edge 0.7) stitch along the entire circumference. Do not fasten the stitch. Next to this line, at a distance of 0.5 cm, lay another line and also do not fasten it. Now these lines need to be pulled together at the same time by one thread, for example the top one, and as a result you will get a uniform and beautiful fold.
Video on how to make a counter pleat for a skirt.
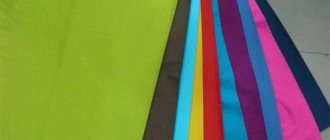
How to choose fabric
First, you should decide what the skirt is needed for and for what period of time. After all, lightweight materials will be preferable for summer, but for winter it is better to choose warm, dense fabrics. It is also worth considering that the denser the fabric, the more difficult it is to process.
- Cotton. A universal, natural material that is perfect in the summer. And all thanks to its properties: good breathability, hygroscopicity.
- Viscose. Among the advantages: price, light viscose drape, creates a spectacular appearance. Disadvantages: synthetic, can stretch after long use.
- Silk. One of the best fabrics for a summer product. Not only will it prevent you from sweating on a hot summer day, but it will also highlight your figure in a beneficial and effective way with shine.
- Chiffon. It drapes easily and is ideal for summer. However, the transparency of this material will not work in your favor. You will have to make the skirt multi-layered, which means it will be very hot in it. Choose chiffon that contains both synthetic and natural fibers. Chiffon makes good summer clothes that are pleasant to the body in cool weather.
- Gabardine. Elegant, warm and practical fabric that will perfectly decorate your look. Most often, business clothes are sewn from gabardine.
- Fatin. Lightweight, mesh fabric that can be used not as a base, but as an addition to your skirt. Tulle makes ideal curvy models.
Cotton
Silk Chiffon Viscose
For winter, choose wool or knitwear. However, you will have to work hard with the first material. For decorative finishing, use lace, elastic ribbons, etc.
How to sew a hidden zipper
After you have connected the sections of the skirt panel and left the area for the fastener unsewn, you now need to insert a hidden zipper. To prevent the hidden zipper from moving, you have to sweep away the zipper tape before stitching it on the sewing machine. More experienced seamstresses, instead of basting, pin it to the fabric with pins. You can sew a hidden zipper without shifting or basting if you first sew the zipper braid with an additional seam, departing 0.5 cm from the edge. Do not make too large fabric allowances for sewing the hidden zipper. The zipper tape should run next to the overlock seam. Firstly, it will be easier for you to stitch the tape exactly along the edge, and secondly, allowances of 2.5-3 cm are already outdated technology. Wide seam allowances may be printed on the front side of the product. And also, from the top edge of the product, the zipper fastening should be lower, approximately 1.2. By the way, the plastic, molded fastener often interferes with the foot when sewing on the zipper. To prevent it from getting in the way, bend it back with your fingernail.
Calculations
Folds
Sewing a skirt with your own hands is not difficult at all, even for novice needlewomen. You just need to correctly calculate your dimensions, material, and then it’s a matter of small things. Since “Tatyanka” is a model with folds, we first need to decide what they will be like:
- One-sided. Classic and traditional cut, which is laid in any one direction (most often to the left)
- Counter. As is already clear from the name, the folds go towards each other, starting from the sides.
- Bow ones. They are similar to “counter” folds, but they are made from the middle, leading in different directions.
- Fan. This is an ideal option for creating a three-dimensional model. Since, thanks to the multi-layer application of folds, a very full skirt is obtained.
If you don’t know how to sew a Tatyanka skirt, then I hasten to please you. There is nothing complicated here. To do this, you will only need 2-2.5 hours of free time and desire. First, let's take measurements, you will need:
- Hip circumference (example: 90 cm)
- Waist circumference (example: 65 cm)
- Product length (example: 70 cm)
Next we return to the type of folds. For beginners, it will be easiest to take on single-sided ones. And experienced craftswomen can try more original models. The width of the fold varies on average from 3 cm to 7 cm.
To calculate the number of folds you need:
- Take hip measurements
- Add allowance to them
- And divide by the selected fold width
Example: (OB (hip circumference) + allowance (4 cm)): width of folds (6 cm) = 16 pcs (quantity) or in mathematical form (90 + 4): 6 = 16
The depth of the fold is also calculated using a certain formula: OB * 3 + 4 (allowance) in numbers looks like this: 90 * 3 + 4 = 274
Textile
Each model has its own fabric calculation:
- The skirt is gathered at the waist and with a stitched waistband. So, to the DI (product length) an allowance of 3 cm is added at the waist and another + 10 cm on the back side. It is also worth considering the width of the belt, let's take 9 cm. To sew a Tatyanka skirt with a length of 70 cm and a belt width of 7 cm, you will need to multiply the resulting number by two. Mathematical calculation: (70 + 3 + 10 + 9) * 2 = 184 cm length of fabric. In this case, the width of the fabric should be = 1.45 m.
- Model with elastic band. Formula: DI * 2 + 9 cm (allowance) = 149 cm material length. All this comes from the calculation that the average width of fabric sold in handicraft stores is 1.4 - 1.5 m.
- Model with yoke and pleats. Most often, the volume of a model with folds is approximately 2.5 times greater than OB. Therefore, the formula looks like this: OB * 2.5 + 2 cm (allowance). Mathematical calculation: 90 * 2.5 + 2 = 227 cm. The length is calculated as for a model with a belt.
How to sew a Tatyanka skirt: step-by-step instructions
Sewing technology will change due to the presence of additional parts.
Pattern No. 2
Simple assembly and sewing of the basic model with a belt
To sew a tatyanka skirt, you need to perform the following steps:
- Using an overlocker, process a panel (or two) of the product on the sides and bottom.
- Fold the fabric right side inward and stitch the side from top to bottom, leaving 13-15 cm at the top.
- Gather the panel around the waist. To do this, set the machine to a stitch length of 4-4.5 mm and stitch, retreating 1 cm from the top. On one side, secure the seam, and on the other, pull the thread so that the fabric gathers.
- Glue doublerhide (for thick fabrics) or interlining (for thin fabrics) to the parts of the belt or yoke so that the product does not stretch. For gluing, a part of the belt (or yoke) is cut out and applied with the rough (adhesive) side to the fabric, and a hot iron is passed over it several times.
- The belt is applied with the unglued side to the front side of the fabric and a stitch is given at a distance of 1 cm from the top of the skirt.
- Next, the zipper is sewn on.
- Sew the belt to the product. All gathers and seams are tucked inside, and the top is covered with belt fabric and stitched. In this case, the seam should be placed on the front side of the product along the line of stitching the product to the belt.
- The hem of the skirt is folded and stitched.
You may be interested in this: Making patterns and sewing elephant toys
Pattern No. 3
Tatyanka skirt with elastic band
The previous technology is performed up to step 2 inclusive. So what is next:
At the top of the skirt fabric, a fold is made 0.5 cm larger than the thickness of the existing elastic and stitched from the front side.
Important! When forming the drawstring, the main thing is to remember to leave holes for threading the elastic through.
A pin is attached to the elastic band and threaded through the drawstring. Next, the pin is unfastened, and the ends of the elastic are connected together and stitched.
Tatyanka skirt with elastic band
Additional Information! If there is a wide elastic band (from 3 cm in thickness), the drawstring is not formed until the elastic is stretched over the entire length of the fabric (at the waist) and stitched at a distance of 7-8 mm from the edge of the product. Next, the upper edge of the product is processed with an overlocker. The elastic is wrapped in fabric and stitched along the bottom edge to the product.
On the yoke
How to sew a skirt with a gathered waist? The sewing technology is identical to that described for the model with a belt, with the exception of the peculiarities of the formation of folds on the tatyanka skirt.
Calculation of a product with assemblies:
- V skirt at the hips = Ob+Pb = 95+3=98 cm;
- Number of pleats on skirt = 98/5 = (approximately) 20;
- V products at the waist: From + Fri = 65 + 2 = 67;
- Width of 1 pleat at waist: 67/20 = 3.4 cm.
Technology for sewing a pleated tatyanka skirt:
- Mark folds on all parts of the panel, alternating the depth of the fold and its width;
- Iron the folds and stitch at a distance of 1 cm from the top of the product along the waist line.
- Next, follow the same procedure as in the technology for creating a model with a belt, starting from step 4.
Pattern on the yoke
Pattern and cutting
The skirt pattern is very easy to make, so it is recommended to do it right away on the material:
- Fold the material in half
- Set aside half of OB*1.5 (assembly factor) from the fold. Example: (90 * 1.5) / 2 = 67.5
- At the resulting point, make a notch with scissors
- Draw a line parallel to the fold, making sure to pass through the intended point. (it's best to use chalk when making a pattern on fabric)
- At the bottom, you should set aside the length of the product, not forgetting to add allowances and hems.
- All that remains is to complete the pattern by completing the resulting rectangle
- Cut it out
Next, you will sew a full-fledged “tatyanka” from the rectangle.
Spectacular images
Many girls who have added such a thing to their wardrobe are interested in what to wear with a tatyanka skirt. The classic option is a look made up of a model with a yoke and a white blouse. You can complement this look with a small clutch. Having a neat hairstyle plays an important role.
In summer, wear a skirt made of light natural material and complement the look with a neat T-shirt. For footwear, you can pair this look with sandals. Don't forget about accessories - a clutch, bracelets and sunglasses will add some zest.
Another variation of the “tatyanka” for the summer is a skirt with an elastic band. A model made of flowing material is best complemented with a top or light blouse. Complete the look with pumps or high heels.
There are other options for fashionable looks made using a Tatyanka skirt. Don't be afraid to experiment with your bow.
Modern women's clothing has incredible femininity and sophistication. A Tatyanka style skirt will make you look expensive, stylish and sexy. This model will help you create great looks for both everyday wear and special occasions.
Skirt with elastic
The easiest way to sew a skirt is with an elastic band. It will not take much time and will also be easy to use. Thanks to the elastic band, there is no need to sew in an additional zipper.
1. So, you need to take the cut out pattern - the material.
2. Sew the fabric of the product along the side seam and carefully iron it
3. Fold the fabric from above along the waist line to the width of the drawstring (a strip of fabric into which the elastic will be threaded)
4.The length of the elastic should be equal to OB minus 5-10 cm. However, if you miscalculate, this can always be corrected by tying the elastic or cutting it
5. Fold the bottom of the product to allowance
6. Thread an elastic band
7. Iron the finished product
Some craftswomen like to decorate their products with lace or other materials. You can also use sequins, sparkles and other decor.
Pockets
Sometimes you just want to put your hands somewhere or put something in your pocket. This is why products with pockets are so popular lately. And they are quite simple to make.
Pattern
You will need 4 pieces the size of your palm, for example, mine is 16 cm. You can take a little more to make the pocket more voluminous.
Sewing
1. To prevent the pocket from looking too flashy and out of place, it is best to cut a piece of fabric from the product and make a valance (that is, the visible part of the pocket will be the same fabric). The valance extends approximately 5 cm wide. However, you shouldn’t sew it on all four parts, only two!
2.Take the fabric and place the remaining unchanged parts on it at a distance of 9 cm from the waist line. Sew the pockets, not forgetting about an allowance of 1-1.5 cm. The same needs to be done with the back fabric and the remaining burlap.
3. You need to bend the pockets to allowances along the side seams and iron them.
4. Sew burlap pockets onto the seam allowances that have just been folded back
5. Now place the back and front panels on top of each other with the right sides facing in, as shown in the photo below
6. Sew the two parts of the pocket along the side seam, remembering to leave room for the entrance
All that remains is to iron the finished product. And now your product with pockets is ready.
Great, this is just a basic version of the “tatyanka”, but thanks to it you can definitely create an amazing look and wear it anywhere.
Ironing
Skirts should be ironed in the following order:
- Iron pockets, if any.
- Iron the belt.
- Steam the hem of the skirt from the wrong side.
- If there are folds, the fold is first ironed, then paper is placed under it to prevent imprinting on the front side, and the fold itself is ironed.
How to iron
To comply with the technology of ironing finished products, the following items must be available: an adjustable ironing board, an iron with a steam function, and, in the best case, a steam generator unit.
Using the step-by-step instructions presented in this article, even a person who does not know how to sew can make a beautiful tatyanka skirt. The most important thing is to make the pattern correctly and then follow the ironing rules so that the product looks beautiful.
The originality of the gypsy skirt
R2=Di+R1=75+4.7=79.7 cm, this value can be rounded to 80 cm.
The choice of material for a skirt for a girl or an adult woman depends on your preferences. But you need to take into account that the volume of the skirt will be large; if sewn from thick fabrics, it will be too heavy .
If we consider such a skirt as an everyday one, then you can wear it with any T-shirt or blouse that matches the color. Or, in cold weather, complement the look with a knitted sweater, leather biker jacket or denim jacket.
1. Take a piece of organza measuring 2 x 1.5 meters and cut it into 5 strips, each 40 cm wide. It is better if it is shiny organza - it is stiffer than usual and holds its shape better.
4. Measure the child’s waist circumference, add a few centimeters to the resulting value for the seam, and cut the corresponding piece of wide elastic band.
Simple assembly and sewing of the basic model with a belt
Skirts without pleats are the least labor-intensive option for sewing.
To perform a simple assembly, you need:
- cut the fabric and sew the side cut;
- bend the cut along the top and stitch it - you get a drawstring;
- thread an elastic band, cord or ribbon into the drawstring;
- process the bottom edge - for example, bend it and sew on a machine with matching or contrasting threads.
To make the product stronger at the hem, the bottom is fixed with adhesive tape. It is better to process the seams using an overlocker or zigzag, but you can do everything by hand.
To make the skirt fit better and put on more comfortably, a zipper is sewn into the waistband.
To do this you need:
- make a seam (from the back - if the material is thick, from the side - on thin fabric);
- iron the seam, sweep away the line of the hidden zipper and stitch on a sewing machine;
- if you need to leave folds, stitch the top edge, make an additional line half a centimeter lower and pull it together with thread;
- sew the product and trim the edge along the bottom.
To make a basic “tatyanka” with a belt, you first need to sew a seam (the only one, the side one). It is advisable to make a pattern in order to properly prepare the elements and cut the lining into a trapezoid shape.
When sewing you need:
- gather the waist line with a thread and add folds;
- lay a basting line;
- secure the lining from the inside out (if a bottom layer is provided);
- sew a belt with a zipper on top;
- bend and process the bottom.
Features of the cut
“Tatyanka” is often confused with a circle or half-circle skirt; outwardly, these styles can really be similar. The main difference is in the cut. The circle skirt is cut in the shape of a circle with a waist hole in the center.
A half-sun is, accordingly, half a circle; such a skirt will have at least one vertical seam. The Tatyanka skirt is cut in the form of a rectangle, the upper edge of which is pulled together with an elastic band or draped under a belt.
The longer the rectangle of fabric, the fuller the skirt will be. The fabric itself also plays an important role - a tatyanka skirt made of dense material will be more voluminous than one made of thin and flowing material.
“Tatyankas” are made from checked suit fabrics, from staples and chiffon with floral prints, from bright knitwear or satin in pastel shades - in any case, the product will look harmonious.