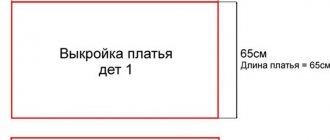
Suitable for cutting fabrics
Light industry produces a large number of materials, among which you can choose the ideal option for a cape. The fabric should be soft, warm, pleasant to the touch. How much material is required depends on the desired length of the product. For a short cape, purchase 1.2–1.5 meters; the details of a long coat can be placed on a length of 2–2.5 m.
The cape coat can be cut from:
- cashmere;
- boucle;
- Angoras;
- mohair;
- tweed;
- wool;
- gabardine;
- faux fur.
The material may contain both natural and synthetic fibers. In the store you need to pay attention to fabrics that are designated as coats. The name makes it clear why they were released. Therefore, the main task of the dressmaker is to select the material according to the color and type of weave of threads in the fabric, which creates texture.
This is interesting: Pattern Women's cardigan with pockets (p 8-24 UK)
Simplicity of cut and quick sewing
To build the back, use a shoulder pattern. The shelves of the cape will be drawn on it. It will be necessary to make adjustments to the pattern - widen the product for a loose fit and flare it down to give it an A-line silhouette. The armhole line should be extended by 9 cm and a new side cut should be built. In this case, the shoulder is increased by 6 cm. A smooth rounded line connects the resulting points. All that remains is to draw the neckline, and the back pattern will be ready.
The construction of the shelf begins from the middle line. For further construction, align the front and back, raise the shoulder 2 cm. Draw a new smooth line that will connect the shoulder and side sections. The rest of the pattern lines will match, with the exception of the neckline. Its depth will be 11 cm. The slots for the arms will be located where the shoulder section of the base pattern ends. Shift the line 2 cm closer to the center and build: up from the waist level - 12 cm, down 8 cm is enough.
Now you know how to sew a cape without any special tailoring skills. To realize your plan, you need to buy fabric and get to work. The experience gained will help you further expand your capabilities and create exclusive things with your own hands.
Master class: Modeling. Cape.
This autumn-winter season, the fashion of the 60s and 70s is returning, and of course you can’t ignore the elegant cape.
Many designers have given their interpretation to this type of product, which will be a universal alternative to a coat or raincoat.
Today I will show you how to model this product.
I chose the option without a collar, the clasp is hidden buttons.
| Technical drawing of the cape |
I do all the construction in the AutoCad program, as it is very convenient, it eliminates the need for drawing on graph paper, then transferring to tracing paper and modeling on it. Here you just need to do everything on the computer and print it out.
We take the base of the shoulder outerwear product. (Why top?
The increase in looseness of fit for outerwear is greater, since it implies that you will wear something underneath.) It doesn’t matter where you got the base from, be it a pattern from a magazine or built it yourself (there are many design methods), the main thing is that it is your size.
| Women's Shoulder Basics |
You will also need the base of a set-in outerwear sleeve.
| Set-in sleeve base |
The sleeve must be divided in the center into front and back halves.
Take the shelf separately
| Shelf base |
We combine the front half of the sleeve with it, and on the continuation of the shoulder seam and the line of the middle of the front we place the point of the center of the circle of the bottom of our future cape.
Having decided on the length of the sleeve along the length of the sleeve (in my case it was up to the elbow), we set aside the entire length of the sleeve and put a dot (this will be our radius)
| Shelf modeling |
We lay an arc with a radius along the length of the sleeve (see above) and to the line of the middle of the shelf. Then we move 4 cm from this line to the right - this will be our clasp. (If the product is fastened at the joint, then this is not necessary)
I made the hand entry line approximately in the center of the shelf. We find the middle along the neckline and connect it to the bottom of the sleeve, then down to the point in the middle of the bottom of the product.
We design everything with a smooth line.
We mark with dots on the line the location of the entry of the arms along the waist. The length can vary depending on your convenience, for me it turned out to be 20 cm.
| Marking the location of the hand entry |
Let's do the back in the same way.
| Modeled drawing of the front and back of the cape |
Next, we remove unnecessary lines and sign each detail so as not to get confused.
We mark the line of the middle of the shelf with a dotted line.
| Finished cape pattern |
That's all, thanks for your attention!
www.julia-fetisova.com
What is a poncho
A poncho is a rather unique piece of clothing that is gradually penetrating more and more into the fashion world. Previously, it was considered the traditional attire of the inhabitants of South America, but now it confidently wins the hearts of fashionistas from the catwalks and glossy magazines.
It is worth noting that not a single fashion show in the last couple of years has been complete without this original garment. The main distinguishing feature of a poncho coat from a regular coat is the absence of sleeves.
Although lately designers have been slightly modifying this robe, and some semblance of sleeves is sometimes visible.
Previously, ponchos were worn everywhere by both men and women.
Nowadays, female models are more popular. It has changed quite a lot and acquired many new varieties.
The most popular models are:
- knitted ponchos that don't have to be warm. There are also lighter models that can be worn with pleasure on a cool summer evening;
- fur ponchos that will help create a luxurious image for its owner;
- fashionable ponchos with checkered prints, which appeared thanks to the efforts of designer McCartney;
- classic and short cashmere ponchos that will be incredibly practical in the rainy autumn season and will protect you from wind and rain.
We will tell you how to sew a poncho with your own hands below. First, let's decide how and what to wear it with.
Cape pattern with a one-piece stand
$1.50 (127.5 rub., 48 UAH.)
Sizes: 40-62 (the buyer receives all sizes of the selected gradation) File format: PDF, full-size finished pattern and without seam allowances Sewing difficulty level: medium - the product will require skills in working with coat fabrics.
Read how to sew this pattern yourself and how to download it!
This is interesting: Women's cape pattern (size onesize)
Choosing a poncho style
The coat-poncho is already a fairly bright element of the image, so you shouldn’t overload it with bright accessories.
Its main advantage is that it suits almost everyone. You can imagine both a young girl and a plump woman in it, and both of them will look elegant and sophisticated.
The main rule when wearing any poncho is the priority of shoes with heels. Even if it’s not big, it must be present.
The best option for any figure and build is a classic poncho. It is usually mid-thigh length. Worn with almost everything: jeans, trousers, skirts. It is recommended to complement the outfit with a beautiful cap or hat, as well as gloves.
More modern models, which boast a hood or fur trim, are usually shorter than classic ones. They have become most popular among young representatives of the fair sex. They are combined with tight jeans and leggings, skirts and even dresses. Shoes are chosen depending on preferences and the overall outfit: these can be comfortable low-top boots and high-heeled shoes.
The shortest models or mini-ponchos are worn more as an additional element in the image. It will look great with both a dress and jeans. With such attire you get an incredibly wide range of possibilities.
An undeniable advantage, even without much experience in sewing, is that you can create a poncho coat with your own hands, complementing and diversifying it with additional elements to your liking.
Pattern “Pavloposad cape with hood”
$1.00 (85 rub., 32 UAH.)
PDF files for printing life-size cape patterns in sizes from 40 to 62 with instructions on how to sew according to the finished pattern. Sewing difficulty level is medium. Not only Pavloposad shawls, but also soft coat fabrics are suitable for sewing a cape.
Read how to sew this pattern yourself and how to download it!
- "" To the begining
- « Previous
- 1
- Next »
- In the end ""
Patterns shown 1 - 5 of 5
View page
Cape pattern. | WomaNew.ru - cutting and sewing lessons
Hello everyone!! Today is a cape pattern. A cape is something between a poncho and a cloak, a hybrid of a coat and a cape with slits for the arms, in other words, a sleeveless cape.
- Judging by the fashion shows of the most famous designers of the past several seasons, the cape will be one of the most fashionable coats now.
- See for yourself: many textures, decorative elements and fabrics.
- The cape pattern is quite simple, so sewing a new stylish coat will not be at all difficult.
- Here is the cape pattern itself. This is one piece, you need to cut two of these from the main fabric, and two more for the lining
- Next you need to sew along the red marks - these are the shoulder seams, and sew the parts together. Make slits for the arms and sew on the lining.
- The collar does not need to be made stand-up, but simply folded in.
Ready. Agree, the cape pattern is quite simple, it makes you want to reach for the sewing machine!!
Also, for motivation, you can see how to sew a beautiful poncho in a couple of hours. Good luck, joy and warmth to you!!
If you liked the article, please share on social networks)) VkontakteTwitterFacebookPinterest
womanew.ru
Materials and tools
The choice of the right fabric depends on the model you plan to sew. If you need a model for warm summer weather, then a light flowing fabric will do. To use this style in everyday life, medium-density material is more suitable.
Cape dress
The following cape dress options are used:
- In hot weather, they usually wear clothes made of viscose, chiffon or silk. This dress will serve as good protection against burns and will not interfere with air access to the body. A fluttering cape will help a woman create a romantic and mysterious image.
- There is a type of cape dress with a hood. It brings a light medieval atmosphere. These models are made from medium-density fabrics: soft wool, cashmere or knitwear. At the same time, dresses that reach the ground are worn. Some prefer knee length.
- Popular models of transformable capes.
- A floor-length dress made of heavy fabrics is decorated with rhinestones, lace or embroidery. It can be sewn fitted or made into an A-line silhouette.
- Can be used in a wedding style.
- You can use translucent fabrics: tulle, thin chiffon or organza. They wear opaque clothing underneath. In this model, the cape can be removable. In this case, you can choose two options for wearing: together or separately.
The cape dress can be sewn in different versions depending on taste. To create patterns, you can use the tips from Burda magazine.
To work, you need to prepare the following tools:
- scissors;
- ruler;
- overlock;
- sewing machine.
You will need threads, marking crayons, and pins. During the process you will need an iron to iron the seams.
You might be interested in this All about sewing pillowcases for scented pillows
Poncho coat with a hood, how to sew according to a pattern
History of the poncho
It is believed that the cape, used as outerwear, appeared around the 13th century among the Indians of South America.
Having become traditional and called a poncho, this clothing is a square piece of fabric one and a half by one and a half meters or a rectangular one with dimensions of one and a half by two meters.
Apart from the round neckline for the head, there were no additional elements.
The wool of animals living in the area was used to make ponchos. For example, the wool of llamas was used to make a coarser fabric called “avaski”, which was worn by peasants.
But ponchos of the “alpaca” type were made from the wool of animals with the same name, and these clothes were worn by noble and rich people. The most expensive capes were reserved for the leaders; they were made from vicuña wool, from which their name came.
An interesting fact is that women wove clothes from coarse yarn, but expensive varieties of ponchos were made exclusively by men’s hands, and this was a special craft.
Among the Spaniards who came to the American continent, this type of outerwear did not take root, and only much later “flower children” or hippies gave it a second life , bringing it into everyday life. Knitted, decorated with beads and fringes with flowers and embroidery, they were rapidly gaining popularity due to their environmental friendliness and ethnic focus.
However, it is not surprising that such a practical and warm thing has caught on. After all, you can wear it both on cool summer evenings and in the cold off-season; it will warm you up and create comfort, without restricting your movement at all and leaving your hands free.
Types of capes
Until now, the poncho firmly occupies its rightful place both on fashion catwalks and in the wardrobes of fashionistas. In the collections of famous fashion houses you can find:
- evening models made of silk with embroidery,
- fur or trimmed with fur,
- in ethnic style,
- asymmetrical shape and fancy cut,
- complete with hand slits, pockets and hood,
- with fastening with large buttons or double-breasted models,
- decorated with fringe, beads, embroidery and other decor.
As a basis they use: wool, fur, knitwear, you can knit such a coat yourself. The length is also very varied, from mini, barely covering the shoulders, to floor-length models.
Sewing recommendations
sew a poncho coat on their own if you choose the option without additional elements. There are free patterns and paid ones, but their variety allows you to find the right model. You can leave the shape rectangular, or you can fold it in four layers and cut off the corners to get a poncho with rounded edges. Let's consider three options:
- From a woolen or fleece blanket.
- With sleeves and fabric hood.
- Knitted.
Plaid poncho
This model is quite simple and there will probably be a blanket in the household from which you can make a fashionable cape. In order to remake a poncho from a blanket you will need:
- a blanket or piece of fleece;
- needles;
- scissors;
- strips of suede or wide ribbon;
- belt.
Sewing instructions:
- Fold the blanket in four layers with the right sides facing inward and secure with needles. Mark the neckline at the fold, 2.5 cm deep along the back. Carefully cut. Now lay out the blanket so that it remains folded in half, and deepen the cutout for the front by another 3 cm.
- You can cut the fabric from the neck down to a depth of about 20 cm, for convenience, or cut it completely lengthwise, choose.
- Treat the neckline with a strip of suede or a wide ribbon to match the product. And also process all new cuts with a zigzag.
- You need to measure the front from the shoulder line to the waist and mark it on the fabric. There will be slots for the belt here. The length of the slot should correspond to the width of the belt plus 0.5 cm, so that the belt fits in freely, and the loops do not dangle and the wind does not get in.
- Process the slots on a machine with a special stitch or a narrow zigzag in two layers. Carefully cut the remaining space between the seams, without touching the stitching threads.
The poncho coat is ready. We measure and insert the belt. It is well suited for walks outside the city and gatherings at the dacha in the fall. And in the city it will be useful as a fashionable and warm protection from the cold.
Made from fabric with sleeves and hood
A drape poncho coat with a hood will keep you warm in the cold winter, while looking more elegant than a jacket. You can choose from:
Patterns of rectangular and round ponchos are presented in the pictures below. The length can be chosen to suit your taste. For beginners, it is better to choose models without additional elements. If the poncho has a hood, it is cut out separately and then sewn to the product. A round poncho coat with fur trim, for which natural fur is suitable.
We sew a cape - BurdaStyle.ru
Cape, cape, poncho, cape - the last model in this series is the most fashionable, relevant and stylish. Sewing a cape in British chic style is not easy.
But even beginners will be able to boast of a cape sewn by themselves, because it can be based on an ordinary rectangular piece of warm fabric. I fell in love with capes from the 2007 fashion shows. Although even then they did not seem like some kind of novelty in fashion. Rather, they reminded us of ponchos and capes that were fashionable even earlier. True, made from noble fabrics, the capes of 2007 looked completely different, especially knee-length. In them, fashionistas no longer resembled South American Indians herding llamas on wild mountain slopes. They didn’t look like shapeless “hoodies”; on the contrary, they evoked associations with aristocratic foggy London, corrosive Sherlock Holmes & Co...
The easiest way to sew a cape is to sew a rectangle of fabric along the sides and cleanly stitch out the hole for the head. Made from large checkered, wool or brushed fabric, such a cape looks very stylish. A similar cape can be sewn from fur or from fabric with a very large fancy geometric pattern. If you pull the fringe along the bottom, you will get an ensemble in an ethno style.
It is better to sew a short cape from feathers, like a cape, so that the beautiful female form can be guessed in it. Instead of a cape or bolero, this is an ideal option for going out and parties. The latest fashion trend: capes that cover only the shoulders, reminiscent of royal robes, made from dress fabric, the same length or longer than the dress. Capes made of fur - short-haired or long-haired, with fur lining - are a fashionable thing not only for the city. True, you will have to try hard when choosing other things to go with it, including accessories. Capes are also very convenient for relaxation: you can not just walk in them, but also play sports, including cycling or snowboarding.
Do you think capes don’t suit curvy women? That's right - you just need to choose a model that suits your body type. Length can be a deciding factor here. If you are carrying extra pounds, you should choose not thick, hard fabrics for sewing a cape, but soft and flowing knitted and light woolen fabrics. Women with an X-type figure should try on a cape with a belt, or leave their waist visible. For women with an O-type figure, it is better to choose straight, non-flared models.
Very short capes, which would be better called capes, can be easily sewn yourself using the pattern on our website. They can be worn over a trench coat or a narrow coat, but should not be worn over a thick sweater or puffy jacket - why do you need the extra volume? Such capes can be knitted. Knitted patterns are often worn over dresses and blouses instead of jackets and cardigans. Such capes can be decorated with collars made of the same or finishing fabric, or you can combine fabric and knitted fabric. By the way, such mixes combine shiny satin and mohair very effectively. Very long capes look stunning. Of course, for an office, the floor length is inconvenient - the width and thickness of the material does not allow you to elegantly choose a hem when you step over the threshold or go down the steps of the stairs. But for going out, such a royal cape is fertile ground for fantasy images. By the way, capes will also be good for home clothes - try replacing your dressing gown with a terry cape with bright trim or huge appliqués.
Capes are worn not only by women, but also by men. Men's capes are also made from a variety of fabrics; for a brutal style, you can add leather details or sew a completely leather cape. For an aristocratic English look, it is better to take high-quality plain cloth or fabrics in a dim check.
Photo: PR; images/de; catwalkpix.com. The material was prepared by Elena Karpova.
Subscribe to the Burdastyle channel in Yandex.Zen
Subscribe
burdastyle.ru
Required measurements
Before you start sewing a cape dress, you need to take measurements. Measurements are taken strictly on a naked body; for convenience, you can mark the main points with washable mascara. The pose is natural. For the simplest one-piece style, several measurements will be needed.
- Half neck length: the length should fit loosely, without restricting movement or causing discomfort. The measurement is made with a tape in the area of the seventh cervical vertebra, crossing the base of the neck, closing in the jugular cavity.
- Shoulder length is measured from the neck to the shoulder descent.
- Sleeve length is measured from the point of the shoulder joint to the bone on the hand.
- The total length of the product along the back: from the base of the neck to the knee (or mid-thigh).
- Overall front length.
- Waist length is necessary in order to know where to make belt loops.
All measurements must be recorded. For convenience, you can use abbreviations: POSH (half neck circumference), DP (shoulder length), DR (sleeve length), ODS (total back length), ODP (total front length). If the dress is with a hood, then the above measurements are supplemented by the height and circumference of the head.
Calculation of material taking into account the length of the product
The amount of fabric needed depends on the model chosen. In this case, the length of the dress, the texture, the presence of a pattern or the width of the garment matter.
If you plan to sew a one-piece dress, then it is recommended to use a 1.5 m wide cut. Usually, to determine the length, the dimensions of the dress are used with the addition of fabric for additional details - slits for the arms.
If you plan to sew a loose dress, then the length of the cut is determined as twice the size of the dress.
Female figure measurements
It must be remembered that the cape pattern implies that a centimeter of fabric should be left for allowances.
Features of the DIY Pavloposad New Year's cape pattern
The cutting is done on a scarf folded diagonally (Figure 2).
You need to fold along the middle line of the design, facing inward, with the diagonal fold of the scarf parallel to the edge of the cutting table.
Then, on the fold, you should find the center of the scarf and lay out the “shelf” and “back” patterns on the scarf, taking into account the center point.
The middle line of the “back” should coincide with the fold of the scarf (diagonal).
Half-skid (middle line of the shelf) - extended to the edge of the scarf. We do not add allowance for the fastener - we will make hinged loops. That is, the sides will end up end-to-end.
The hood pattern fits into a lunge. If it doesn’t fit, move the “shelf-back” patterns a little from the center, but along the diagonal line, which in this layout replaces the lobar one.
The seam allowance for the hood is 1 cm along the stitching edge and along the face framing line. No allowance is added along the stitching line.
There is no allowance added to the neckline, either in the cape or in the hood.
Is a shoulder dart necessary? A dart is needed if you want to attach a shoulder pad. If the cape does not have a shoulder pad, then the “shelf” and “back” patterns can be glued end-to-end along the shoulder seam and used when cutting the already combined pattern.
We cut out the lining according to the cut details (Figure 3), which have already been cut out - along the cape and hood.
The fabric is folded in half, face inward, the edges are aligned and placed parallel to the edge of the cutting table.
We lay the cape on the lining with an indentation of 3 cm from the cuts. The fragment that does not extend across the width can be covered with plastic film and outlined, taking into account the double allowance for the dot-up - 2 cm. If you have enough experience, then you don’t need to make a dot-up pattern. Please note that you do not need to cut the neck yet.
We also cut out the lining details for the hood according to the cut details, adding 1.5 - 2 cm to the existing allowances.
Then, we sharpen the lining, iron the seam and you can cut out the insulation.
The insulating lining is cut out according to the cut details of the lining. There is no need to add allowances. Fragments of insulation, if it is made of batting or sherstepon, are best joined end-to-end with oblique stitches, so as not to add thickenings. The fractional direction does not matter.
If the lining and insulation are cut out of footer or fleece, then there is no need to add 3 cm “around”, 1 cm is enough.
Constructing a pattern
The style of a one-piece outfit practically does not require a pattern. This is an option for beginners. The second most complex type is a combination of a straight dress without darts and a classic cape with slits for the arms. The construction of such a pattern can be divided into 2 stages - creating a pattern and transferring it to fabric. To do this you need to perform several actions:
- Take measurements: circumference of the neck, chest, hips, waist, front and back length to the waist, shoulder and hip height, armhole depth, shoulder length.
- On a sheet of paper for the diagram, make an indent of 10 cm from the top edge, put a dot, for example, A. Four marks are placed vertically down: the depth of the armhole, the length of the back at the waist and the entire product along the back, the height of the hips. It is more convenient to mark with dots: AG, AT, AN and TB.
- Using the obtained points (G, T and H, B), draw lines horizontally from the original point (A).
- From G, measure a distance equal to half the chest circumference, mark G1. Draw a vertical line down through it until you get intersections with the lines - points T1, H1, B1.
- From point G, the width of the back is plotted to the right, obtained by dividing the chest circumference by 8 cm plus 5.5 cm - mark G2. Draw a perpendicular straight line from it up to the intersection of AA1.
- From G1, set aside a distance to the left equal to a quarter of the chest circumference minus 4 cm, obtaining G3.
- The middle line of the armhole can be obtained by dividing G2G3 in half. Place mark G4 in the middle. A perpendicular goes down from it to the segment HH1.
- The neckline is measured at a distance of 1/6 of the neck circumference plus 1 cm.
- The lines of the shoulders along the back and front are constructed by laying arc lines from points T and T1 with a radius equal to the height of the shoulders of the back and front minus 1 cm.
- Next, build the back and front, setting aside the appropriate measurements.
The resulting diagram is cut out in detail and transferred to the fabric.
If the fabric is elastic, it is necessary to enter minus increases. Otherwise, you need to take into account the standard seam allowance of 1.5 cm.
The cape pattern with slots is created directly on the fabric, without the use of tracing paper.
- A piece measuring 130 x 260 cm needs to be folded in half - you get a square. Fold into a triangle again.
- From the top of the structure, measure a radius of 130 cm, cut off the excess. It turns out to be a wedge, like a circle skirt. The edges of the fabric need to be moved to the middle.
- Set aside the length along the back, mark the neckline and shoulder seam.
- On the front, measure 5cm in each direction, mark a vertical line and remove excess fabric to reveal the inner dress.
- Make slits for the hands at a convenient distance; to do this, try on the workpiece on yourself and mark the points. The length of the cut is 30 cm.
The pattern is ready, all that remains is to stitch and sew. Instead of collar parts, you can make a hood pattern. Another option is a collar, which looks like a cross between a voluminous collar and a hood.
Tailor plus...
<Several sewing options, many patterns and tips from forum users!
Even a beginner can sew a cape coat, poncho or cape... choosing a style “within his strength”! Effectiveness and simplicity of execution are what attract and maintain constant interest in their cutting and modeling. The simplest option is the absence of a shoulder seam, creating a cape with a minimum of funds from a cut of the required length and width.
However, in this post I have collected several sewing options, ready-made patterns and even a video with a detailed description. Choose a style, tailoring option and act!!!!
Since the post turned out to be very long, I decided to post ideas for inspiration separately. You can get inspired by checking out the huge range of designs here. I published very beautiful poncho capes with ready-made patterns here. You can take these patterns as a basis, and then choose a model from photo ideas.
Here is a video on one of the sewing options:
FIRST OPTION
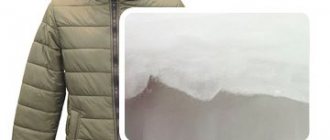
This fur cape coat from Jaegar London is a real boon for budding dressmakers. And sewing and cutting such a coat is as easy as shelling pears. In addition, if you sew it from soft fleece, you can do without a lining. We offer you our own, simplified version of this masterpiece.
How to model a coat? In order to create a pattern for this coat, you need to take several measurements, namely:
Shoulder length + sleeve length Coat back length Neck circumference
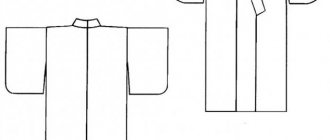
The main advantage when creating a coat pattern is its simplicity! Draw a rectangle with a width equal to the length of the shoulder + sleeve length + 1/3 of the neck semicircle (SNC) + 1.5 cm and a length equal to the length of the coat along the back.
Draw the neck of the back of the coat and the neck of the front of the coat according to the pattern as shown in the pattern drawing (AB1 = 1/3 POSH + 2.5 cm). Add 5-6cm along the front of the coat and draw a new line for the middle of the front of the coat. Draw a one-piece border. The blue dotted line marks the facing of the back of the coat.
How to sew a coat?
From the main fabric, cut out:
The front half of the coat is 2 pieces, one-piece with a selvedge. The back of the coat is 1 piece. with a fold. Trimming the back of the coat neckline – 1 piece. with a fold. Top coat pocket – 2 children. Bottom coat pocket – 2 children.
Important! Make loops for threading the belt both on the front half of the coat and on the back of the coat. The belt is threaded along the back and front over the coat.
Description of work:
Baste and stitch the side seams of the coat, leaving open areas along the bottom of the sleeves. Stitch the facing of the back neckline to the facing of the front neckline, and press the seams.
Fold the hem along the middle front line face to face, sew the facing of the front neck and back of the coat in one line. Turn right side out, sweep clean, iron.
On the back of the coat and the front half of the coat, sew stitches into the frame.
Fold the seam allowances along the tops of the pockets and sew them by hand using blind stitches. Fold the pockets in according to the remaining allowances, place them on the coat according to the markings, baste and sew by hand using blind stitches.
Fold the bottom of the coat and sew with hidden stitches. Sew the hem allowance to the coat allowance using a flexible stitch.
Sew buttons according to the marks.
SECOND OPTION
As easy as pie! Even a novice dressmaker can sew this original cape coat from Baby Phat. However, it will look gorgeous! Note the contrasting, fiery red lining fabric and gold buttons. It is these details that can turn a simple cape coat into a luxury item.
How to cut a coat? From the main fabric, cut out:
2 parts of the front half of the coat (with an overlap to the fastener and a one-piece collar) 1 part of the back of the coat - with a fold (without overlap to the clasp!) stand-up collar - 1 piece. with a fold. Belt – 2 children. 20cm long and 10cm wide (in finished form you should get 2 belts 20cm long and 5cm wide)
From lining fabric: front half of the coat – 2pcs. (cut to the blue construction line, without taking into account the opening of the fastener and the hem), the back of the coat is 1 piece. with a fold. stand-up collar – 1 piece. with a fold.
How to sew a cape coat?
On the front and back parts of the coat, make shoulder seams from the main and lining fabrics. Press seam allowances. Turn the one-piece collar to the wrong side and iron it. Place the lining of the coat face to face with the garment and baste it to the lining along the longitudinal seams. Sew, turn right side out. Fold the allowances along the bottom edge of the coat and hem them by hand.
Reinforce the stand-up collar made of the main fabric with an adhesive interfacing, fold it with the lining collar face to face and stitch along the short and top edges. Turn, iron, stitch. Sew the collar into the neckline, place the lining on top and sew in one line, stitching the lining along the neckline.
Sew both belts, topstitch them along the edges, baste them according to the marks, and stitch them.
Sew the loops along the markings, sew on the buttons.
THIRD OPTION
Modeling a cape (poncho)
A poncho looks impressive, and it is much easier to sew than a jacket or coat. Depending on the fabric and finishing, both casual and dressy options are possible.
Features of the pattern: To create a cape pattern, a pattern is used with a set-in shirt sleeve, and with a slight change in the back.
Construction of the shelf We close the chest dart of the shelf. Due to the closed chest dart, the waist dart opens. We combine the front half of the shirt sleeve with the armhole of the front. We outline a new contour. We received the front part of the cape.
Constructing the back Similar actions must be done with the back and sleeve. But the back must first be changed, as for constructing a kimono, i.e. raise the line of the neckline and shoulder as follows: move point A up by 0.7 cm, move point A2 up by 1 cm, move point P1 up by 2 cm. By combining the back half of the sleeve with the back and outlining a new contour, we get a pattern for the back of the cape.
FOURTH OPTION. Circle cape!
Yesterday I tried on a similar cape made of double-sided wool, dark and light gray, it looks amazing. If you are short and wear it with the long part down, you get a long vest, but if it’s the other way around, the collar covers your arms and “sleeves” appear. This versatile cape will be useful both in your wardrobe at home and at work!
Recommended material: woolen fabric, felted, mohair or, as a cheaper option, good quality fleece. It can be sewn together with cutting in half an hour. Armholes are processed like framed loops. Take a circle with a diameter the width of the fabric, say 140 by 140. Divide it in half horizontally and vertically. In the second half, we draw two vertical segments that start from our horizontal line. We will place the segments on both sides of the vertical at a distance of 20 cm, i.e. between segments – 40cm.
Considerations were expressed regarding the possible use of sleeves in the model: Goldfish: the sleeves can be tied. Renata: since the shoulder line is horizontal, and the item is quite voluminous, a sleeve in the form of a rectangle and an armhole in the form of a slit are absolutely suitable. I propose to make the sleeves fastened with buttons. Without sleeves, you can wear it “upside down” and determine for yourself where your legs are. If you sew sleeves like a kimono, then this possibility remains, but if you sew “correct” sleeves, then you cannot wear them “upside down”.
FIFTH OPTION. Cape with vest from Burda! Two styles!
Unfortunately, I didn’t find any ready-made patterns, I searched the entire Internet - all the magazines for downloading without patterns. But actually redoing your base pattern after looking at the description from the magazine won’t be too difficult. If, however, anyone finds ready-made patterns for this magazine, I will be grateful if you give me a link.
SIXTH OPTION. Schemes and description from a foreign site. Automatic translation - please don't judge too harshly))
Modeling front half: AR = 1/12 chest circumference AC = 1/4 chest circumference CM = 1/4 chest circumference. Chest cm.3 + CP = 1/18 of the circumference. Chest RP = 1/7 circon.torace AB = toe length in front
rear half: AR = 1/12 chest circumference AC = 1/4 chest circumference CM = 1/4 chest circumference. Chest cm.1 + CP = 1/18 of the circumference. Chest RP = 1/7 of circumference. + Cm.1 chest, 5 AB = length of toe behind
Creating the base explained above, with the length of the cape which you want to achieve and trim, draw at right angles, lay the template on the vertical side of the front and along the horizontal axis of the model by matching the point behind the shoulder, drawing a curved line B to B Tracing the contour as it appears in the drawing Here. To cut the handrails, mark 50 cm distance D from C and continue as described in the drawing. Draw a slit in the skirt about 8-10 cm wide (follow the instructions on the design side, the pocket in the skirt is part of the painted green, the white part of the liner model) Cutting and sewing: crop the model, target with pins on the fabric already treated, point in front front pocket in the skirt and in the center of the wire on the back doppiofilo. Go around the soft points, remove the pocket in the skirt and go even centrodavanti, cut the line of the railing and go slowly to the points in the slot. Cut with a margin of 5 cm from the rim line, 1 cm from all others. Make a cut at the beginning and end of the attachment collar. Make a small cut in the center of the back of the collar, pocket in the skirt and cape (see blue dots in the first picture). Open with two layers of fabric and cut into long strands in half. Intelinare trim and collar (1 only). Sew shoulder pence, back pocket in skirt. Place straight with straight lines on both sides of the collar, sew the sides and more curve, add to the side of the cape does not fit intelinato nicks, and the other to the pocket in the skirt, sew the other side of the pocket in the skirt, like the blue lines of the second design, turn to the right. Intelinare patina, fold their lengths and sew them inside out to 1 cm from the 2 short sides, turn one and sew them right according to the instructions shown in the picture. Sew hem. Focusing on the SPP, switch brands into a braid, cut with a margin of 1 cm. Sew a pocket in the skirt and with a slit along the edge of the brands around the hole and secure the cape with small 1 cm points, tucking in with your hand. inside. Make loops along the right side and attack the button.
SEWING OPTIONS from forum members Thanks to the girls for the material and photos!!! Vassa's poncho The poncho is incomparable in terms of convenience and comfort; you can wear any thing under it - both elegant and simple jeans.
“I tore off” a 1.90 m piece of fabric in the store. It was a pity to cut the fabric - such beautiful stripes. A 0.25 m strip was cut along the entire length of the fabric for a scarf collar, and I tied tassels at its ends.
The fabric was a little short of what I wanted, so I had to knit the tassels at the bottom and the cuffs on the sleeves. In the center, I inserted a detachable zipper and placed the entire product on the lining. To complete the set, I knitted a bag with peonies and tassels, and embroidered it with glass beads and beads.
Poncho from Kitti The entire creation process took about 4 hours. A poncho with fur trim is sewn easily and simply, but the result is spectacular!
You need 2 meters of soft, double-sided, well-draped fabric with a width of 140-150.
We fold the fabric in half along the length of the cut and boldly make an incision along the fold exactly to the middle! View of the poncho unfolded. During the fitting, we will clarify the outline of the poncho. The original model has square tails. You can round them by drawing lines in front of the mirror. To ensure that the lines are symmetrical, before cutting off the excess, first fold the workpiece in four.
We determine how much fur is needed for finishing. We measure the length of all cuts. The finishing width is 10 centimeters. I needed a piece of fur 70 cm long.
We cut the fur with a razor from the wrong side. The villi should look down, not to the side! We sew the fur strips by hand using large, sparse stitches. If you sew with small and frequent stitches, the fur may wrinkle. First we sew the fur strip on the bottom, then on the top.
Cape poncho from Helena The poncho is one-piece, only the neck (“Dracula collar”) is formed with raised seams. The pattern is inscribed in the fabric pattern - the central figure and the ornament forming a rectangular carpet. Photo of the back. Material: carpet 100 by 110 cm, double knitted weave. On the wrong side there is a light knitted base, on the front side there is a woolen, velvet type. All together creates the impression of a tapestry and the effect of heavy stretchy fabric. Hence the problems - the fit of the shoulder and the calculation of the lining.
I took the pattern from Burda. I built it directly on the fabric, relying on the proven method of changing the pattern, because only the shoulder seams are important. Well, it flew by with the shoulder: it turned out to be longer than necessary, I had to hem the shoulders, put the seams on the binding...
The fit is good, but because of this cutting error, the “sleeve” itself turned out to be a little small. I spent a long time choosing the location of the slots for the hands. It seems convenient.
I sewed on the lining - and the whole cloak was warped! It turned out that I didn’t take into account the elasticity of the fabric, a few centimeters were missing vertically. I had to re-pair it and add 10 cm in the shoulders (I decorated them with parallel gathers). Now it fits like a glove.
More about the fabric: the salesman in the store said that they usually take two carpets and sew them together, leaving a hole for the head - they get a loose “Indian” poncho. I was the first to come up with something unusual from this fabric.
The Dollmaker's Cape The silk-lined cape was sewn because “I just wanted to.” Now decorating a mannequin in a store. An interesting texture of the material is given by a layer of lace on a brocade base. If the cape is unfolded, its length will be 180 cm and width – 90 cm. The cape took: 2 meters of silver brocade with a width of 90 cm. 180 cm of lace fabric, about 4 meters of lace with beaded embroidery. 2 platinum foxes.
The pattern was made by eye. Before modeling, the batwing cut was taken as a basis. Decorative stripe: the same brocade, but covered not with lace fabric, but with a ribbon with beads. The width of the finishing fur strip is 10 cm.
For fur trim, only embroidered ridges were used. “In stitching” means that the plate consists of fur strips sewn together. This allows you to make the thin flesh stronger and more elastic. The fur was too thick for a stole, so thin strips of leather were placed between the strips of fur. On a furrier's machine, the strips were stitched at a distance of 1 cm.
Creation of fur trim: The fur is sewn together at a furrier and moistened with a special compound. Then it is stuffed from the inside out with small nails onto the board according to the shape of the pattern. After the fur dries, the fur accurately holds the shape of the pattern and does not crawl. The fur strip is sewn to the cape by hand.
Circle cape from Tanja. This model differs from previous ones in the original idea of creating an unusual shape. It has kimono-type sleeves (an option without them is also possible). Depending on which side is chosen as the “top,” the length of the product and the shape of the collar change.
Tanja tells... The model was sewn spontaneously, in 1 night, on a virtual model. In the morning, the cape was instantly bought from my store by a very nice lady.
The fabric is pure wool, quite thick, double-sided. The edging is viscose braid, lace. I folded it in half and edged the edges.
The distance between the armholes is 50 cm. The sleeves are almost a kimono, slightly narrowed at the bottom. The sleeves are sewn with a linen seam. Photo unfolded. Since the fabric is double-sided and the seam is chosen correctly, the cape can be worn on the light or dark side. The ability to choose a long or short part of the cape as the “top” adds options for its use.
OPTIONS for patterns from different magazines. There are mainly knitted models here, but the patterns are also suitable for sewing from fabrics.
Source
Sewing stages
After the patterns are transferred to the fabric, the parts need to be cut out. Next, all that remains is to stitch the edges and sew them together. Step-by-step instructions will help with this.
Basic dress
A straight dress as a base is sewn taking into account the characteristics of the fabric. The edge processing depends on it. Once the cutting is done, you can start sewing.
- The lower edges of the back and front parts must be tucked and stitched. If the fabric “crumbles”, then it must be processed using an overlocker.
- Overcast and then sew the seams - shoulder and side. The allowances can be trimmed with binding.
- Stitch the edges of the armholes and neckline.
- Sew a hidden zipper into the side of the dress or along the back.
Fitted and tapered dresses look better with a cape. This is easy to achieve: just measure 10 cm from the hip line and stitch at a distance of 1-2 cm. From the waist line, use the same principle to make a narrowing, measuring 3 cm down and up.
We turn and sew the back parts
Sew side and shoulder seams
Working on the edges of the neckline
Sew in the snake
Cape
The cape will look more elegant if its length is 3-5 cm shorter than the dress. The difference in fabric texture is also welcome. For warm weather, the fabric of the cape should be thinner and airier than the main dress; for cold weather, on the contrary, a denser material is suitable: soft cashmere or a suit with wool in it. The base can be made of thin knitwear.
Sewing a cape comes down to finishing the edges, since this part is one-piece. The sections are overcast and stitched. If desired, you can use bias tape around the neckline. Special attention should be paid to the slots: they are finished using the “frame”, “loop” technique or facing on both sides.
The cape is sewn on at the shoulder seam. If there is a collar or hood, then it is attached to the back neck of the dress. The choice of sewing method depends on the type of fabric of the cape: the lighter it is, the thinner and more inconspicuous the stitching should be. Don't forget about decorative finishing.
Processing the edges
Sew and overcast the edges
Marking the location of the slots for the arms
Grinding the slots
Decor options
The decorations for this type of dress are varied. These can be eye-catching details in the form of brooches at the place where the cape is attached at the front neckline or trimming the peeking edge of the inner dress. You can play on the contrast of these details:
- texture of the material – airy translucent top and bottom in the form of a case made of coarser fabric;
- contrasting colors - delicate shades of the cape against the rich color of the same tonality of the base and vice versa;
- combinations of printed and plain fabrics.
In addition to these techniques, you can focus on the cape. This is the finishing of the lower or side edges with lace, twisted cord in golden and silver shades, and braid. Embroidery on the back or at the neck is also a great option to diversify the outfit. Fashion designers also use guipure trim on the back of the cape, creating the effect of a semi-open back for an evening dress. At the same time, the lower dress has a deep neckline, repeating the contour of the finishing fragment.
There are a large number of variations of the cape dress. Gradually moving from the simplest design to more complex ones, you can master the technique of sewing this spectacular outfit. To work on the first dress, it is better to take a simpler fabric and with a reserve; without sufficient experience, there is a risk of ruining the material.