Hello, my dear masters and craftswomen! My name is Daria, and I am the author of the blog “Unique Chichimova Workshop”.
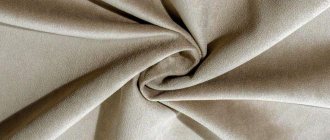
Last week I decided to talk about yarn that is made from plants. And there is a lot of such yarn! Since ancient times, people have learned to process plant fibers in order to obtain thread and products. Previously, I talked about hemp yarn. You will find links to useful articles at the very end. In the meantime, let's talk about another bright representative of plants, which for many centuries has served as an excellent material for creativity - nettle
.
Remember Hans Christian Andersen's fairy tale "The Wild Swans"? The same one who wrote “Thumbelina”, “The Ugly Duckling”, “The Snow Queen” and “The Little Mermaid”.
If you don't remember, then I'll bring you up to date. There is a moment in “Wild Swans” when a girl, in order to save her brothers (swans), must pick nettles, spin yarn from it and knit chain mail. In the cartoon this is a very sad moment and I always worried about her as a child.
But those are fairy tales and cartoons. In life, everything is much easier, simpler and more pleasant. This is the very moment when fiction is worse than real life. But in real life, nettle yarn is simply magical!
Making nettle fabric with your own hands
Now it's time to start the practical part of our work!
- Preparation of nettles.
- Fiber processing.
- Receiving yarn.
- Fabric making.
Before setting off to harvest autumn nettles, we decided to negotiate with our “Technical Support”.
We can't do it without help! Having discussed all possible options with us, our assistant and support Tolya, under the leadership of Anatoly Vladimirovich, began his difficult task - making devices for processing fibers and weaving. How grateful we are to them! Technical support
It was decided to make, based on drawings, photos and descriptions from the Internet, a small loom and a device for processing trust - a wood grinder. We were wondering how people coped with this work (obtaining fabric) in ancient times.
To begin with, technical drawings of the products were worked out. And then materials, tools and devices are prepared.
Materials
- Beam 50x50x2500
- Stud with thread on both sides and nuts
- Plywood 5 mm and 3 mm thickness
- Pine board 25x250x400
- Self-tapping screws for wood
- Wood screws 3.5
Tools
- Sander
- Electric jigsaw
- Hacksaw
- Screwdriver
- Drill
- Angle grinder (small)
- Wood cutters
- Wood lathe STD-120M
- Roulette
- Pencil, compass, eraser,
- Construction corner
- Crafting table
- Wood drills
- A circular saw
- Awl
- Metal cutting disc
- Sandpaper
Initially, the production of a loom was ordered, but in the process of working on the project, the girls had a problem with processing the trust - they needed a hammer.
The history of the creation of nettle fabric
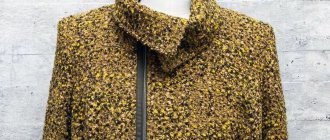
The history of the emergence of nettle fabric is amazing; back in 4000 BC, nettle fabric was used to produce clothing. Products made from this fabric were used by the military of Emperor Napoleon. This practical fabric provided warmth and was very durable. In addition, things made from nettle were popular and in demand back in the Middle Ages. Already around the 16th century, cotton began to be more actively used for clothing. During the First World War, cotton became a scarce material and nettle fabric again became in great demand. This fabric was characterized by fairly high thermal conductivity. In summer, the material will provide long-awaited coolness, and in winter, comfort and warmth. Clothing made from this fabric was characterized by an antiseptic and antifungal effect. In addition, nettle was used to sew bed linen, as well as sundresses, shirts, and towels.
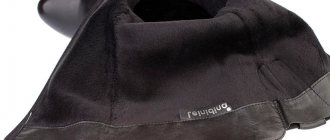
From shorter fibers they wove rows of yarn, which were used to make bags, blankets, as well as bedding and covers for carts. From unspun threads - ropes and ropes. Initially, the threads were soaked for 24 hours in a decoction of oak bark, thus making products made from this fabric as strong and reliable as possible. High quality extended service life. Waste nettle fabric was used for lining between logs in the construction of solid wood houses. This made it possible to create warmth and optimal temperature inside the house. Slippers and belts were also made from nettle fabric, which had a healing effect.
Today, nettle is not used so often; cotton has displaced this material from the textile market. This fabric has a higher cost, but the exceptional technical characteristics provide a stunning appearance, as well as superior quality and durability. Currently, nettle fibers are used for sewing clothes, bags, baskets and other products.
Instruction card “Making a grinder”
| No. | Sequence of work | Tools and accessories |
| 1 | We will need: · plywood from 5 mm to 10 mm timber | ruler corner pencil |
| 2 | We make markings according to the drawing on plywood and timber | ruler corner pencil |
| 3 | We cut out according to the markings with a jigsaw, larger parts on a circular saw or with a hacksaw | Electric jigsaw Circular saw (hacksaw) |
| 4 | We sand all parts with sandpaper or a grinding machine. | Sandpaper Sander |
| 5 | We mark and drill holes according to the drawing. To prevent the plywood from splitting open. Sand the chips around the hole. | Drill Drill Sandpaper |
| 6 | We secure the bottom to the bars with wood screws. | Screwdriver |
| 7 | We place the middle part between the other two and insert a threaded pin along the edge and tighten the nuts. | Spanner |
Instruction card “Making a shuttle”
| No. | Sequence of work | Tools and accessories |
| 1 | We will need: plywood | Ruler Corner Pencil |
| 2 | On 3 mm plywood, mark the lines according to the drawing and cut out with an electric jigsaw and sand the part. | Pencil Ruler Corner Electric jigsaw |
We are sure that the hammer and loom with a shuttle will serve as an excellent visual aid for technology lessons.
Procurement of raw materials and production of fibers from nettles
Although our project was launched back in August, we were only able to start collecting raw materials in October, when the nettles finally began to shed their leaves, dry out and turn brown.
And by this time we had managed to study in sufficient detail on the Internet how to process plant stems to extract fibers. In online videos, we saw two main ways to obtain fiber: completely manual (removing fibers from the stem) and traditional - using devices (kneading, carding, etc.). It was decided to test both methods of work.
Instruction card “Primary processing of nettle fibers”
| Sequence of work | 1 method “Manual processing” | Method 2 “Traditional” | |
| 2. | Cleaning the stem from leaves | ||
| 3. | Flattening nettle stems (it’s impossible to do without gloves and scarves! Everything is prickly and there’s a lot of dust) | ||
| 4. | Releasing fibers from the stem | We carefully split and break the stem without damaging the fibers | Slowly knead a bunch of nettles using a crusher. The main thing is not to damage the fibers |
| 5. | Cleaning fiber debris | Using smooth movements, separate the fibers from the trust | Gently grind and shake the mashed twigs to free them from debris |
| 6. | Combing out fibers | Using a mild knife, remove the wax coating from the fibers. Very painstaking work! | Using gentle, smooth movements, comb out the tow. There's still a lot of trash |
Our work was not easy. The fibers are very delicate and do not have the promised strength. A lot of time was spent on mechanical cleaning of debris using method 2. Of course, method 1 is cleaner, but it's too slow!
Benefits of nettle fabric
Nettle fabric has high strength, thanks to which the material easily resists mechanical and physical stress. Throughout its entire service life, nettle fabric perfectly retains all its positive properties. Let's take a closer look at other advantages:
- excellent resistance to stains: the fabric does not accumulate dust and dirt
- antibacterial properties (nettle is a natural fabric, the material has a positive effect on the human body). In addition, nettle is a hypoallergenic fabric; even if worn every day, products made from this material will not create any discomfort and will not cause allergic reactions.
- the fabric is not susceptible to chemical influences
- does not shrink even after numerous washes
- resistant to different temperatures, ideal for use all year round
- not electrified
- It is quite easy to process and retains its rich color perfectly.
- natural fabric will provide maximum comfort and convenience
- It is quite easy and simple to maintain, so in order to maintain an attractive appearance, the products do not require additional effort
In addition, Kan nettle is actively used for sewing clothes; the positive properties of the material will ensure a long service life.
Obtaining yarn from nettles
When we carefully studied everything on the Internet about spinning, we breathed a sigh of relief - the hardest part is over! But that was not the case... Our fibers somehow turned out to be not too long and strong. Looks like our local nettles are still growing and growing. Those threads that we managed to spin were unraveling right in our hands and did not want to be fixed on the spindle!
We urgently began looking for advice on this problem. And help came to us literally the next morning in the person of Larisa Petrovna Bazhukova, a teacher of additional education and a part-time jack of all trades. Larisa Petrovna deftly and skillfully showed us the basic techniques of work, shared her spindle and brushes for combing out tow. Thank you very much!
Gradually we got used to spinning a thread, albeit not a very even one, and the work gradually went smoothly. In the end there weren't many threads. But we still hope to make a sample and a couple of coasters from them.
How to make nettle manure from bio-accumulator in 5 steps
With the onset of warm weather, nettles began to overflow in the garden? This means that you have free raw materials for homemade, but very useful fertilizer. Without delay, start making nettle manure right now!
Stinging nettle is often considered a weed due to its erratic growth and stinging spines. But experienced gardeners treat it completely differently.
Nettle belongs to a special group called bio-accumulators, which also includes dandelion, comfrey and chickweed. These plants easily extract nutrients and minerals from the soil and then store them with high bioavailability in the leaves. This ability makes nettle an excellent organic supplement for all crops. The use of nettle manure at the beginning of the season helps seedlings to take root better and activates the soil microbiome without inhibiting it, like highly concentrated agrochemicals.
During the growth process, fresh nettle leaves are literally “loaded” with high concentrations of vitamins, a complex of minerals and plant polyphenols, which improve plant health and stimulate their growth.
Seedlings treated with nettle infusion are less susceptible to some fungal diseases and less susceptible to environmental stress.
The only negative is that fermented nettle, as befits manure, stinks quite a bit. Therefore, it is better to place containers with miracle feeding away from the house.
To prepare, we will need the nettle itself, thick gloves with protection against thorns, sharp scissors, a bucket with a lid, a stirring stick and gauze. As for water, it is better to take rainwater, without chlorine.
Let's get started.
1. Collect nettles in a 10-liter bucket. You can pull it out by the roots, cut it with scissors, or mow it down.
2. In a bucket, use scissors to chop the nettles into smaller pieces to better release the nutrients during fermentation.
3. Add water to just cover the nettles. Stir and check the consistency. The composition should mix freely; if it turns out too thick, dilute it.
4. Cover loosely and make it a habit to stir once a day. If there are bubbles while stirring, everything is going as it should. After one to two weeks, there should be fewer bubbles, which means the end of active fermentation and the product is ready.
5. Strain out the solids and compost them.
Remember that nettle manure must be diluted before use. Part of the infusion to 10 parts of water, for example, a liter of concentrated solution to 10 liters of water.
For seedlings, two glasses of diluted product for each bush is enough. It’s easier to water the bed using a watering can, walking evenly along the row.
It is recommended to water the soil no more than once every 3 weeks.
In addition to feeding the soil and roots, you can also apply it leaf by leaf to repel ticks, thrips and aphids. In addition, plants readily absorb nutrients through their leaves, absorbing them faster than through the soil.
To prepare nettle spray, pass the infusion through the filter several times. Otherwise, plant material residues will clog the sprayer. This time, dissolve 1 part infusion to 20 parts water.
It is always best to apply any type of foliar spray during the evening hours when the plant is out of direct sunlight. This reduces the risk of sunburn from wet leaves, and this is the time when beneficial insects are least active. Spray the leaves until the mixture begins to drip.
Note. For leafy greens that you plan to eat soon, do not use nettle treatment due to the unpleasant odor.
Extracting fabric from nettles
Well, our project is moving towards completion and all we have to do is make fabric from the resulting yarn. We really hope that at least at this stage no unexpected surprises await us!
Instruction card “Producing yarn from nettles”
| 1. Threading the warp threads onto the loom | 2.Winding nettle weft threads onto a shuttle |
| 3. Selecting threads and passing the shuttle through the shed | 4. Sample weaving |
We got the job done!
We got samples of fabric, a bracelet and coasters for mugs made from nettles, which literally grow under our feet.
Conclusion
In technology lessons , when studying the “Materials Science” section, we studied the process of producing fabric from plant fibers using flax as an example. The teacher showed samples of flax processing - it was interesting to look at them and even touch them. Therefore, when we began a similar process of obtaining fibers from nettle stems, it was decided to create a similar visual aid.
In our research work, we studied in detail information about the use of nettles in everyday life, became acquainted with the features of technologies for producing nettle fabrics in ancient times, and mastered the technology of processing and obtaining nettle fibers and the weaving process. Next, they made not only samples of fabric and stands for mugs from nettles, but also a loom and a grinder.
We have also prepared a visual aid “Producing yarn from nettle fibers” for technology lessons, which, of course, will be useful for students in grades 5-6 when studying the topic “Natural fibers of plant origin.”
The survey we conducted of local residents, craftsmen and museum specialists not only turned out to be a very exciting activity and expanded our knowledge about the history of our region and the republic, but also allowed us to meet such interesting people. And besides, we were convinced that in the southern regions they produced fabrics from nettles and even sewed clothes from them!
We received fabric samples, but unfortunately our nettle is not durable. And the quality of processing leaves much to be desired - the fabric turned out to be rough and scratchy. But we are very pleased with the result - we were able to confirm the hypothesis put forward: at home it is possible to produce fabric from nettle fibers using ancient technologies.
The goal of our research work has been achieved.
Our design and research work turned out to be not only difficult, but also very interesting. We learned a lot of new and useful things for ourselves, we learned how to extract fiber practically from weeds. Our creative activities attracted the interest of classmates, friends and teachers. Many at first simply observed and then joined in our work. Everyone was wondering whether the threads would work out, what the fabric would look like. It was interesting and fun to work.
DIY rope. Part 3: Processing nettle stems to make rope
Like ordinary trees, nettles also have a kind of bark, inside of which there is a kind of “core”. While strong fibers can be isolated from the outer layer, the inner layer has no practical use. Therefore, they need to be separated before work. However, before you start making nettle rope , you still need to collect it and clear it of leaves and thorns.
The content of the article
Harvesting nettles and removing leaves and thorns
Mid and late summer is the best time to harvest nettles. By this moment it has already reached its full height, which, accordingly, makes it possible to obtain long fibers. Which, moreover, will be much stronger than that obtained from spring nettles. It is also worth noting that those plants that grow in well-lit places acquire a purple tint to the stem and greater fiber strength
Believe it or not, it is quite possible to work with nettles with your bare hands without getting burned. This just requires some thick skin, especially if you have to work with large volumes of material. But there is nothing stopping you from using additional equipment, such as gardening gloves. And the need to work with bare hands does not arise so often. Unless you urgently need fiber and have nothing else at hand. In any case, the technique for processing nettles for ropes is as follows:
- With one hand, grab the top of the plant, and with the other, cut it at the root with a knife.
- Now grab and pinch the base of the nettle between your thumb and forefinger. With each hand. If you work without gloves, be especially careful not to prick yourself.
- Pull the stem sharply between your fingers to remove most of the leaves and thorns. Repeat if necessary.
Nettle processing
Crush the hollow trunks
Take a nettle and squeeze it with your fingers as shown in the picture to spread out the hollow stem. This will need to be done along the entire length. Particular difficulty may arise only with the nodes from which leaves used to grow, due to the fact that they are more rigid.
An alternative option is to tap the stem with a light wooden rolling pin, or with a tightly rolled magazine. You need to knock carefully to distribute the central part, but not to damage the “bark”. This method works well if you need to process a large volume of material.
Open the flattened trunk
Using your nails, split the flattened trunk in half. Just be careful not to tear it into two separate parts.
Separate the individual layers
Hold the open stem with the outside facing down. Approximately half the length between the two nodes, break it - the inner layer will break, but the outer one will remain intact. After this, begin to pull the “bark” of the nettle down, as in the picture.
Each half received should be worked on separately. There is a quick way to do this. After breaking, pinch the “bark” between your thumb and forefinger, and then slowly pull it down. The thumb, in this case, will additionally facilitate the separation of the inner layer. Repeat until done.
Separate the bark into smaller pieces
It is better to tear a wide strip into smaller threads, from which it will be much easier to make fibers for rope . The picture shows that the strip can be easily divided into three or even 4 parts without much difficulty. Along the folds, using a fingernail, along the grain.
Drying nettles
Now the nettle fibers for the rope need to be dried. Hang them somewhere so air can circulate freely between the individual strips. If the weather is sunny and hot, you will only need a couple of hours to achieve the desired condition.
These fibers can now be used to make nettle rope . You just need to place them in warm water for a while, and you can continue working. But read about this, as well as other aspects of making ropes with your own hands , next time.
Source – How to gather and process nettles for cordage making fibers