As in any business, here you should start with simple models, and after improving your skills, move on to more complex schemes. Materials for knitting can be:
- natural or synthetic yarn;
- twine rope;
- leg-split;
- knitted fiber or old knitted items;
- plastic bags.
The same style, made of different materials, will look completely different and will also be used in different cases.
How to crochet a bag
How to crochet a bag
To create a crocheted women's bag, you need to know the basic rules of crocheting techniques in this way. There are many video tutorials on the Internet on making knitted accessories for beginners or masters. The ability to read knitting patterns will allow you to master new patterns. You can crochet a bag step by step using the instructions and description of the work progress.
There are many master classes on knitting beautiful handbags in magazines and on the websites of craftswomen; it is easy to choose the right one from them.
Stylish knitted jute bag in almost one evening
This bag will last forever! It is knitted entirely from jute - from rope tied with twine. If desired, you can attach accessories to such a bag at the end of knitting. You will spend no more than one evening on all the work, and the bag will be ready!
The work uses jute rope (8 mm) + twine, hook No. 5. You need to knit with two strands of jute twine at once. Make a chain of 21 loops (20 working loops + one lifting loop). Now take the edge of the rope and place it on the side of the knitting with a small margin from the edge. Insert the hook into the back wall of the knitted braid, tie it around the rope, continue tying in this way until the last two loops in the row.
At the end, at 19, knit the loop twice, and at 20, five times with a sharp turn of the rope, so that you can then turn the entire knitting and end up with a perfect oval. The thicker/thinner your rope, the more/less additional loops you need to make at the end of the rows at the knitting turn.
Now we insert the hook in the new row into the full edge braid, and not just behind the back wall. In the mirror hole, where there were two stitches in the first row, knit two stitches in the second row in the same way. Then just knit one stitch into one loop as usual. In the last loop, which was the first in the first row, knit two stitches for a smooth transition to the new row.
At the end, it is convenient to hook the hook to the first lifting loop in the first row and again knit 5 single crochets around the rope. Next, the rows are knitted in a spiral, and now loops are added only at the turn - knit 2 loops in each of the 5 columns, those that were made earlier, at each turn of the rope, that is, a total of 10 loops at the turn on each side. On the next row, at the knitting turn, you need to alternate in the previous 5 loops: 2 loops - 1 loop - 2 loops, etc. At the next turn, you don’t have to add anything.
As soon as the required size of the bottom of the bag is knitted (26*9 cm), adding loops at the turns stops. Now you just need to knit 1 stitch per loop, however, slightly turning the rope on its side so that the walls of the future bag begin to “grow”.
The number of columns (66 pieces) will no longer change - it must be even. Continue knitting row after row (about 11-12 rows, sides approximately 17 cm long) to complete the base of the bag.
All that remains is to knit the handles. For the armhole you need 12 loops. Find side loops on both sides so that there are 33 loops between them, then isolate 12 in the middle on one side and the other.
Now you need to knit a series of stitches, reaching the marker. No loops are knitted where the markers are! The handles are knitted as follows: lift the rope, forming a handle, and simply tie the rope around with twine (18 loops - the same number should be in the second handle), reaching the second marker in the row.
Tie the rope back to the canvas after the second marker. Knit to the markers on the other side and repeat the procedure with tying and skipping stitches. On the second round, so that everything looks even, make a decrease on the handles, in the corners: knit two loops (one related to the fabric, the second to the handle) into one.
Finish knitting exactly where the fittings will be sewn. Cut the rope and continue knitting it to hide it in the knitting. After this, on the last row, switch to tying with connecting stitches. This will give the edge a finished and neat look.
At the end, it is advisable to thoroughly steam the finished product, then sew on the fittings (optional). Cool jute bag is ready!
For more information on how to knit a jute bag, see the video below:
How to knit a bag from knitted yarn or jute
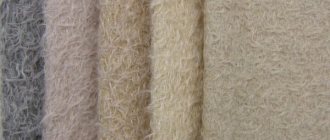
Large knitted yarns are made from different fabric compositions, cut into thin strips, and then twisted into threads.
Uniform tubes 4-8 cm thick have no knots, so they fit well when weaving. From this material you can knit different models, for example, beach, business, shopper or loaf. They are strong, dense, and do not require lining. You can make a bag from knitted yarn by crocheting or knitting.
Knitted bag
Twine bags are knitted in a similar way, but this material is much stiffer, so the craftswoman’s hands get tired quickly. But the result is worth the effort and patience.
Making a model from twine on knitting needles is quite simple. To knit a rectangular handbag with a bottom and a shoulder strap, measuring 25*45 cm, you will need:
- 80 grams of jute twine (3-4 skeins);
- hook No. 3;
- lightning;
- elements for decoration and fasteners for handles.
How to knit a twine bag:
- To get a length of 25 cm, you need to cast on 20 chain stitches and knit 30 rows with a single crochet. The result will be a bottom with dimensions of 25*16 cm.
- For the front and back walls you need to cast on 35 loops and knit 56 rows according to the chosen pattern.
- After that, fasten all the parts with monofilament. You will get an elongated rectangular product over the shoulder.
- You can use voluminous or relief patterns: arans, braids, decorate a simple knitting with ribbons, beads, stones or embroidery.
Jute twine bag
A satin ribbon bag is knitted in the same way. For knitting, a combined satin-organza ribbon 1-3 cm wide is used: the size and density of the yarn depends on the width. To make a small handbag measuring 23*28 cm with two handles, you need 100-120 m of tape, 1.5 cm wide, hook No. 5, zipper, 0.5 m of regillin.
- First, the bottom of the bag is done. An oval is knitted from a chain of 12 air loops. Then - the front and back round parts with the top cut off.
- We knit a crossbar along the contour, which maintains its shape. Before assembly, you need to steam all elements.
- A handle 18 cm long is knitted with a “cancerous tract” pattern.
Environmentalists will definitely appreciate a handbag made from trash bags. To do this, they are cut crosswise and fastened into a single thread. Knitting is done with crochet. Such an unconventional item is not so different from others in its creation, but it lasts longer, is easy to wash, does not deform and retains color.
Fashionable round handbag crochet
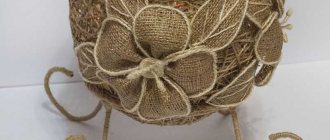
The handbag is knitted from jute, the parts are mounted on a frame that holds the ideal shape of the bag.
To work you need to prepare:
- white or milky jute yarn - 2.5 skeins;
- knitted yarn in the color of jute – 1 skein;
- “Iris” threads in three colors for making a keychain – 3 skeins;
- elements for decoration (optional) – shells, beads, beads;
- hook No. 4;
- round rigid blanks, for example, wooden, Ø 20 cm - 2 pcs.;
- felt for lining, thickness - optional, color does not matter;
- carabiners in bronze, gold or silver – 3 pcs.;
- plastic zipper – length 18 cm.
Description
Circles
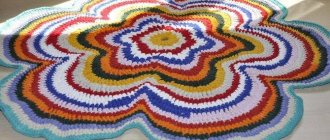
Let's start with circles. You need to knit 2 of them. We knit according to the pattern up to a diameter of 20 cm. During the knitting process, make test fittings to the wooden circle. The finished knitted piece should be slightly larger than the wooden one. If at the end of the pattern you do not reach the desired size, knit another half of the last row.
As the diagram is completed, it is possible to deviate from it arbitrarily if this improves the shape of the part.
It is convenient to mark the beginning of a row with a marker or use a pin as a marker.
Iron the knitted circles with a steamer.
We cut out round linings from felt. We use wooden blanks as a template for marking.
We assemble a “sandwich” from circles - knitted, wooden, felt. It turns out to be a fairly rigid structure. In it, the knitted part is perfectly fixed, aligned and retains its shape.
Assembly
To knit the base of the handbag, we will make a chain of VP equal to the number of stitches in the last row. circle. We tie the sc. We make the width at our discretion. In this case, we provide a hole in the center for the zipper, equal in length to it. To do this, we do not knit a row in this place; instead, we make a chain of VP. In the next row we knit a sc along this chain.
Steam the finished side-ring. Then, using a thin hook, we connect the side panel with the round bases. We insert the hook into three loops, knitting a loop from them. As you work, periodically make decreases as needed. We get the original base of the handbag!
Sew in the zipper using a thick needle. We make the stitches almost next to the teeth, but so that the zipper can be unfastened/fastened freely.
Pen
The handle for this model is long. When calculating the required length of the handle, keep in mind that it will be secured through a carabiner; accordingly, its total length will increase by 5 cm x 2 = 10 cm. The approximate estimated length of the handle is 120 cm + 10 cm = 130 cm. Keep in mind that the handle will stretch under the weight of the bag.
The method of knitting a handle can be very different:
- Tunisian knitting;
- turning rows RLS;
- caterpillar cord.
We thread the knitted handle into a carabiner, pull it up by 5 cm and fix it with several stitches using yarn or regular threads to match. We attach the carabiner to a bag or a half ring, as in the photo above.
Decoration
We make tassels from “iris”. You can determine their color and quantity as desired.
The bag is ready!
How to knit a bag with knitting needles
Tip for beginner needlewomen: circular knitting needles will avoid seams. Knitting patterns are widely distributed on the Internet: both with descriptions and laconic graphic ones. We will share with you a detailed diagram from Stephanie Hanisch’s book “Stylish Handbags. The best patterns for knitting."
How to knit a bag with knitting needles
How to knit a round bag
To create a round string bag from thin yarn (250 m/g), you need a No. 2 or No. 3 hook and a skein of thread. You can make a string bag in a classic diamond pattern or make a mesh of cross air loops.
How to knit a round bag
The simplest shopping bag can be crocheted in a couple of hours. This knitting does not require special patterns or decorations. It is better to start work from the bottom. A chain of 20 air loops can be used to knit a bag with a width of 30 cm and above.
A beach bag will look especially good in bright colors and large sizes. Like a shopper, it must hold a lot of things and withstand a lot of weight. For such models, it is best to choose artificial threads that are easy to wash and do not deform from weight.
A small marshmallow bag, distinguished by its splendor of shape thanks to the knitting from thick knitted yarn, can be a very fashionable accessory. Such models are in harmony with everyday and evening looks.
Marshmallow bag
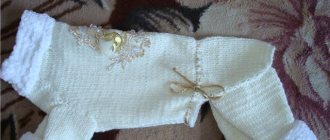
Even a needlewoman who is just beginning to get acquainted with the art of knitting can make a bag. The peculiarity of this model is its shapelessness. This is a small bag with handles. This style does not require knitting the bottom: you can simply sew two knitted rectangles and add handles to them, or knit a circle and gather it on top with a rope, adding two handles.
You can quickly make an accessory for a child for a fancy dress costume or for playing with a doll using knitting needles or crochet. Just choose a style and reduce the number of loops.