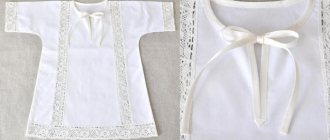
Today, there are a lot of children's events that are celebrated in the Slavic style. Maslenitsa, New Year, farewell to autumn and many others. Children must be dressed in national costumes. If your son is invited to such a celebration, he will need to dress in traditional clothing, including a special shirt. Sewing a shirt for a boy with your own hands is very simple.
A kosovorotka is a piece of clothing that was worn both on weekdays and on holidays in Rus'. It got its name because of the peculiar location of the collar - on the side of the neck. This cut was invented so that the pectoral cross would not fall out during work. The shirt was not tucked into the trousers, but was belted in a special way. Such shirts were made from satin, silk or linen. The edges of the sleeves and the bottom of the shirt were embroidered with woven patterns. Thanks to the photo guide below, you can easily create this element of Russian folk clothing.
The history of a men's shirt with an oblique collar
The name of the product comes from the word “oblique collar,” that is, not sewn straight, but obliquely. Previously, shirts were made exclusively from hemp fabric, although modern ones can be made from any fabric, preferably natural - cotton, linen. The kosovorotka was worn as underwear, outerwear, decorated with tassels and belts and used as festive outfits.
Men's shirt
Note! The pattern of a Slavic men's shirt is so simple that even a beginner can make it. It is enough to take the correct measurements.
Today, this type of product is used both in everyday life and on national holidays. The main advantage of the shirt is its convenience. It is loose-fitting, not fitted, so it does not restrict movement. It is for this reason that back in 1880, the kosovorotka served as a soldier’s uniform.
Initially, the collar was cut in a straight line, not on an oblique. But later they decided to move it to the side so that the pectoral cross would not fall out during work and bending (according to historical data). Since then, the name kosovorotka came to be, and the style of the shirt has survived to this day and is very popular among people, regardless of age and gender.
Nowadays, the classic shirt pattern is used for sewing many products: sundresses, women's and men's shirts, underwear, pajamas or Ukrainian embroidered shirts. Based on it, you can even sew women's nightgowns from satin or silk.
Slavic shirt
How to sew a Russian shirt for men: essential elements of the traditional cut of a kosovorotka
How to sew a Russian men's shirt: essential elements of the traditional cut of a kosovorotka
Modern fashion is increasingly in demand for the Slavic style of clothing. The main element of the wardrobe in this style is the Russian folk shirt, the oldest in origin and a particularly symbolic outfit. Its later version, the men's blouse, appeared in the 15th century and became popular in the 19th century, displacing previous styles.
The shirt was worn by men, women, and children. In ancient times, it was the same for everyone, only men's - to the knee, women's - to the floor, children's - below the knees. It was belted and held up, ensuring freedom of movement.
Measurements for sewing a shirt
To sew a men's shirt yourself, you first need to make a pattern, but to do this you need to take measurements:
- back width;
- sleeve length (to measure correctly, bend your elbow and place a centimeter from your neck over your shoulder and elbow);
- hip girth;
- head circumference (to cut the neckline correctly);
- length of the product.
How to take measurements
You can add a few centimeters to all measurements, because a folk shirt should fit freely.
Taking measurements
Recreating an entire image in the Old Slavonic, traditional style is possible with the help of one blouse. Sewing exclusive clothes with your own hands is not easy, but it’s worth it. After selecting the fabric and braid, get ready to take measurements. The pattern for a boy's shirt has a similar pattern to that for an adult man. But each product has its own characteristics. The difference lies in the size of the shirt.
The shirt pattern will fit on 1 x 1.3 meter fabric. Suitable parameters are shown in the table.
| Width(cm) | Product length(cm) | Sleeve length(cm) | Neck (cm) |
| 38 + 2 for seams | 50 + 8 per hem | 34 + 8 per hem | 32 + 2 for seams |
Cutting and elements
The Russian shirt, the pattern of which is presented below, is sewn in several stages: taking measurements, cutting, sewing. Before sewing, you need to cut out all the elements of the shirt. They are all rectangular, so no difficulties should arise. It is enough to calculate the width and length of the products:
Decorative elements are used to decorate the product: it can be a ribbon, braid, embroidery, a belt with tassels, etc.
Elements
In addition to the classic method of cutting a shirt, where all the elements are rectangles and squares, there is another way to sew a product of this type. The main difference is that in the first version the main part is cut out as a solid rectangular cut, and in the second - in two parts - the back and the front. As a result, the product will be the same, only there will be an additional seam from the neck to the sleeve. The differences can be seen in the picture below.
The second version of the shirt cut
For those new to sewing, it is recommended to first draw a pattern on paper and then cut it out of fabric. Experienced craftsmen can immediately transfer everything onto the canvas and cut out parts for stitching. Unlike other products, the Russian shirt has no darts and the style is quite loose, so it can be sewn oversized, that is, one size at a time. When wearing, you can tie the shirt with a belt, which will emphasize the waist, and the product will fit your figure and not look baggy.
Main part
The standard pattern for a shirt for a man is size 54 - it needs to be drawn from the main part. The base (this is the base of the shirt, it is sometimes called the body) - it is cut into a rectangle measuring 2 times the length of the product. To do this, first measure the height of a man or boy, transfer it to fabric folded in half, and cut out the main part.
Stanovina
The main panel should correspond to the width and length of the future shirt. According to the classics, the width should be 36 cm, because this is exactly the width of the homespun fabrics used to make clothes. The rest of the volume is added by the side panels.
Attention! When taking measurements, you need to add 2-3 centimeters to the resulting numbers for seam allowances.
Sleeve pattern
The braided shirt, the pattern of which is made almost the same for men and boys, has several features when cutting out the sleeves. Unlike a regular shirt, the sleeve pattern also looks like a rectangle, like the frame.
Barrels (side panels) are calculated according to the formula: you need to subtract the length of the armhole from the length of the side seam. As a standard, they take 1 meter for the average width of the product, but if the customer wants a more fitted option, then the shirt is cut out according to individual measurements.
When cutting out sleeves, it is important not to forget about the gusset. These are underarm inserts. Typically they are cut out in the form of a square, approximately 15 × 15 cm or 20 × 20 cm.
The gusset is not the most important element of the shirt and you can do without it. But its presence is considered a sign of the quality of a good product. The gusset can be triangular, square, or diamond-shaped and serves to strengthen the side seam connecting the front and back. Beginners who are sewing a shirt for the first time can avoid focusing on the gusset and sew the product without it.
The width of the sleeve should be equal to the width of the frame and be equal to 36 cm. But the length is determined individually. The sleeve can be short, to the elbow, 2/4 or completely long.
Neck
You can use any braid for the neckline. To make the product look elegant, you can sew on an embroidered border. Before sewing the barrels, you need to process the clasp of the shirt. The collar itself is sewn in after all the details have been stitched, that is, at the very end.
Sleeve cuff - pattern
The cuffs are cut out as desired, depending on the intended model. The sleeves can be left loose or the cuffs can be cut to fit around the wrist. Another option: elastic at the edge of the sleeve.
Master class on cutting and sewing cuffs:
- A cuff is cut out (4 pcs.).
- To compact it, you can use non-woven fabric, which is ironed on the inside of the mantege.
- Next, 2 parts are applied face to face and basted with stitches, ironed and sewn on with a machine, not finishing 1 cm so that the part can be turned out.
- The length of the sleeve at the bottom and the length of the cuff must match. Due to the loose cut of the shirt, the sleeve according to the pattern will be wide, so it can be adjusted using one-sided folds.
Cuffs
Fabric selection
The quality of the fabric previously differed depending on the class. The main materials used were linen, cotton, satin and silk. If you want your shirt to look like a real one, then it is better to choose thick and durable linen. And if you take white cotton, the clothes will have a festive look. Please be aware that pure white will show up with slightly blue undertones in photographs. Therefore, it is better to take beige fabrics. But blue, red, yellow and other shades are also found in socks. The choice is yours.
The number of decorative ribbons is not limited. The gate must be decorated. But the sleeves and hem are optional. You can apply the pattern separately to the elbows or choose several options for ribbons for the entire shirt.
If you have all the necessary materials at home, then after reading the article, sewing will take about 5 hours.
Product assembly for men and boys
Once all the pieces are cut out of the fabric, you can begin assembling the shirt. It consists of several steps:
- The side panels are sewn to the frame. It is initially a rectangular piece of fabric, two lengths of the future product. You need to fold it in half, find the middle and cut out the neck.
- The next step is to sew the sleeves, not forgetting to leave room for the gusset in the armpit area. The base is sewn onto them, after which the sleeves are attached to the side panels, and a gusset insert is sewn in.
- The neckline can be turned up and stitched or finished with bias tape. Often, red or blue braid is used to decorate the product. The sleeves and bottom of the product were treated with the same braid.
Features of a DIY men's shirt pattern
Embroidery style
nki is extremely simple (Figure 1).
And since this is festive clothing, it can be sewn not only from fine linen and chintz, but also from cambric.
Embroidery can be done both on the details of the product (front, collar, bottom of the sleeves or on the cuffs) and on special fabric and then connected to the details of the product.
Attention! The sequence of work depends on whether the embroidery will be done directly on the shelf or you use a ready-made embroidered border.
If embroidery is done directly on the shelf , then it must be done before cutting begins and the sequence of work will be as follows:
If you are using an embroidered finished border , then we start by making patterns, then we carry out cutting and sewing.
An embroidered shirt must be cut with a side seam, since the use of a non-stop shirt sleeve presupposes its presence (read about a non-stop sleeve in the article “How to baste a sleeve” and a master class on the topic of tucking in a sleeve, as well as “How to process a vent”).
Shirt cutting options
Seam allowances for all options are normal: shoulder, side – 1 cm;
armhole, neckline, sprout, hem - beyond the outline line of the pattern; along the bottom - 2 cm. Collar and cuffs - rectangles of appropriate length. The width is calculated as follows: Double the width of the finished part + two seam allowances (1 cm each).
So, the economic layout is with a middle seam along the back (Figure 1).
The fabric is folded in half, the edges are aligned and placed parallel to the edge of the table.
The parts are stacked in the most economical way.
The disadvantage lies precisely in the middle seam of the back, since a straight seam greatly impairs the fit of the product and is the “weakest” point of the shirt.
Expect your embroidered shirt to tear here.
To correct the lack of fit of the middle seam, you can use the design proposed in Figure 3. The middle seam is marked as in men's jackets and blazers.
To do this, we find the level of the shoulder blades (1/3 up from the armhole) and the level of the waist (midway between the level of the armhole and the bottom).
At the waist level we retreat 2 cm and smoothly connect the resulting point with the level of the shoulder blades and a straight line with the bottom.
I note that
It is difficult for those with large sizes to avoid economic layout, therefore, before purchasing fabric, make patterns and lay them out, taking into account all allowances and the width of the fabric, in order to calculate the consumption.
The next option is a two-step layout (Figure 2)
First, the front and back are cut out, and then the sleeve and small details.
This option is ideal for small to medium sizes.
In this case, the back is cut out without a middle seam, that is, the back pattern is placed on the fold of the fabric.
Considering that the shelf cannot have a middle seam or a fastener to the bottom, it should also be laid on the fold.
The fabric folding pattern is shown in the bottom "bubble".
After the front and back are cut out, fold the fabric in half along the width of the sleeve. The diagram is in the upper “bubble”.
Finally, we cut out two cuffs and a collar from the leftover pieces.
Cutting option for figures with a beer belly (Figure 3).
It must be said that the use of the option with gathering under an embroidered insert is quite narrow (Figure 4 - finished product).
It is important to note that for such figures, the pattern size is selected based on the volume of the chest above the stomach, and the difference between Cr and St is added to the belly allowance.
It is also possible that the shelf will have to be lengthened by the difference between Ds and Dpt (see “Taking measurements”).
The layout in this case can be either with or without a middle back seam.
And the last option: if the front and back do not extend across the width of the fabric (Figure 5)
Fold the fabric in half along the width of the shelf.
Fold the fabric in half the width of the back. Cut out the back.
Fabric folding diagram at the bottom of the picture. Then we fold the fabric along the transverse thread, which is
started in Fig. 5 with a green dotted line and cut out the sleeves. The leftovers include collar and cuffs.
Making a braid
A shirt with a slanted collar is not only festive, but also everyday work wear, which is why it should not hinder movement. Therefore, a loose, non-tight fit is preferable. The oblique collar prevented the pectoral cross from falling out when tilted; this feature gave the name to the shirt - kosovorotka.
Patterning a blouse for a man or boy, further sewing and finishing will become an interesting experience for you in creating a folk costume. The simplicity of the kosovorotka does not require any special sewing skills. It is enough to have an initial level of knowledge about cutting clothes and sewing.
There were and remain five main elements of the kosovorotka. This is how the Russian folk men's shirt was created, the pattern was simple:
– Tulovo (stanovina). The main, largest element. - Sleeves. According to the rules, they are cut in a rectangular shape. In traditional tailoring, the rectangular cut of the blouse elements saved fabric: there were no scraps, with the exception of the collar cutout (it was left for patches). - Barrel. Side insert. Two side panels increased the circular volume of clothing to the desired size. The peasant weaving mill did not allow weaving fabric wider than 50-80 centimeters. This was not enough for the width of the shirt. Therefore, the peasant women supplemented the missing width with side inserts. - Gusset. The underarm insert prevented clothes from riding up when raising your arms up during everyday work. – Decorative elements. A spacer connected the sleeve and body. At the same time as the embroidered collar, it was part of the embroidery. The collar, if present, was also trimmed with ornamental embroidery. There are two options for finishing the collar of a shirt: a stand-up collar or without a collar (hollow neck).
Creating a braided shirt with your own hands begins with cutting. As we clarified, all the details of the shirt are rectangles. To start cutting, we calculate the main parameters - the length and width of each part of the shirt:
- Calculate the length of the body based on height. The canvas is cut in one piece, the so-called wall. Measure the wall to 2 lengths of the product.
- Measure the length of the barrels according to the following scheme: from the length of the shirt, subtract the length of the sleeve opening - the armhole. The width of the side element depends on the overall width of the body. It roughly looks like this: the wider the frame, the narrower the side. Everything is individually sized. On average, with a frame width of 40 centimeters, the width of the barrel will be 60 centimeters.
- Cut the sleeve 65 centimeters wide with an armhole of 30-32 centimeters. Calculate sleeve length like this: subtract shoulder width from arm length.
- The gusset is cut out as a square. The width of the side of the fabric square is approximately 15-20 centimeters.
Next we will tell you how to sew a Russian folk shirt:
- First of all, you take the main element of the shirt - the frame. Fold a piece of fabric in half. At the fold, cut out the neckline symmetrically. Calculate the width of the neck based on the volume of the child's head. Leave a margin of 2.5 centimeters for the spacer. And you sweep away the frame with a couple of barrels.
- Then sew the sleeves lengthwise. At the stitched end of the sleeves, leave small working edges for attaching the edges of the gussets.
- Sew the sleeves and body. Then sew in the gussets. If you have planned a shirt with a beautiful spacer where the sleeves and the frame are sewn together, attach the spacers. You can decorate this element with embroidery or scarlet fabric.
That's it, the draft version of the shirt with a slanted collar is ready. Now you know how to sew a shirt for a boy. All that remains is to decorate the clothes in accordance with Russian traditions.
Neck
A piece of 40 x 8 cm is cut out, the edges of which are folded with a centimeter and smoothed with an iron. For a tighter fastening, after folding, the strips are ironed again. Next, it is best to sew the neckline to the neckline by hand, and then sew it on a machine. Now the stand-up collar is ready!
In addition, there is an option when sewing a shirt begins with processing the fastener, that is, before sewing the shoulder seams. The process is similar to sewing a set-in trim. Start working by marking the front side of the shelf. You need to distribute the placket on a flat surface and step back from the left shoulder seam by 2-3 cm. The indentation depends not only on the size of the children's shirt, but also on the width of the placket itself. The length in this case is the same: 15–18 cm. If in doubt, measure the circumference of the head horizontally, taking the back of the head and drawing a centimeter along the eyebrows.
Sewing the collar in this version remains the last operation in sewing a shirt.
We complement the shirt with accessories
A traditional Russian kosovorotka sewn by you will decorate an adult or child at a festival, concert or children's party. Sewing a Russian shirt for a boy and then adding some color to the look is a great idea. Therefore, decorate your shirt and make it a bright element of your stage image:
- Process and decorate the gate post (neck). Use wide braid with ornaments, satin, trim, and bright fabric inserts.
- Hem a thick lining under the set-in placket. You decorate the set-in strip itself according to the example of the collar trim.
- Use shanked buttons or hooks as fasteners. Their number depends on the tailor’s imagination. The fasteners can be located along the set-in placket or only on the stand-up collar. For a children's shirt, you can sew Velcro as a fastener.
- We frame the ends of the sleeves with small folds outward, no more than 1 centimeter wide. To trim the bottom edge of the sleeves, use the same component as for decorating the collar.
- Hem the hem. Decorate it with a wide braid, spacers decorated with embroidered patterns, or a bright strip of fabric.
An important element of the national costume is the belt. You can weave it with oblique weaving in several rows of thick woolen threads. Or sew it from fabric and decorate it with wide braid or trim.
A headdress - a cap or cap - can be an addition to the folklore image.
Men's shirts in modern times (XVIII-XIX centuries)
From the unusual royal and boyar shirts of the 17th century, let's move on to the clothing of the Old Believers in modern times. First of all, it is worth saying that the cut of a men’s shirt surprisingly remained virtually unchanged structurally until the 20th century. It remained similar for different segments of the population and classes, differing only in fabric and richness of decoration.
We have very little information about peasant and Old Believer shirts in the 18th century. The only interesting mentions are those related to color. Thus, the Polish Council of 1752, in article 41, prohibits young men from wearing red shirts.
It is curious that among the Old Believers “Poles” and “masons” of Altai, a tunic-like cut with seams and a square neckline with a side slit was preserved (Fig. 21, 22). These shirts are distinguished by an abundance of embroidery in different techniques - understitch, tambour, dosyul and cast-on stitches.
Rice. 21. Shirt of Altai Poles
Figure 22. Shirt of Altai masons
- Options for hemming trousers manually and using a machine
In the 19th century, in the Ural factories, a naked shirt with a round neckline and a side slit, made of calico or silk (for a festive item), or “svoedelshchina” (self-woven material used for everyday wear), was typical of the Old Believer population. The collar and cut, as a rule, were decorated with a soutache gold “gasnik” cord, characteristic of the wealthy population, notes N.S. Popov, member of the Russian Economic Society in 1804. This technique comes from men's clothing of the 17th-18th centuries. Gasnik held cast round buttons. In some cases, the blanker and buttons could be gold, but most often they were bronze or silver (Fig. 23). In the second half of the 19th century, bare necks almost completely replaced shirts with a stand-up collar.
Fig. 23. Men's silk tunic-shaped shirt of a resident of the Ural factories of the 19th century. Reconstruction
Among the old-timers of the Perm region and Komi-Permyaks, there is a cut of a men's shirt with wedges at the back, reminiscent of the cut of shirts of the 15-17th centuries (Fig. 24, 25). They are also decorated with an abundance of woven patterns and rounded embroidery on the collar using the set technique and have a stand. Shirts of a similar type were in use at the end of the 19th century among the Baltic Pomeranians. They were distinguished only by the straightness of the lines, which can be explained by the entry into fashion of jackets (Fig. 26). The appearance of shirts with an oblique placket at the beginning of the 20th century, which also took place among the Old Believers (Fig. 27, 28), can be explained in the same way.
Figure 24. Complex of Perm old-timers. Front view. Reconstruction Fig. 25. Complex of Perm old-timers. Back view. Reconstruction Fig. 26. Baltic Pomeranians, late 19th century Fig. 27. Shirt with bias placket. S. Golubkovskoe, Alapaevsky district, Sverdlovsk region Fig. 28. Silk shirt with a braid, a placket and a pocket for a watch. Beginning of the 20th century. The village of Koptelovo, Alapaevsky district, Sverdlovsk region
We looked at the most exotic shirts, and it is worth saying that most of the existing shirts had a straight tunic-like cut with a side placket and a stand-up collar. Everyday ones were made from motley (checkered fabric) (Fig. 29) or unpainted canvas, while holiday ones were made from purchased material, white thin canvas, decorated with embroidery (Fig. 30).
Fig. 29. Casual motley shirt with a tunic cut, early 20th century. Rezhevsky Historical Museum Fig. 30. Festive shirt with embroidery using satin stitch technique. Beginning of the 20th century. Nizhne-Sinyachikha Museum-Reserve
Subsequently, the cut begins to change. By the end of the 19th century, shirts with yokes appeared (Fig. 31), formed under the influence of urban fashion and neo-Russian style. In the same era, in the urban environment and among the intelligentsia, wearing a blouse became a symbol of dissent and sometimes of belonging to revolutionary ideas.
Fig. 31. Siberian peasant caretaker in a shirt on a kokekt. 1890
Prayer shirts were designed as a separate type of clothing, gradually becoming monochromatic, made from homemade items or from rich purchased materials (depending on agreement), sometimes they were similar to holiday ones (Fig. 32) . And along with fashion, their cut also changed. Today we have in use both shirts of the old tunic-like cut and shirts of the new urban cut with set-in sleeves.
Fig. 32. Prayer shirt from the village. Zakharovo, Perm region. Popovtsy. Early 20th century
We complete the image - apply makeup
So, you are preparing a costume for a holiday or concert performance. At the same time, you can brightly complement the folklore image. This is easy to do with the help of special paints - face painting or regular theatrical makeup.
Theatrical makeup is made on a fat basis - lanolin, Vaseline, beeswax. To create a children's image in a folklore style, face painting is better suited. Its water-based paints are safe for children's skin. You can remove face painting with plain water. Whereas theatrical makeup is removed from the face using special means.
As a rule, folk makeup involves a bright blush on the cheeks and large orange freckles. You can line your eyes and lips a little for expressiveness. The main thing is to know moderation in everything.
The shirt is sewn, the cap is twisted at the back of the head, folk makeup is applied. Now the image is ready!
How to sew a children's shirt
how to sew a children's shirt
I present to your attention a master class on how to sew a children's folk shirt. I am sewing it using a slightly simplified pattern compared to the traditional men's shirt pattern.
shirt pattern
I don’t specifically give dimensions on the pattern, because... They are different for children.
Materials we will need:
Manufacturing technology:
- Central panel – 1 piece with weft fold
- gussets – 2 parts
- sleeves – 2 parts
- On the central panel, starting from the fold in the middle, I outline a neckline.
- (If you plan to do hand embroidery, it is best to do it before cutting out the neckline)
I make at least 12 cuts at the neck! cm. Before making a cut, I finish it with a zig-zag stitch on a sewing machine.
from the edge of the neck down, and retreating 2mm back up.
Finish the cut at the neckline with tape. Finish the neck of the shirt with trim.
Sew the seams of the sleeves, finish the bottom of the sleeves with a closed hem seam. Finish the bottom of the shirt with a closed hem seam.
- At the neckline, make a fastener made of a thread loop and a button.
- Perform WTO (wet heat treatment) of seams at each stage.
If the material was useful to you, share it using the buttons at the bottom of the article. Thank you!
DIY Russian folk shirt for a boy:
The pattern is very simple, so you can cut it directly on the fabric or first draw it on a newspaper. Just be sure to allow for seam allowances and hem allowances for the sleeves and bottom of the shirt.
After cutting we have: One main part, two sleeves and two gussets. We start sewing from the sleeves. We attach a gusset to the edge of the sleeve. Now we attach the sleeve with a stitched gusset to the main part of the shirt and sew it on by machine. To prevent the fabric from moving out of the sleeve, we first secure it with needles or sew it with a “forward needle” seam. After this, fold the shirt as in the picture and sew the sleeve and gusset.
We also sew the side part of the main part.
Sew the second sleeve in the same way. We process the seams using an overlog or manually.
We bend the edges of the sleeves and the bottom of the shirt.
Iron and stitch.
The braid is almost ready. It remains to process the neck and clasp on the left side. This is a small, but troublesome and delicate job.
Shirt for a boy: pattern
Graph paper or newspaper are perfect for making such a shirt. The shirt pattern is usually placed directly on the fabric, since it is classified as a simple level. Decorative material is used in sewing: a wide braid in a traditional style - 1.1 m, an even narrow one - 0.1 m, two buttons or a Velcro fastener - 0.1 m, threads in the color of the shirt and additional sewing accessories. You can also use an embroidered border for finishing.
Shirt neck
Let's start with the clasp. The length of the fastener is 15 cm. To process it, cut out two rectangles. One is 20 x 5.5 cm. The second is wider 20 x 10 cm.
We sew a narrow strip on the left side (the left side if you look at the photo).
We wrap it inside the shirt.
We sew a wide strip to the right edge of the neckline (to the right, if you look at the photo. If you put the shirt on yourself, this will be the left side). The linden will be attached to it.
We fold the wide strip in half and wrap it inside the shirt.
We secure all the parts with an external seam. Now let's process the neck - the stand. Cut out a piece 8 x 40 cm. Fold the edges 1 cm and iron them.
Fold it in half and iron it again.
Using a hand stitch “forward with a needle” we sew the stand to the neck. Let's stitch it on the machine. The stand-up collar for a shirt in the Russian style is ready. At this stage, the braid looks like this. All that remains is to decorate the shirt with a ribbon with a Russian pattern. If there are any unevenness, the tape will hide it. Sew linden onto the inside of the fastener. For the belt, cut out a piece 8 x 90 cm. Combine it with a wide ribbon. Let's stitch. My belt is short because it fastens with a hook. If you tie it, make it at least 120 cm. The result should be a Russian folk shirt, a blouse for a boy, sewn with your own hands.
Selecting a scheme
For example, let’s take a seven-year-old boy and sew a shirt for him. As a basis, you can take the pattern of a blouse for an adult man. We take the child’s sizes, replace them with the sizes of an adult shirt and get this diagram:
A Russian folk shirt can be sewn quite quickly using this pattern. Even if you rarely sit down at a sewing machine or have never tried to sew, you can still succeed. It will take you approximately five hours to complete the entire work.
Don’t be alarmed by the amount of time you spend working – you can sew a blouse in two (maximum three) evenings.
We adjust the pattern to the desired size. To do this, you need to write down the measurements from the resulting diagram in the second photo like this:
- shirt width – 38 cm + 2 cm for seams;
- sleeve length – 34 cm + 8 cm for hem;
- shirt length – 50 cm + 8 cm for hem;
- neck – 32 cm + 2 cm for seams.
Materials for sewing a shirt:
- fabric: satin, linen or cotton - 1 x 1.2 m;
- decorative braid - 1.10 m wide and 1.10 m - narrow;
- Velcro fastener - 10 cm;
- threads matching the color;
- sewing supplies: scissors, seam ripper, ruler, pins and so on.
Making a braid
A shirt with a slanted collar is not only festive, but also everyday work wear, which is why it should not hinder movement. Therefore, a loose, non-tight fit is preferable. The oblique collar prevented the pectoral cross from falling out when tilted; this feature gave the name to the shirt - kosovorotka.
Patterning a blouse for a man or boy, further sewing and finishing will become an interesting experience for you in creating a folk costume. The simplicity of the kosovorotka does not require any special sewing skills. It is enough to have an initial level of knowledge about cutting clothes and sewing.
There were and remain five main elements of the kosovorotka. This is how the Russian folk men's shirt was created, the pattern was simple:
– Tulovo (stanovina). The main, largest element. - Sleeves. According to the rules, they are cut in a rectangular shape. In traditional tailoring, the rectangular cut of the blouse elements saved fabric: there were no scraps, with the exception of the collar cutout (it was left for patches). - Barrel. Side insert. Two side panels increased the circular volume of clothing to the desired size. The peasant weaving mill did not allow weaving fabric wider than 50-80 centimeters. This was not enough for the width of the shirt. Therefore, the peasant women supplemented the missing width with side inserts. - Gusset. The underarm insert prevented clothes from riding up when raising your arms up during everyday work. – Decorative elements. A spacer connected the sleeve and body. At the same time as the embroidered collar, it was part of the embroidery. The collar, if present, was also trimmed with ornamental embroidery. There are two options for finishing the collar of a shirt: a stand-up collar or without a collar (hollow neck).
Creating a braided shirt with your own hands begins with cutting. As we clarified, all the details of the shirt are rectangles. To start cutting, we calculate the main parameters - the length and width of each part of the shirt:
- Calculate the length of the body based on height. The canvas is cut in one piece, the so-called wall. Measure the wall to 2 lengths of the product.
- Measure the length of the barrels according to the following scheme: from the length of the shirt, subtract the length of the sleeve opening - the armhole. The width of the side element depends on the overall width of the body. It roughly looks like this: the wider the frame, the narrower the side. Everything is individually sized. On average, with a frame width of 40 centimeters, the width of the barrel will be 60 centimeters.
- Cut the sleeve 65 centimeters wide with an armhole of 30-32 centimeters. Calculate sleeve length like this: subtract shoulder width from arm length.
- The gusset is cut out as a square. The width of the side of the fabric square is approximately 15-20 centimeters.
Next we will tell you how to sew a Russian folk shirt:
- First of all, you take the main element of the shirt - the frame. Fold a piece of fabric in half. At the fold, cut out the neckline symmetrically. Calculate the width of the neck based on the volume of the child's head. Leave a margin of 2.5 centimeters for the spacer. And you sweep away the frame with a couple of barrels.
- Then sew the sleeves lengthwise. At the stitched end of the sleeves, leave small working edges for attaching the edges of the gussets.
- Sew the sleeves and body. Then sew in the gussets. If you have planned a shirt with a beautiful spacer where the sleeves and the frame are sewn together, attach the spacers. You can decorate this element with embroidery or scarlet fabric.
That's it, the draft version of the shirt with a slanted collar is ready. Now you know how to sew a shirt for a boy. All that remains is to decorate the clothes in accordance with Russian traditions.
Cut of an ancient shirt
The design of the proto-shirt is the simplest. The fabric panel is folded along the weft, a neckline is cut on the fold, which is subsequently designed without a collar (holoshka) or with a small stand-up (later type), with a bar in the middle of the chest. On the sides of the body, or frame, inserts are made - barrels.
They are necessary for a loose fit. The fabrics woven on chairs were from 40 to 80 cm, which did not allow obtaining the required width of the product. The shortage was compensated for by inserts.
The sleeves were cut straight. Under the arm they were connected to the frame and barrels with a square gusset. The gusset provided comfort in movement: if you raise your hand, the whole shirt will not be pulled behind it.
The cutting and sewing process was regulated by rules. The main thing concerned the gate. When cutting out the neck, a piece of linen was removed exclusively through the internal space of the product. The seemingly strange movement of the dressmaker was dictated by security considerations.
We complement the shirt with accessories
A traditional Russian kosovorotka sewn by you will decorate an adult or child at a festival, concert or children's party. Sewing a Russian shirt for a boy and then adding some color to the look is a great idea. Therefore, decorate your shirt and make it a bright element of your stage image:
- Process and decorate the gate post (neck). Use wide braid with ornaments, satin, trim, and bright fabric inserts.
- Hem a thick lining under the set-in placket. You decorate the set-in strip itself according to the example of the collar trim.
- Use shanked buttons or hooks as fasteners. Their number depends on the tailor’s imagination. The fasteners can be located along the set-in placket or only on the stand-up collar. For a children's shirt, you can sew Velcro as a fastener.
- We frame the ends of the sleeves with small folds outward, no more than 1 centimeter wide. To trim the bottom edge of the sleeves, use the same component as for decorating the collar.
- Hem the hem. Decorate it with a wide braid, spacers decorated with embroidered patterns, or a bright strip of fabric.
An important element of the national costume is the belt. You can weave it with oblique weaving in several rows of thick woolen threads. Or sew it from fabric and decorate it with wide braid or trim.
A headdress - a cap or cap - can be an addition to the folklore image.
Shirt in folk costume:
Men's shirt and its features
Based on ethnographic data of the 17th-20th centuries, G.S. Maslova there are four main types of men's shirts: 1. Tunic-shaped. 2. With straight edges. 3. With narrow stripes on the shoulders. 4. On the yoke. The tunic cut of a men's shirt is the most ancient cut known to us and at the same time the most common cut. There are two types of tunic-shaped shirt: “with barrels” and “without barrels”. A shirt “with barrels” is formed from a panel of fabric folded along the weft (a collar is cut at the place of the fold); Straight panels are sewn to the central (middle) panel, forming “barrels” and a straight-cut sleeve.
The tunic-shaped shirt “with barrels” has several options:
With straight solid barrels; - with beveled side panels (a later form that embossed a shirt with straight sides); — with barrels cut “clumsily” or “lock-shaped” (in the northern regions); - with side wedges inserted on each side from the back between the middle and side panels, while straight barrels, expanded by inserting wedges, were sewn into the assembly (early 20th century in Altai); - "koloshkoy". The peculiarity of its cut is that the side panels bend over the shoulders in the same way as the central one. It has straight sleeves and a straight cut collar without a collar;
- a tunic-shaped shirt without a barrel made of one folded wide panel. Such shirts were made mainly from factory fabric; a shirt with barrels was made from homespun canvas; Shirts made from one folded piece of canvas. They were made in Transcarpathia and had a specific cut of sleeves sewn into the ruffle. Tunic-shaped shirts were made with a straight or oblique cut on the chest; without a naked collar or with a stand-up collar. The "collar neck" with a straight cut on the chest is considered the most ancient. An oblique cut was made on the left; often the shirt was complemented by a stand-up collar and button closure. Men's shirts were made from homespun canvas, which preserved the natural color of the fibers, so such shirts were necessarily ornamented. Embroidery or weaving patterns were passed down from generation to generation; they were not random. Randomness in ornamentation appeared at the end of the 19th and beginning of the 20th century in places where there was a strong influence of the city (Moscow region). In ancient times, people conveyed their world, their ideas about it, their relationships with the world in a conventional figurative language. This was the first code system invented by man and had a magical meaning for him. As noted by B.A. Rybakov, in the works of the ancients, two principles existed and competed with each other: the more ancient magical one and the aesthetic one that replaced it.
The website “Folk Historical Costume” (narodko.ru) also provides a description of the sewing and cutting of these shirts in more detail. ——————————————————-
We complete the image - apply makeup
So, you are preparing a costume for a holiday or concert performance. At the same time, you can brightly complement the folklore image. This is easy to do with the help of special paints - face painting or regular theatrical makeup.
Theatrical makeup is made on a fat basis - lanolin, Vaseline, beeswax. To create a children's image in a folklore style, face painting is better suited. Its water-based paints are safe for children's skin. You can remove face painting with plain water. Whereas theatrical makeup is removed from the face using special means.
As a rule, folk makeup involves a bright blush on the cheeks and large orange freckles. You can line your eyes and lips a little for expressiveness. The main thing is to know moderation in everything.
The shirt is sewn, the cap is twisted at the back of the head, folk makeup is applied. Now the image is ready!
Russian folk costume for a boy | Clothes for dolls | Clothes for dolls
For work you will need: satin, chintz or linen of two types - red for finishing the collar and fastener and for the gussets and the main one; and buttons for fastening.
How to build a pattern is shown in the drawing:
Operating procedure:
Trousers
For work you will need: linen or thin woolen fabric, plain or striped, and a cord for tying.
How to build a pattern is shown in the drawing:
Operating procedure: