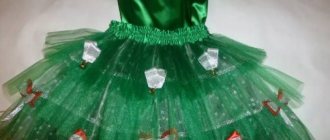
A carnival bunny costume must include long ears and a fluffy round tail!
We suggest you sew a comfortable hat with ears, simple mittens, and a ponytail that can be attached to any clothing.
Required material
Sewing a bunny costume for a boy with your own hands is a fun activity for parents and kids. Initially, you need to completely think through the outfit. It is recommended to first develop a sketch.
Soft fabric is suitable for making. Choose a color from snow-white to grayish-blue. You also need to stock up on satin fabric or fur to make a tail and decorate the ears.
To save time and money, you can use terry pajamas or thermal underwear in the desired color. If the suit is made for a girl, it requires a full satin skirt.
This is interesting: Pattern Costumes for kids
Creative process
The selected workplace should be well lit. The surface must be flat. When making an outfit, it is better to involve a child. This will make the process much more fun. The baby will have a craving for creativity. The child will know that he made the exclusive, festive or New Year's bunny costume himself. At the same time, young children develop fine motor skills. She is responsible for speech, behavior and thinking. Children with whom their parents engage in creative activities develop much faster than their peers. In a costume made with your own hands, the baby will feel much more confident and joyful.
Carnival bunny costume: material, size and how to complement the look
In our project we used felt in three colors: white, as well as some gray and pink.
Felt is thick felt of varying thicknesses. It is great for a variety of crafts, has a smooth edge that does not fray, is flexible and holds its shape well.
In craft stores you can buy felt in rolls or sheets. The most common size is 20x30 cm.
The hat, mittens, and tail are sewn from white felt. For the hat with ears you will need four sheets of white felt, and one sheet each for the mitts and tail. The hat pattern is designed for a head with a girth of 55-56 cm. This size can be suitable for both children, so do adults. If you need a hat for your head with a girth of 53-54 cm, you can cut out the details of the hat without seam allowances. You will also need one sheet of pink and one sheet of light gray felt.
To complement the bunny look, sew or take a ready-made white vest, shirt or golf shirt, and pin the tail with a safety pin to white trousers or a skirt.
So, let's sew a carnival bunny costume!
Printing patterns and cutting
Download the pattern file and print it on A4 sheets. Make sure your printer is set to print mode "actual size", "100%", and not "scale to fit". In the Russian-language program, the option “real size” is possible. Cut out all the pieces.
Cut out the details of the hat with a 1 cm allowance on all sides except the bottom edge. Cut out the ears, cheeks and nose without allowances.
WHITE FELT
- Two mirror parts of both halves of the hat
- Two identical parts of large ears
- Two mirrored cheek details
- Two rectangles for mitts, each of which has a width equal to the circumference of the palm and a length equal to the desired length of the mitts.
- Rectangle for tail 10x24-25 cm
GRAY FELT
- One common detail of cheeks and nose
PINK FELT
- Two identical parts of small ears
- One nose detail
- Two ovals for palms
Progress
Sew pink small ears onto large white ears.
Sew the back parts of the hat. Sew the front parts. Baste the darts, baste the center seam and try on the hat. Once the shape is finalized, close the darts and open the center seam.
Stitch the white cheeks and nose onto the gray backing as shown in the photo.
Stitch the spout piece along the center front of the hat, aligning along the bottom edge.
Pin the ears onto the front piece. Pin the back of the hat on top. Stitch.
Cut out the mitt rectangle as shown in the photo. Cut the second rectangle as a mirror image. Stitch the pink palm detail in the middle of the lower half of the mitts.
Sew the side seam, leaving a thumb hole about 5cm long. Place the seam allowances to the side and baste with a blind stitch. Turn it inside out.
Fold the rectangle for the tail in half and stitch along the bottom edge.
Cut into strips as shown in the photo, not reaching the edge 1 cm.
Roll and staple by hand.
The carnival bunny costume is ready!
Lesson 3. Tail and joining the two halves of the rabbit
We continue our crocheting rabbit . Today I’m showing the third lesson on how to make a ponytail and connect the two halves together. Let me remind you that this is already before the last lesson. And links to all parts of the master class can be found at the end of the publication.
Lesson 3. Tail and joining the two halves of the rabbit
Required materials for the third lesson
Legend
For beginning needlewomen, I have prepared a special publication - Basics of Crochet [patterns and lessons].
Ears
For production you will need:
- soft plush fabric: velor, velvet, plush;
- pink material: satin or satin;
- hair band;
- wire;
- thread and needle;
- glue;
- scissors.
The work of making ears does not require any special skills, but you need to be patient and be careful.
This is interesting: Pattern Tracksuits for children (р 62-176)
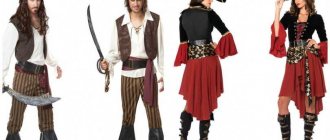
Making a hare costume
First of all, let's define the main elements of character.
- Ears and a tail are a must, without them our character will be unrecognizable.
- As for color, in addition to traditional white, gray, blue, pink are also used, but diluted with snow-white inserts.
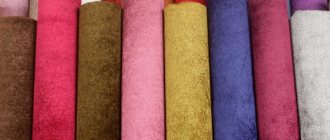
- Another characteristic feature of the hero is softness and fluffiness. This can be achieved using appropriate fabrics (fur, velor, fleece, knitted velvet, etc.)
- The rabbit's favorite treat is carrots. It can be used as an accessory.
Costume base
Let's start sewing a bunny costume with our own hands from the base - a sports kit.
Of course, first it would be a good idea to check your existing wardrobe. Perhaps you will select suitable clothes from those that you already have.
And we will tell you how you can easily and simply sew such a set for a bunny costume with your own hands.
You will need:
- Soft fabric (footer, velor, knitted velvet, fleece). With a canvas width of 150 cm, you will need a cut equal to approximately twice the height of the child
- Fur for finishing, 20 cm
- Threads, needles, scissors
- Sewing machine
- Elastic band, 1 m
- Decorative elements (optional)
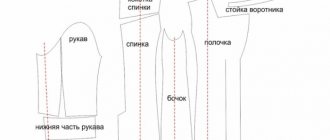
Fold the prepared cut in half. Cut out all the parts for the bunny costume in duplicate with your own hands. The pattern will require the following measurements: chest circumference + 10 cm, hip circumference + 10 cm, trouser length, sleeve length, back length, hood height.
Sewing trousers consists of the following stages:
- Sew the bow-seat seam
- Turn the product inside out and sew the side seams with pockets
- Press the seams
- Tuck up the waist and bottom of the panties
- Insert rubber band
Sewing a hoodie:
- Sew shoulder seams and press
- Connect the sleeves to the main part
- Sew the side seams
- Assemble the hood from two parts, tuck the front edge
- Connect the hood to the armhole
- Process the bottom of the sleeves and the main part
It should look something like this:
A very convenient set for both sports and home entertainment. But, alas, completely different from a festive outfit. So we need to continue working further.
Add long ears and a bib
Prepare four parts according to the template. You can make two of the main tone material and two contrasting ones for the internal surfaces. Gather the ears and baste them to the hood.
The result could be like this. It’s also not very elegant yet.
Let's add a beautiful fur bib. It is better to manually sew it directly onto the blouse.
Much more interesting now.
Let's do the tail and paws
Cut a fur circle of approximately 15-18 cm and tie it with a thread and a needle along the circle line. This will be the tail.
It is better to make rubber pads for the hands; the baby may feel hot in the mittens. Prepare small oval pieces the size of your palm and sew elastic fasteners on the back side, one for the wrist and two for the palm.
Shoes can simply be trimmed with a strip of fur.
Making ears
Ears are an important component of a bunny costume.
Let's find out several ways to make bunny ears with your own hands for boys and girls:
- One of the simplest ways is to cut out ears from thick cardboard. Such ears must be painted, decorated with sparkles, beads, edging made of ribbons or threads and decorated with other materials;
- if you want the ears to bend, use wire and fabric. Make the desired edging for each ear from the wire and wrap it in fabric, carefully sewing in a circle. It is better to attach such ears to a headband, and if you use a hat, it is better to make a stable base on the inside that will not allow the ears to move;
- persistent ears will be made from felt. But you shouldn’t make them flat: bend them slightly in the center of the upper part and sew them with a thread that matches the color;
- You can make miniature bunny ears by tying any fabric into a bow and lifting the two sides up. But the ends of the fabric must be pointed, so take care in advance to create the correct textile fragments.
Tip: if you can’t make the correct elongated ear pattern, use a telephone or an iron as a basis.
For girls, it is not at all necessary to make ears from fabric or cardboard. Put a hat with slits on your head and let your hair out. Using a large number of elastic bands, they can be given a stable shape. Tie your hair into two braids or two ponytails - and that will be enough.
Now you know how to make bunny ears with your own hands. They are made very simply and quickly, the main thing is to stock up on all the necessary materials.
By the way, don’t forget about the decor: sometimes fabric ears need decorative improvements, just like the New Year’s costume itself.
Sunny bunny
Your baby will look very unusual in a homemade sun bunny costume. Any top or bottom will work for this look. But they should be bright, preferably yellow.
For decoration it is possible to use various shiny materials: rain, sparkles, rhinestones, beads and other colorful elements.
The main thing is not to overdo it, because additional jewelry should not rub the skin or be too heavy.
List of required items
To create a bunny costume with your own hands, you will need:
- thick cardboard;
- wire;
- ties or laces;
- decorative eyes and nose;
- scissors;
- ruler;
- glue;
- iron;
- sewing machine;
- needle and thread;
- foam rubber or batting;
- paints;
- rubber;
- headband;
- lightning.
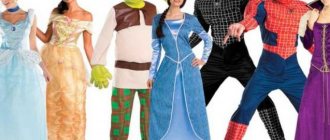
“Realistic” costumes and cartoon ones
The author-fashion designer can design costumes depicting hand-drawn characters in a completely bizarre and unexpected way. For example, sew pink polka dot pantaloons into the body of the suit.
Costumes of this type simultaneously expand the range of features of the hare, making it more limited in non-classical productions, original scripts, and in modern interpretations of cult stories.
Such a suit is necessarily made of synthetic material in order to maintain its original appearance for a long time; it is easier to care for, wash, and dry without damage. Because clean suits in children's groups are the key to health.
Scenarios in which it is more appropriate to use a realistic hare:
- Russian folk tales
- European folk tales
- Fairy tales from authors of past centuries: The Brothers Grimm
- Images from Soviet puppet cartoons
Scenarios for cartoon hare costumes:
- Winnie the Pooh, Well, wait a minute
- Hare in the cartoon "Zootopia"
- Modern cartoons and comics
- Original productions invented by teachers for the realities of our time
Specific elements for assembling the costume:
- skirts, breeches, vests
- cape and tail
- hare head hat
- hare ears on head
- mask with a picture of a hare
- button ponytail
This way, you can significantly save your budget, especially if you are a costume designer and have many clients. You can also rationally organize the costume room in a kindergarten or creative group - let the costume elements work, and not lie on the shelf waiting for a production with a specific hero.
This will free up space for things and accessories from which you can create a character’s image easily, quickly and creatively. After all, every time you can use new elements, so the hares in different representations will not be similar to each other. This is especially important for parents who take photographs as keepsakes, but also for presenting your work as an educational organization on social networks.
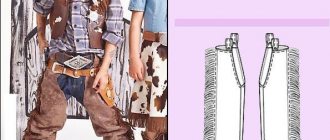
The button is made of transparent plastic, so you can sew such inconspicuous buttons on trousers for characters with tails in advance
You can attach a detachable ponytail with a button to all suit options. Temporarily sew a button to your trousers or skirt and attach the bunny's tail to an elastic elastic loop. This way the tail stays firmly on the suit and hangs naturally.
When the button is not needed, it can be easily cut off or sewn to other pants. The time spent altering, as practice has shown, fully pays off with the confidence of the costume designer and actor during the performance that the tail will not fall off.
Video for the article
Watch a small selection of videos on the topic of the article. In the presented material you can see a visual demonstration of various techniques and options for making accessories for holidays and parties with your own hands. We hope that the material we offer will be very useful and interesting for readers. Enjoy watching and exploring.
No matter how sophisticated modern designers of the fashion world try to catch the interests of women. Many of their inventions remain unclaimed, many never left the podium at all, remaining in the world of haute couture. But, oddly enough, some carnival elements of clothing and accessories have come into use. For example, our fashionistas take great pleasure in buying and making bunny ears with their own hands.
, decorating your cute heads with such touching decor.
Lace ears delight girls the most. We will tell and show you how to make them
Sewing a hare costume from a sewing kit
You can simply sew a hare costume yourself from the parts in the sewing kit. The set includes chiffon for the future cape with a wool pattern printed on it, as well as detailed instructions on how to sew it.
Tools for sewing a suit from the set:
- sewing machine
- safety pins
- scissors
- iron
The stages of creation are described in the paragraphs of the instructions, in which we tell you step by step how to iron, pin and sew parts of the future costume.
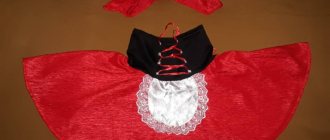
Drape details printed on chiffon and instructions for the sewing kit
Stages of creating a costume:
- Cut out the parts from the fabric.
- Fold it as shown in the picture and sew down the shoulder darts.
- Sew down the middle seam, finishing the edges with an overlocker.
- We unravel the seam, adjust the cut on the back 0.1 mm from the edge..
- We edge the neckline with bias tape and sew on a button.
- We process the bottom of the product with a micro-overlock.
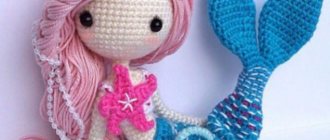
Crochet rabbit. Lesson 3
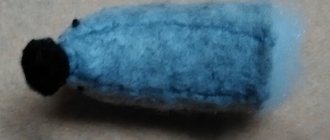
Knitting the tail
Knitted with fluffy yarn. You can also try the one that the whole rabbit was tied up. But that's up to your taste.
Our ponytail is ready. We stuff it with a small amount of synthetic fluff and sew the rabbit into the right place.
Connecting the two halves of the rabbit together
Let me remind you that on one half we have already sewn pink centers to the ears and made a muzzle.
And on the second one we have a tail sewn on. You can connect using single crochets with the white thread we used to knit. Or sew it neatly. I connected with single crochets.
Connecting the two halves of the rabbit together
We begin to connect with the ears. As we connect the parts, we fill the toy with synthetic fluff, but not too much.
We also put a little stuffing in the ears and insert toothpicks into the middle. I showed in the picture approximately where they should be in the middle. This is necessary for the ears to stand up.
Insert toothpicks into ears
Our rabbit is almost ready. There is one last lesson left, where we will tie the legs and sew them to the body. I hope that there were no difficulties with this lesson.
Step-by-step instruction
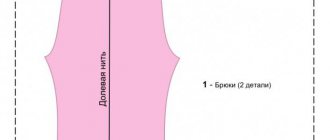
Creating a shorts pattern:
- Take two A4 sheets, fasten them together with tape and fold them in half.
- Take your child's favorite shorts, turn them inside out and fold them in half too, fold to fold of paper.
- Trace them with a pencil, do not forget to leave allowances for ease of sewing and to be able to add elastic in the place where it is necessary.
Creating a sleeveless vest pattern:
- Take any T-shirt of your child’s size and, folding the sleeves inward, trace the shape on four A4 sheets of paper taped together.
- Leave allowances.
The patterns are ready.
Fabrics:
Insulated synthetic fabric with a fleecy surface
Universal elastic fabric
Translating patterns and cutting out parts:
- Fold the existing piece of fabric in half.
- Lay out the patterns on the fabric, trace with chalk or pencil and cut out. Since the allowances were laid in advance, there is no need to supplement or add them.
- We got four parts for making shorts and two parts for a vest. One of the parts of the vest must be divided exactly into two parts and, if desired, a beveled cutout must be made for beauty. Use a ruler for straight cuts.
Sewing products:
- Align the parts with each other and fasten them with safety pins so that the fabric does not “move away” when sewing.
- Sew the main side seams by hand or using a sewing machine.
- To make the product neat, you need to process the edges. Fold them over and sew, retreating from the edge about 1 centimeter. You can also sew tinsel onto the raw edges - and the costume will also get a finished and neat look.
- Sew shorts and vest.
Equipment:
The best overlockers for home and production according to customer reviews
The best sewing machines from budget to computerized
Elastic for shorts:
- To thread the elastic into the shorts, you need to fold the edge and sew it, retreating 1.5-2 centimeters.
- Leave a hole of 0.5 centimeters so that the elastic can be threaded comfortably.
Tail:
- On the remaining fabric, draw a circle with a diameter of at least 10 centimeters. You can take a mug or plate, circle it - and the circle will turn out even.
- Cut out a circle, sew it with a thread and a needle manually using a simple seam.
- Fill the tail with any filler (cotton wool, padding polyester, scraps of fabric), then tighten and secure the thread.
- Sew the finished ponytail to the shorts in the middle of the back seam.
Cap:
- Take any hat that fits your size and trace it directly onto the fabric folded in half, leaving an allowance for the bottom seam of at least 2 centimeters and an allowance for the body of the product of at least 1 centimeter. It will be much more convenient if the fabric for the hat has good stretch.
- After you have cut out the shape for the hat, on the same fabric folded in half, immediately draw and cut out the ears of the shape you like.
- Sew the details of the ears, and then, placing them in the shape of the hat, sew it too.
- Finish the edges and the hat with bunny ears is ready.
Other costumes:
New Year's costume of a space alien. Easy to sew in a few evenings
How to quickly and cheaply sew an original outfit for a boy or girl at home
Children's costume for matinee and New Year's holidays. We sew on our own
A costume for a sparkling appearance at a party. How to sew in one evening
Making carrots
Various accessories will perfectly complement the bunny costume. There are many photos and videos on creating accessories. The easiest way is to make carrots from foam rubber. Create a shape and cut out the product along the contour with sharp scissors. Thin emerald-colored material is sewn on top. The carrots themselves are painted with paints. It is necessary to choose paints from natural ingredients. They do not affect human health. The use of food coloring diluted in water is allowed. This paint is not harmful and does not stain the fabric when wet. The most difficult method is to make carrots using a pattern. Cut out 2 triangular shapes. They are stitched and turned right side out. The empty space is filled with batting. The wide edge is hand stitched. Scraps of green fabric are attached to it.
Bunny looks in other types of costumes
When working with children, teachers face various methodological tasks, including theater teachers. Other types of costumes can enhance children's improvisational and acting skills, as well as assist in educational activities and psychological counseling. Play techniques are widely used in preschool development programs, and they require unusual tools, including atypical costumes of iconic characters.
Variations of bunny dolls: glove puppets and a life-size puppet that turns into a puppet doll
Glove dolls. Mitten dolls are suitable for mini-performances, leisure games and individual lessons with children, including working with a psychologist.
With a mitten doll, you can easily get your child talking, open up his mood, entice him with a story and make his imagination work.
The mitten is made of fleece and decorated with fringe; it is easy to wash, dry and carry in your bag.
Fleece glove dolls of Wolf and Hare, Turtle and Hedgehog
Having assembled a set of glove puppets, you can arrange table performances and games. The doll comes in two sizes: for a child's hand and for an adult's hand.
Puppet doll. A life-size Hare doll is sewn to trousers, which the actor places his hands into the Hare's paws and controls the doll with his hands. The doll can be used as a puppet. To do this, cords are attached to it, on the arms and legs, and threaded into the crosspiece attached to the doll’s head, which allows you to control its movements.
The doll can also be attached directly to the child. And then the doll’s movements are produced by the movements of the little actor’s arms and legs. The doll is put on a person in the following way: it is attached to the neck with a strip fastened with a contact tape.
The felt Hare mask is painted with the canonical Gzhel pattern in blue
Masks. We print masks with characters on felt and attach an elastic band, thanks to which the mask sits firmly on the head. The masks are flat and good because they are convenient to store in a box and take out when you need them for a game.
Aprons. An apron with a character is a simple and multifunctional costume. Choose a fairy tale and transform into the characters in your mind or put on apron costumes with images of the heroes.
In order to concentrate on the lesson and not take time to change clothes, teachers came up with easy-to-use costumes in the form of aprons with images of characters.
A child puts on a Hare apron and immediately transforms into a fairy tale character
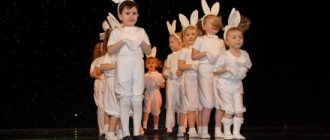
A popular hero of fairy tales around the world is the hare or Brother Rabbit. A character who knows his weaknesses, sometimes cowardly, but more often gentle and very friendly. The hare is a constant character in theatrical children's productions.
In the culture of fairy tales, the hare has many faces; it is an indispensable character in theatrical productions in kindergartens, schools and theater studios.
The hare is not just an inhabitant of the forest, but the embodiment of the archetype of a trembling, outwardly defenseless character who knows his limitations and often, thanks to this, behaves smartly and resourcefully.
The bunny not only always jumps under the tree, but also confronts the wolf and the fox on equal terms in many works for children.
How to create the image of a wolf: using a ready-made costume, accessories, or sew it yourself
Bear costume: putting together an image from the elements, choosing a ready-made costume and sewing it yourself
Methodology for creating costumes “Your own costume designer”
Masks and headdresses of characters for educational games "EXPROMT"
7 ideas for an apron theater in kindergarten