The skirt has a straight silhouette, the right panel of which is gathered along the waistline, the hemline is rounded. This model is convenient for adjusting changes in waist circumference by simply changing a button or hook.
The skirt is good for everyday wear for any typical figure, except for those with a protruding belly, since the gathering will increase it even more.
A wrap skirt can be made from any fabric of the dress group, excluding transparent fabrics such as chiffon.
To create a pattern for a skirt with a wrap and drapery, use a pattern for the base of a straight skirt.
Fashionable outfit
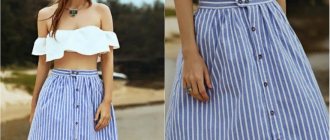
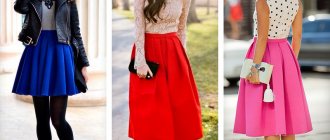
A dark burgundy draped miniskirt looks great paired with an asymmetrical long-sleeve sweater. You can complement the look with bright boots and stylish accessories.
Smooth and fresh skin: dermaplaning, or why a woman needs to shave her face
Rare shot: Viktoria Isakova showed her grown-up daughter from Yuri Moroz (new photo)
“We are still friends”: Derevianko commented on the breakup with his wife
Modeling a skirt with drapery
This skirt model was published in the APART catalog five to seven years ago. The photo quality leaves much to be desired. Still, this is a scan from a magazine, not a photo. But you can see the skirt model itself. The photo is enlarged so that you can better see the details of the skirt.
At that time I was studying another cutting method. As an experiment (and homework at the same time), I decided to sew this model.
I regret that not a single decent photograph of me in this skirt has survived. But the skirt turned out just fabulously good. I sewed it from thin dress wool (black with thin stripes). The wool was light and all the tails on the skirt swayed coquettishly in time with the step)) When I went to the fabric departments, the sellers who knew a lot about sewing certainly noted this skirt and began to ask me questions about it. But this is all a lyrical digression.
In fact, the skirt is very interesting and I suggest you consider modeling this skirt.
No photo from behind. Therefore, here you can improvise and add something of your own. I decided that a small train at the back would go well with the draping in the front.
But let's take things in order...
The modeling was done from the base that we make according to the video course “Formula for the Perfect Skirt” . Thanks to our precise base, you can model with confidence and be sure that the fit of the skirt will be perfect.
On the front parts (the part is in full spread) we apply undercut lines. Yoke on the side is 9 cm high, at the highest point 12 cm:
Cut off the yoke (part 1) and middle part 6:
We close the darts on the yoke, and the resulting excess will be ironed onto the fabric. We move the side parts apart by about 4-6 cm. We focus on the photo, where the drapery is larger, in order to get closer to the original. For part 6, we make a flare at the bottom by 5 cm. We cut the upper part of part 6 and spread it apart to simulate a bow knot by 4 cm:
I repeat that from behind you can improvise and sculpt something of your own))
Therefore, it was decided to model a yoke on the back panel and slightly increase the length in the middle of the part.
On the back part we outline the yoke:
Cut off parts 2 and 3 from the main panel:
We close the dart on the yoke, lengthen the back part 3 by 5 cm. We flare part 3 along the middle line at the bottom according to the godet principle by 25 cm to create a train:
That's all!
And then we lay out the finished, modified parts on the fabric. We cut and sew. I laid out the bottom pieces on the bias, adjusting the strips. The bias cut allowed the fabric to flow incredibly beautifully, giving it a feminine, graceful look.
Here I post a photo of the finished skirt, which I made just for myself. It was not intended that they would be shown somewhere)) Therefore, do not judge the photo too harshly. The sharpness wasn't very good, I was filming on my phone at the time.
The skirt looked very cool!)) I wore it with different blouses, shirts, jackets. And sometimes I wore it with a leather jacket with studs - it was something! The combination of a feminine skirt with leather “rocker” elements looked incomparable. I highly recommend this model to you.
I hope you like it. And perhaps some of you will decide to do a repeat. I will be glad if this MK helps you with this))
Skirt with asymmetrical drapery. Instructions for printing patterns and sewing
Difficulty level: easy sewing
Technical drawing of the model:
Description of appearance:
Women's casual skirt, knee length. The front of the skirt has asymmetrical drapery inserted into the right side seam. The back of the skirt has two darts. There is a zipper in the left side seam. The upper section of the skirt is finished with a stitched belt fastened with a loop and button. The product requires a lining.
Recommendations for materials:
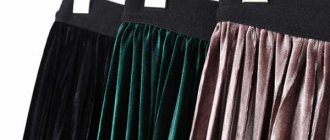
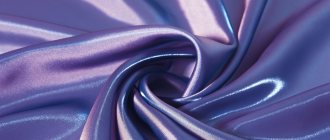
The main material is suiting wool, wool blend, silk or mixed fabric, plain or with a stripe pattern, which will emphasize the design intent of the asymmetrical drapery.
Attention! To ensure and maintain drapery, the material must be “dry,” not in the sense of an antonym to the definition of “wet,” but in the sense of “sufficiently rigid, capable of holding the drapery without sagging.”
Lining material – any lining material in color combination with the main one. However, I would recommend focusing on material containing viscose fibers and threads, because... it is less electrified (sticks).
When ordering a pattern you receive 3 pdf files:
- A file with instructions for printing a pattern, containing a control square and the measurements according to which the pattern was constructed;
- File with pattern in A4 format, for printing on a regular printer
- File with a pattern on one large sheet - for printing on a plotter
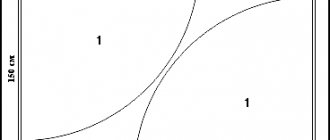
Pattern sample:
* PRINTING ON A4 FORMAT PRINTER:
When printing patterns in A4 format, open Adobe Reader and check the “Actual size” checkbox (or uncheck “Fit to page size”) in the print settings.
Note the test square (or grid) on the pattern sheet. Its size is exactly 10 by 10 cm. It is needed in order to understand whether the printing scale is set correctly on your printer. Before printing the entire pattern, print out a sheet with a red square and measure it. 10cm sides? This means you can print the remaining sheets of the pattern. If the sides are more or less than 10 cm, you need to adjust the print scale of your printer. Otherwise, the pattern will not print correctly.
After printing all the pattern pages, glue them together in the order shown: the letters (A/B/C+) indicate the column, and the numbers (01/02/03+) indicate the row. The first (top left) pattern sheet will have the number A01.
*PRINTING ON A PLOTTER:
When printing a pattern on a plotter, open the pattern file in Adobe Reader (or Foxit Reader). Click on the "File" menu item, then select "Print". Select the Poster print mode under Page Sizing and Handling. Make sure the Segment Scale field is set to 100%. Check the boxes for Cutting Marks, Shortcuts, and Split Large Pages Only.
The following designations are used on the pattern:
Parts Specification
MAIN MATERIAL
- Back - 1 piece (with fold)
- Front - 1 piece
- Belt – 1 piece (with fold)
LINING MATERIAL
- Back of the lining – 1 piece (with fold)
- Front part of the lining – 1 piece (with fold)
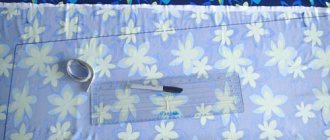
Attention! Seam allowances for the front of the skirt are shown in the picture.
When cutting other parts, add seam allowances along all main connecting sections - 1 cm; along the lower section of the back of the skirt - 4 cm for the main material and 3 cm for the lining.
Attention! To more accurately determine the length of the belt (parts without seam allowances), you need to measure the waist circumference, add 1 cm (for material processing and structural gain), as well as 4 cm for processing the fastener.
Attention! Before cutting the lining material, it must first be de-decated, i.e. ensure forced shrinkage (soak in warm water for 15-20 minutes, allow time to dry and iron).
The consumption of the main material for the specified model can be determined as follows: the length of the finished product plus 30-40 cm, with a material width of at least 140 cm for small sizes and at least 160 cm for large sizes!
The average material consumption for a skirt is 1 m with a material width of at least 140 cm.
In addition to the main material for making a skirt, you will need:
— about 10 cm of adhesive interlining material for duplicating the belt (with a width of 90 cm);
— adhesive edge (woven or non-woven) 0.8 cm wide - 30 cm;
— zipper - 18-20 cm;
— button.
Technological sequence of skirt processing
Processing the front of the skirt
1. Draw the main drapery lines on the front side using hand stitches of the material.
2. Glue the edge along the top edge of the front of the skirt.
Now the fun part!!!
3. Pin and then sweep along the right side edge the folds that form the drapery (the upper fold faces the fold upward, and the lower fold faces downward) Fig. 1.
Note! The horizontal line between the numbers 1 and 1* will sag between the layers. This is fine! In the process of basting the folds, it is advisable to align the sections so that the right side section of the skirt is completely aligned. The formed cut does NOT repeat the side cut of the back of the skirt . It is this design solution that allows the excess volume of material in the front part to be shifted back.
Attention! At this stage, you need to baste the back part of the skirt along the side sections to the front part and look at the “drawing” of the resulting drapery. The constructive solution of the part allows you to “play” with the volume of folds formed and their direction. Materials with different properties will fit into drapery differently!!! You can take advantage of this and create your AUTHOR'S version. AFTER you have made your final decision, trim off the excess material along the right side edge, maintaining a 1cm seam allowance.
4. Sew along the right side edge, securing the folds.
5. Lightly iron the masonry in an area 4-5 cm from the cut.
6. Overcast the left side edge of the front of the skirt.
Processing the back of the trousers
- Baste and stitch the darts. Iron the darts towards the middle.
Belt preparation
- Duplicate the waistband (glue adhesive interlining to the wrong side of the waistband).
- Iron the waistband in half.
10. Overcast one longitudinal section of the waistband. (If you take a belt ironed in half and the curly cut is in your left hand, then you need to overcast the lower cut of the part of the belt that faces you ). Rice. 2. Option 1.
- Stitch the figured end of the belt (the flip part). Turn the corner out and iron it.
Preparing the lining
- Sew the folds along the top edge of the front of the lining.
- Stitch the darts to the back of the lining. Iron towards the side cuts (!).
- Stitch the side edges of the lining.
- Sew the front and back of the lining along the side edges.
Attention! Stitch the left seam from the “end of zipper” control mark to the bottom.
- Press the side seam allowances.
Installation
- Baste and then stitch the front and back of the skirt along the right side seam.
18. Overcast the seam allowance sections and iron them onto the FRONT of the skirt (!). It is this “trick” of incorrectly ironing seam allowances that allows you to get the required shape.
- Sew the front and back of the skirt along the left side seam (from the “end of zipper” control mark to the bottom.
20. Press the left side seam allowance .
- Sew the zipper into the left side seam.
- Sew the lining of the skirt and the skirt from the main material along the top edge ( line 1, Fig. 2 Option 1 and Option 2 ).
- Stitch the lining to the seam allowances of the zipper.
- Sew the front of the waistband to the skirt along the top edge. Iron the seam allowances toward the waistband ( line 2, Fig. 2 ).
- Stitch the side of the waistband. Turn the corner out. Iron it.
- Baste and then stitch the back of the waistband onto the skirt along the front seam (line 3, Fig. 2. Option 1).
- Baste and then stitch the back of the waistband onto the skirt along the stitching seam of the front while simultaneously sewing a finishing stitch along the top edge of the waistband (line 3, Fig. 2. Option 2).
28. Sew a loop and sew a button on the waistband.
29. Finish the bottom edge of the skirt with a hem seam with a closed edge or a hem seam with an open edge.
30. Try on the product. Determine the length of the lining. If necessary, trim it along the bottom edge.
31. Sew the seam allowance for finishing the bottom edge of the skirt lining.
32. Sew a loop and sew a button on the waistband.
33. Iron the skirt when finished.
Pencil skirt with decorative zippers: video MK
Leather pencil skirt
A skirt made of faux leather or leather looks great on any body type. The main thing is to decide what style and length of a leather pencil skirt suits you. For large women of sizes 56 or 58, you should not sew a short skirt. A long pencil skirt with a slit is better suited for them.
It should be noted that this type of material is well suited for business style. A jacket or jacket that matches your style will highlight your look. A long eco-leather skirt will look interesting with a sleeveless fur vest and leather boots.
Let's take a step-by-step look at how to sew a leather skirt with an elastic band.
Comment
Keep in mind that not every sewing machine can work with leather. If you have a thin skirt made of eco-leather or faux leather, the sewing process will be simplified. But, if the main material is thick leather, then you will need to sew some seams with an awl.
Measurements used to construct the pattern: DI=45 cm, OT=67 cm;
We will need:
- leather (eco leather) – 0.5 m;
- fabric for lining – 0.5 m;
- wide elastic band (4 cm) for the belt – 0.7 m;
- hidden zipper;
- sewing machine, scissors, leather needles, chalk.