Handicraft creates an atmosphere of comfort and warmth. Among the varieties, I would like to pay attention to patchwork. The “patchwork technique” has been popular since ancient times. The idea belonged to housewives who sewed pieces of fabric together to create delightful jewelry, clothing and home furnishings.
I would like to tell you in more detail about the nuances of this popular hobby. After reading the article, you will understand that patchwork is an unusual way to have fun and at the same time become a master of patchwork technologies.
Style Description
The word patchwork translated from English means a product made from multi-colored patches .
Initially, things were made from leftover fabrics for economic reasons. This then grew into the process of creating unique, unusual products.
Patchwork is a very hard and painstaking work that deserves respect and admiration.
Sometimes craftswomen create simply works of art consisting of many small pieces.
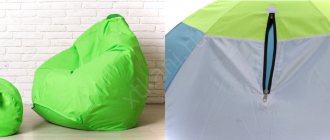
These include pillows , napkins, bedspreads and baby blankets of extraordinary beauty .
To work you will need:
- Sewing machine.
- Scraps of fabric.
- Fabric for the reverse side (about 1.5 meters by 2.20).
- Needles and pins.
- Threads in the color of the fabric.
- Well sharpened scissors .
You also choose colors according to your taste, but no more than 6-7 different colors .
- Also, experienced needlewomen in master classes advise taking one color as the main one, and the remaining pieces should be harmoniously combined with it.
Why we recommend this style for beginners
Because no one will see your first in life and therefore not entirely successful fabric collages and uneven seams - feel free to hide them under winning, well-made embroidered fragments, lace, as well as purchased braid, ribbons, metal and other accessories for needlework.
In the process of creating your next creation, do not forget that the use of any available materials - shapeless scraps, appliqués, buttons, beads, brooches and so on - is only welcome.
Having started your creative activity with crazy patchwork, you can easily make your first masterpiece on your own - a handbag, pillow, panel or even an original piece of clothing.
Stages of work and stitching techniques
Patchwork consists of 3 main stages :
Selection of fabric pieces
Look at the remaining fabrics at home, sort them by materials and colors.
Preparing scraps for the future bedspread
Or buy in the store those fabrics from which you would like to make a bedspread.
Creating a Sketch
At the second stage, needlewomen come up with a design that they ultimately want to get on the finished product, or select ready-made patterns.
Sewing the patches
The last stage is the direct assembly of the pieces together to obtain a whole canvas .
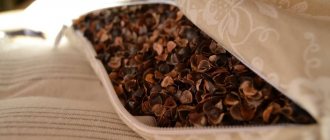
Also, for the back side of the product you will need a single piece of fabric a layer of synthetic padding placed between the top and bottom sides to give the pillow or blanket shape and volume.
Selection of pieces (shreds)
There are various techniques for stitching pieces together, from connecting squares of the same size to laying out a complex pattern of geometric shapes of various shapes and sizes (triangles, squares, etc.)
The result is unique work, it all depends on your skills, available fabric and imagination.
Types of patchwork according to the method of stitching elements:
- “Quick Squares” – it is based on prefabricated square blocks of different colors.
- “Watercolor” based on the selection of the required color scheme.
- “Strip to stripe” - connecting multi-colored strips of fabric of different lengths at different angles.
- “Log cabin” - stripes go around the square in a spiral.
- “Magic Triangles” is a technique for creating complex shapes from initial triangular scraps.
- “Checkerboard” - the shreds are arranged in a checkerboard pattern.
- “Russian square” is a multi-tiered pattern of a square in the center, triangles and stripes.
- “Honeycomb” - the original pieces of fabric have the shape of a hexagon.
With your own hands
To create a patchwork bedspread for beginning craftswomen, it is advised to take simple pattern patterns and patches in the shape of squares of the same size, for example 23 by 23 centimeters.
STEP 1 Place the pieces on the floor in the correct order as in the diagram.
We lay out the shreds according to the planned pattern. STEP 2 Take the first two scraps, fold them right sides together and sew with a small seam allowance of half a centimeter.
STEP 3 Then machine sew 2 more pairs of pieces. Then connect them into a ribbon of 6 squares, 160 cm long.
Sewing the patches
We make 11 ribbons in a similar way, carefully ironing the seam allowances.
STEP 4 Then take 2 stripes with the pattern facing each other, pin them with pins with an allowance of 1.5 centimeters and sew them together.
The remaining strips are connected in the same way, resulting in a canvas 160 by 220 centimeters.
STEP 5 The next stage is hemming the padding polyester .
It is taken a little larger than the resulting cloth from shreds.
Hemming padding polyester
The synthetic winterizer is laid out on the wrong side of the fabric and stitched on a machine along the same seams connecting the squares and stripes.
STEP 6 The last step is to connect the upper part with padding polyester and the lower part of the bedspread.
Bonding all layers
the patchwork part of the bedspread down 1-1.5 cm and sew it with the bottom using a machine.
Ready product
The result is a beautiful, handmade bedspread, one of a kind.
Finished bedspread fabric
From denim scraps
And if you have a lot of old jeans and shirts lying around idle in your house, then they can become an excellent source material for a bedspread and even pillows for it.
How to sew a blanket from old jeans?
STEP 1 First strip out the clothes , leaving only those pieces of fabric that do not have stains, signs of heavy wear, zippers or other accessories. Then wash and iron them.
STEP 2 The next step is to cut out squares, triangles or other shapes according to the design or pattern you have chosen.
STEP 3 Next, the patches are sewn together 2 at a time, then in strips, then the strips are joined together.
STEP 4 Sew on the padding polyester and the lower part of the bedspread.
STEP 5 If you wish, you can trim the patchwork bedspread around the perimeter with a satin ribbon, decorate it with beads, sequins or braid .
The resulting product will be dense and wear-resistant due to the properties of denim, and one of a kind.
In conclusion, we can say that patchwork is a fascinating, but very labor-intensive process of matching scraps to each other, and then connecting them to obtain an overall design.
Experience working with fabrics, a machine, as well as perseverance and patience will help you master this unusual style quickly enough. Piece by piece, it will become one of your favorite things to do!
Video: master class
Sew a bright, colorful patchwork quilt
Mastering the high-speed method
Quilting
Pychwork is a popular type of needlework that combines elements of embroidery, appliqué, and knitting, the roots of which go back thousands of years. Previously, it was common among the lower strata of the population as a way to save fabric by using leftovers from cutting items. In this it is akin to rap, which previously existed in the status of African folk songs. Today, even some wealthy men take up handicrafts as a hobby.
Creating appliqués from patches: where to start
Let's talk about one of the most popular types of needlework - patchwork. Surely, in your grandmother’s house there are several things made from scraps of fabric that are similar in color or pattern. Take a closer look at them: shred by shred, thread by thread...
Finally, the new thing I sewed myself took pride of place in the wardrobe and is waiting in the wings. Before becoming a real craftswoman, your granny made some efforts, spent energy and, of course, time.
A novice needlewoman should pay attention to cotton materials - calico, satin or linen cuts. They are easy to wash and iron.
And here’s what the works of experienced craftswomen look like:
Now you know what patchwork is based on: small pieces of fabric are applied to larger pieces in the form of decorative patches.
This form of folk art is good because the remnants of materials, which, it would seem, belong in a landfill, become part of interior items, kitchen utensils, or even take their rightful place in the dressing room.
In addition, patchwork involves the use of fabric of any type, color, texture.
If you love to knit, try to show your talents as a creator of knitted patchwork, but still, do not rush to throw away old dresses and scraps of fabric. This patchwork method allows you to combine fabric scraps with knitted fragments, crocheted or knitted.
To connect all the fragments into a single puzzle, arm yourself with a crochet hook and threads of any thickness that, in your opinion, contrast with the details and fit perfectly into the overall pattern.
Look how beautiful it is! The creators of these wonderful things are masters of knitted patchwork:
Do you love Japanese landscapes?
Perhaps you are the future creator of magnificent panels in the best traditions of Western or Eastern Japan. The main elements of this type of patchwork technique are made in the form of geometric shapes: squares, triangles, decorative corners, and so on, and evoke associations with the “land of the rising sun.”
If you decide to join the ranks of needlewomen, but don’t know where to start, start with a simplified version of patchwork art.
In 1876, the products of English craftswomen who worked using the “crazy” technique were first presented at the World Exhibition held in Philadelphia. Particular attention of visitors was attracted by exhibits called “Rose”, “Carousel”, “Spiral” and others, made from pieces of silk and decorated with embroidered draperies covering the seams.
The exhibition brought popularity to patchwork sewing and world fame to its creators.
Followers of British needlewomen began to experiment with brocade and velvet scraps, complementing the products with their own fabric drawings and appliqués. The seams were traditionally covered with embroidered or lace fragments.
In 1879, the new sewing technique was advertised in an illustrated American publication for women, Peterson's Magazine.
Now let's look at the basic rules of crazy patchwork.
Types of patchwork
Depending on the territorial distribution, the peculiarities of the creation technique, or due to the differences in the materials from which things are made, a direction such as patchwork is divided into several types. Here are the main ones.
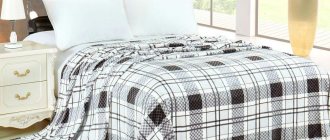
Classic (traditional)
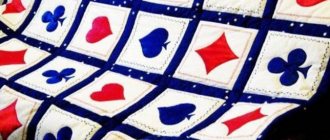
This use of pieces of fabric is characterized by stitching together parts of similar shapes and sizes. The product should not be variegated; repeating only two colors is allowed.
Examples of patterns for English conservative patchwork:
- arrangement of squares in a checkerboard pattern;
- symmetrical triangles.
Crazy
The themes depicted on the product, created using this technique, are quite varied:
- scenery;
- vegetation;
- ornament;
- random fastening of material.
Knitted
You can make a blanket not only from fabric scraps, but also by using thread parts. With the help of knitting, parts are created from yarn of any color and structure, crocheted or knitted. Square, polygonal, round or diamond-shaped pieces are stitched and tied together in a certain sequence.
Knitting is often used to create household items - a blanket, a pillow, wall decoration, a cape. The hook is used to decorate a beautiful dress, boots or napkins for the nightstand.
Oriental
The shapes of the flaps vary quite a bit when using this style of sewing:
- squares;
- triangles;
- arched pieces;
- wavy details.
You can decorate or connect patches when creating this model using the following elements:
Japanese
This style leads in terms of uniqueness and originality. National characteristics have left their mark on this type of patchwork. Fabric colors are not limited to a certain quantity, but must correspond to the selected shade range. The depicted landscapes and plants are created using pieces of different shapes.
Due to cultural characteristics and a catastrophic lack of space, Japanese residents eat and sleep in the same room. In order not to take up space with sofas, they lay mattresses on the floor.
Differences between Japanese patchwork:
- several fabrics are combined at once using a special stitch;
- this technique is interspersed with standard techniques;
- exclusively natural motifs are depicted on household items;
- the needle is directed away from itself, forward. This technique is called sashiko.
Quilting
This is a patchwork with a 3D function, or American patchwork. The features of quilting include the presence of a group of different stitches and the multi-layered, three-dimensional nature of the created model.
Historically, the desire for a large number of levels is due to the fact that when settlers explored the new continent in its northern part, there was a continuous need for the use of woolen quilts.
Basic patchwork techniques
The patchwork style of creating blankets and other household items has become extremely popular since the beginning of the twentieth century. The world does not stand still, and patchwork has changed over the years and developed into certain trends.
Several sewing techniques from pieces differ according to the shape of the selected parts.
Squares
A simple and classic way to create a product from scraps is to use a square template when cutting out the parts. This patchwork is great for beginners, as it is difficult to make mistakes when calculating. The parts can be made quite large.
Triangles
The magic triangle is an element that is reflected in the cultures of different peoples. This circumstance is associated with the frequent use of geometric figures in many types of art. Handicraft, as the creation of a fundamentally new element, refers to creative activity.
In patchwork, rectangular, isosceles, and equilateral types of triangles are most often used.
Lyapochika
One of the features of this style is the splendor of the created structure. An imperial carpet with a five-centimeter pile is not much superior to a fabric woven using the Lyapochika technique.
The pretentious name hides the chic effect of working in this style. When viewing the corresponding photos, it becomes clear how the conventional technique differs from this one.
When using this technique, the practiced geometric figure is a six-sided polygon in which all sides are equal. After the individual parts have been cut out and cut out according to the template, each of them needs to be stitched to the main one, like petals, and then sewn together and so on until the desired size is achieved.
The main thing is to remember that you need to leave a seam allowance and take this into account in your calculations.
Watercolor
Next, you should mix the fabrics in such a way that you can visually detect the overall whole picture, but in reality you would not have to compare the details according to the drawing. This way you can sew a wreath or a heart on canvas from large flowers.
Chess
It is created using pairs of fabrics of different colors, contrasting with each other. The simplest approach to using this technique is to first stitch together two identical wide strips.
After receiving a canvas consisting of a pair of colors, it is necessary to cut it into longitudinal parts and turn over every second part. The chess structure is ready!
New patterns and how to create them yourself
With detailed study and testing of some techniques through personal experience, the need arises to move forward. You can come up with the shape of the part yourself.
To do this you need:
- draw a picture on paper divided into small cells and divide it into triangles, squares, rhombuses, rectangles, trapezoids;
- cut strictly along the lines;
- Using the created templates, cut out the fabric parts with seam allowances and lay them out with the wrong side up;
- sew the scraps.
As a result of such a creative approach, you can get not only an interesting unique interior detail, but also create a real work of art.
History of the emergence of handicraft techniques
It is quite difficult to trace the origins of this skill. It is known that references to patchwork have been around since the Middle Ages. There are examples of such creations in Europe, India, and the Far East. At the moment they are kept in museums.
The name of the style comes from the English word “patchwork”, which means patchwork.
Fact! There is an exhibit in the Bulaq Museum in Cairo that confirms that patchwork was practiced as early as the 9th century BC.
Plain pillows decorated with multi-colored patches
Many people associate Slavic women with the patchwork technique, because many grandmothers and mothers have blankets, pillows and other household items made using this technique. In fact, patchwork came from Africa and Asia. Europe learned about patchwork during the Crusades. It gained particular popularity among the British.
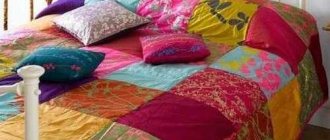
A beautiful patchwork quilt made from strips of different sizes
Residents of America felt a real boom in terms of this type of needlework in the 18th century. It was popularized by Europeans. This distribution was dictated by the needs for clothing, and since whole linens were expensive, it was made from small waste scraps.
Patchwork has become a wonderful decor for clothes
Around the same time, patchwork came to us, but at first it was actively used among the Old Believers. It entered wider areas in the 19th century and was considered an original peasant occupation. In 1917, patchwork became a decorative and applied art.
Children's pencil case made by hand using the patchwork technique
Fact! Patchwork gained particular popularity a couple of decades ago.
Step-by-step instructions - the main stages of patchwork
You will need:
- several types of fabric;
- lining material;
- sewing machine;
- good scissors;
- strong threads;
- templates;
- excellent mood and desire to create a masterpiece.
The main stages of work are as follows.
- It is better to cut the blanks from fairly dense but pliable cardboard, after adding a few millimeters for the allowance.
- Trace the patterns onto the fabric and cut out with sharp scissors.
- Place the finished patterns on a wide tabletop.
- In accordance with the diagram, sew the parts on a machine, gradually ironing them with an iron.
- Place the resulting product on the lining material, possibly using an adhesive base.
Cutting rules and working with patterns
The most convenient to use are template frames. The inside of the frame is the size of the fragment, and the outside is the seam allowance.
The pattern is transferred to the fabric with soap or chalk, never with a pen - marks will remain.
Cut only along the grain thread so that the part does not stretch or warp. You can cut with cutters and scissors. When parts are curved, a cutter is indispensable.
Pins must be used so that the fragments do not move and the stitching is even. The machine foot should go along the very edge of the fabric. This gives an allowance of approximately six centimeters. With equal seam allowances, the product will turn out smooth and crisp.
Stages of creating a product using patchwork technique
The main stages of making a product from scraps:
- selection of material for creativity;
- drawing up a diagram;
- laying out the ornament and joining the parts into a whole canvas.
Material for creativity can be chosen in different ways. Some needlewomen begin by revising the pieces of fabric they have, and only after that they draw up a diagram of the future masterpiece. Others prefer to first develop a detailed design of the product and, based on needs, select the material and cut it into pieces.
If you have not been involved in this type of needlework, then it is not recommended to develop a pattern yourself; to make your first masterpieces, it is better to use materials from specialized magazines or handicraft websites.
Beginning needlewomen can use patterns from magazines
After approving the patchwork pattern and preparing the material, you can move on to the next stage. The process of joining individual elements into a finished product also occurs in several steps, including:
- sewing scraps into blocks;
- connecting blocks into a canvas;
- sewing lining fabric to the fabric.
Individual patchwork blocks can be joined together by hand or machine stitched. Some craftswomen prefer to use knitting threads and a hook to connect elements. This type of needlework is called knitted patchwork.
Methods for joining shreds into one fabric
Before joining the flaps into a canvas, you need to baste everything and check that there are no mistakes. Then you can scribble.
Stitching parts in a straight line:
- Fold the two flaps right sides together.
- Mark the seam with pins.
- Baste along the given seam, stepping back from the edge, then stitch on a machine.
- Secure the stitch at the end by turning the machine in reverse.
- Iron to one side.
If it is necessary to connect rounded parts, then small cuts should be made to the seam line. The rounder the part, the more cuts. Next, the process is the same: fold the parts right sides together, pin them together, stitch them, and iron them in one direction.
The individual elements are assembled into blocks according to the sketch, then the lining is sewn on.
Varieties of patchwork
“Traditional patchwork patterns are best suited for beginning craftswomen”
Like many types of needlework, patchwork developed not only in one direction; in this regard, it is customary to distinguish several basic techniques for this type of creativity:
- Traditional. Patterns for this type of patchwork are best suited for beginning craftswomen. To create a product using this technique, you need to prepare blocks of scraps that will have the shape of various geometric shapes. The individual elements are combined into a whole product, and its reverse side is hemmed with a single piece of fabric.
Traditional patchwork is suitable for beginners
- Quilting. The peculiarity of this technique lies in the method of stitching individual elements, the canvases are connected to each other by machine stitching, and the craftswoman seems to be quilting them together. This technique is suitable for creating blankets, and a layer of batting is laid between the canvases as insulation.
Quilting technique is suitable for creating blankets
- Crazy patchwork. A complex technique using scraps of different sizes and shapes. The individual elements are connected with various stitches, and then the product is decorated with beads and seed beads, buttons and appliqués.
Crazy patchwork uses scraps of different sizes
- Japanese patchwork. For this technique, not all types of fabrics can be used, but only expensive silk. Fabric blanks can be of any shape and size.
Handbag made using Japanese patchwork technique
- Knitted patchwork. It differs in the way the elements are connected, when parts of the product are not sewn, but connected to each other with a crochet hook.
What is patchwork
So, patchwork is a word of English origin. Literally translated as “products made from scraps.” So we deciphered the meaning of the incomprehensible name “patchwork”. Fabric appliqués were created not only in England, as is commonly believed. Various peoples of the world collected original patterns, paintings and figures from strips and squares of fabric. This type of needlework has been passed down from generation to generation. And gradually it turned into a special direction for creating patchwork products.
In Russia, for example, a patchwork mosaic festival is held every two years. Masters present their creations, and visitors get the opportunity to experience aesthetic pleasure and purchase original items.
Patchwork techniques
For your first projects using scraps of fabric, it is recommended to choose simple patchwork techniques using simple patterns and templates:
The basis of the product is a piece of fabric of a certain size and shape, on which shreds are sequentially laid on the wrong side. The intended ornament appears on the front side. Most potholders and blankets are sewn using this technique.
Pot holder using traditional patchwork technique
Quick squares.
One of the simplest methods is to prepare square-shaped fabric blanks and then lay them out in a certain order to create a pattern. The complexity and size of the product depends only on the perseverance and imagination of the craftswoman.
“Quick squares” technique
Stripe to stripe.
This method involves combining colored strips of fabric into one product. Workpieces can be laid diagonally and zigzag, and not just vertically or horizontally.
“Strip to strip” technique
Magic triangles.
The main element of the patterns in these patchwork patterns are triangular blanks. Beginning needlewomen are recommended to use equilateral or isosceles figures, which can be much easier to arrange in a beautiful sequence.
Patchwork “magic triangles”
Pizza technique
- The scraps need to be placed on a piece of fabric of the desired shape and size.
- You can use fabric blanks of any size.
- The blanks are laid in any shape, without adhering to any pattern.
- Cover the pieces placed on the base with a piece of organza.
- Iron the product.
- We lay another layer of fabric blanks.
- Cover the product with another layer of organza.
- We secure all layers with machine stitching.
Patchwork technique “pizza”
Crazy technique for jeans products
- This technique does not have any requirements for the design or plot of the future product, therefore it allows even novice needlewomen to implement any patchwork patterns.
- A great opportunity to give old denim items new life.
- The use of buttons, beads and rhinestones, as well as lace and ribbons is welcome. To decorate denim products, you can cut pockets or labels from old trousers and customize them to your masterpiece.
Boro technique
“Any craftswoman who knows even simple patchwork patterns and patterns can change her style beyond recognition”
- Boro style refers to Japanese ethnic culture.
- This technique involves imitating darning with pieces of fabric.
- The boro technique is very complex and time-consuming, since each piece must be sewn separately.
- Any craftswoman who knows even simple patchwork patterns and patterns can change her style beyond recognition.
- A product that was made or decorated using the boro technique will become the highlight of your image or home.
Bag decor using boro technique
Lyapochika technique
Most needlewomen, regardless of their taste and work experience, create their patchwork products using this technique. It is suitable for making carpet runners and seats and involves sewing strips of fabric to a prepared base. Choose colored blanks, and your finished product will be colorful and very beautiful.
Features of patchwork creativity
- At first glance, this is a simple and very original type of needlework, but having mastered patchwork patterns, at least for beginners, you can already create real masterpieces.
- An excellent opportunity for creativity and self-realization, an individual approach to the manufacture of a product using any of the technologies.
- Working according to the scheme and strictly following the recommendations of the masters, it is impossible to completely replicate the original.
- Each subsequent product always turns out more beautiful than the previous one, which inspires the craftswomen to continue their patchwork creativity.
Patchwork is an excellent opportunity for creativity and self-realization
Patchwork patterns for creating designer pillows
Pillows decorated using one of the patchwork techniques always look very original. They can serve as decoration and fill the living space with special comfort and warmth. Typically, pillow patchwork patterns involve the use of bright fabrics in contrasting shades.
Types of pillows
- Classic pillow.
Traditional style is by no means boring and monotonous; on the contrary, classic decorative elements are in great demand and therefore are widely used for interior decoration. To make a pillow using the patchwork technique using the classic pattern, you need to select square or rectangular fabric scraps that will be in harmony in tone with the furniture in the room. If you have leftover fabric from curtains, they are perfect for creating a pillow.
Pillows made from patches are widely used for interior decoration.
- Knitted pillow.
Decorative pillows are perfect for decorating a relaxation area. Knitted round pillows allow you to create a warm, cozy atmosphere in the room. To create a pillow, you need to prepare yarn, foam rubber and crochet hooks. First, the needlewomen knit an openwork pattern, then secure its edges in a small square frame, and after that they begin to connect the opposite sides of the product. The side parts of the pillow are made using the circular knitting method. The finished product is stuffed with foam rubber.
Knitted patchwork pillows are suitable for decorating a relaxation area
- Denim pillow.
Patchwork patterns and patterns allow you to bring many design ideas to life and make original products for the interior. Fabrics of different compositions and shades are suitable for needlework, and it is not always necessary to purchase new cuts. Old jeans are also quite suitable for making a patchwork pillow; they should be cut into blanks in the shape of squares or rectangles and joined into a product using classical technology.
Denim patch pillow
- Crazy patchwork pillow.
The most original products are made in this style. For creativity, scraps of fabric in contrasting shades are used, they are cut into pieces of different sizes, and then they are laid out with an ornament. For crazy sewing, craftswomen use various decors, including laces, ribbon and braid.
Schemes for making patchwork pillows
Various handmade items can add special comfort and a unique atmosphere to a living space. It will be difficult for beginning craftswomen to create their first project without outside help in the form of detailed diagrams, job descriptions or master classes. From the proposed schemes, you should choose one that is not very difficult to manufacture, but suitable in color and combination of blanks. The most popular are products that are sewn from scraps in the shape of geometric shapes.
Patchwork patterns for beginners
- Square in a square - consists of connecting individual isosceles triangles into square blocks.
- Russian square - triangles or stripes are sewn around the main figure.
- American square - in the very center of the product there is a main figure, which is surrounded by rectangles of the same width, but of different lengths.
American square pillows
Needlewomen who have already taken their first steps in patchwork can use the following patterns:
- Diamond – consists of a combination of quadrilaterals and pentagons. To manufacture a product according to this scheme, it is necessary to prepare blanks according to six templates.
Patchwork pattern “Diamond”
- Mill - consists of a combination of triangular and square elements of different sizes.
Patchwork pattern “Mill”
- Star - is a beautiful combination of equilateral triangles.
Pattern for patchwork “Star”
Having decided on the technique and execution scheme, the craftswoman prepares patchwork blanks using templates and begins sewing.
Master class on patchwork sewing
We bring to your attention a detailed master class on making a patchwork pillowcase with a three-dimensional “rose”. For needlework, you can use material of any bright colors. Before cutting the blanks, be sure to wash the fabric and iron it.
Step-by-step instructions for the master class
- Prepare square-shaped scraps. The size of the finished product will depend on the number and size of the workpieces.
- Cut a circle out of fabric. Place a piece of fabric and bulk filling in the very center of the circle, secure the layers with machine stitching. The middle of your product is already ready.
- Fold the square pieces diagonally, then take 3-5 resulting pieces and sew them around the middle of the product.
- For the next circle, you should select larger squares of a different color. Continue sewing fabric blanks until you have a flower of the intended size.
- Trim the sewn petals in a circle.
- Distribute the finished flowers over the pillowcase and secure them to the product with a zigzag or tight stitch. We get the “Volume Rose” applique.
- The finished bouquet can be supplemented with leaves by making them from scraps of the appropriate shade.
Volumetric rose using patchwork technique
Materials and tools for patchwork
Let's figure out what an inspired needlewoman needs to create a masterpiece. Desire alone is not enough; you will have to stock up on some tools and materials.
For patchwork sewing, it is recommended to purchase a color wheel
- Color Wheel First of all, you need to take care of the color harmony of the future product. To quickly combine the right colors, experienced craftsmen recommend using a color wheel. This is a basic tool that today can be implemented in the form of a special computer program.
- Threads For patchwork you will need 2 types of threads. One is for stitching, the other is for quilting. You should choose durable polyester threads, no thicker than the thickness of the thread of the fabric itself.
- Scissors To cut fabric, large, sharp scissors are useful. And for ripping seams - small ones. You can immediately purchase a set of scissors that will serve you for many years.
- Pins and needles There are many different similar accessories. For patchwork, thin flexible pins with a loop eye are best suited.
An employee of the Saransk Local History Museum talks about the history of the development of patchwork, the fabrics used and products made using the patchwork technique.