We suggest you avoid this problem by sewing a hat of your own design. The style of the hat is 6 wedges and a cut-off part for the ears.
Initial data
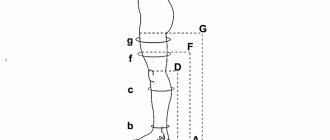
We need to take measurements - the circumference of the head ( Og ) and the depth of the hat.
Pattern of hat wedges
(1). We make a hat pattern for sizes 58 - 61, with the head circumference being 54 cm. To build one wedge, we need 0/6 wedges , i.e. 54/6 = 9 cm - the width of one wedge. In the lower left corner we put t.A , to the right of it we put 9 cm and put t.V. t.C is the middle of segment AB .
(2). From t.C 14.5 cm up and put t.C1 .
(3). We connect points A, C1, B .
(4). Round the line AB .
(5). We get a finished wedge pattern for the hat. Let us remind you that we need 6 of them.
(6). Constructing a cut-off part with ears
In the upper left corner we put t.A , from it to the right we put aside ½ measure Og , i.e. 27 cm , put t.V.
(7). From t.B and t.A 6 cm down and put points B1 and A1 .
(8). From point B1 to the left we set aside 7.5 cm and place point B2 . From point A1 to the right we set aside 4 cm and place point A2 .
(9). Draw an auxiliary line 2 cm below the resulting segments.
(10). And with a smooth line we connect an arbitrary line with points A2 and B2 .
(eleven). As a result, we have a ready-made cut-off pattern with ears, where line BB1 is the fold line on the forehead, and line AA1 is the seam line at the back of the head.
Congratulations, the hat pattern is ready! When cutting, the cutting part must be made double, and the wedges must be made single.
In the cold season, the most necessary item for both our wardrobe and our children's is a warm hat. In the modern world, four-piece hats made from fleece or knitwear are quite popular. They can be single-layer, lined, elegant, sports and the like.
What kind of hats do we choose for our kids? Yes, exactly the same - warm and comfortable, so that the head does not sweat and nothing pricks. Fleece is also an ideal material. It is anti-allergenic, breathable, and retains heat well.
Next, we’ll look at how to sew some options for such hats.
Tools and materials for sewing thin four-piece hats
To create such a thing, you need to prepare the fabric. They mostly use thin or thick knitwear, or even better, fleece.
For an adult hat you will need approximately 40 cm with a width of about a meter. There will be some fabric left, but it’s better to have some extra than not enough. For children's hats you will need 20-30 cm depending on the size of the head.
You also need threads to match the color of the fabric, very sharp scissors - dull ones will “chew” it instead of cutting it, and patterns for a four-bladed hat. The diagram below is suitable in size for an adult, but you can subtract a few centimeters on each side, based on the measurements, to get the desired option.
If you plan to decorate your product, then beads, rhinestones, cabochons, sticker prints and the like will come in handy.
Winter hat with lining: pattern construction and cutting
Doing everything yourself will not be difficult. The pattern of the four-piece hat in the article is based on approximate dimensions, and you can change them to your own and build a new one.
So, the girth of the head is 52 cm, subtract 4 cm and get the girth of the hat - 48 cm. Next, this value must be divided by 2 - this will give us the width of the pattern. In our case it is 24 cm.
To determine your size, measure your head circumference using a measuring tape.
Don’t forget to check the material to see if it will shrink after washing or not. Steam and iron the fabric, or you can cut a small piece and wash it.
Find the top and bottom of the fabric by pulling the thread at the cut. The top loops should unravel, but the bottom ones should not.
So, let's start building a pattern for a four-piece hat on fabric:
- Place the fabric on a flat place with the wrong side inward, turning the bottom cut in your direction. On the left, fold the flap 24 cm + 1.5 cm = 25.5 cm. The front side is inside.
- Immediately set aside 1.5 cm for allowances.
- Divide the top into 4 segments - we got 24 cm / 4 = 6 cm each.
- Next, we look for the midpoints of these segments - 6 / 2 = 3 cm.
- From the top of the cut, set aside 6 cm downwards and use smooth lines to connect the markings on top with the points in those places where 6 cm were set aside. Add 0.5 - 1 cm to the allowance.
The four-piece hat pattern is ready, cut it out.
We cut two pieces each - an outer layer and an inner one. Products made from two matching colors turn out to be very interesting. They can be worn either side out, giving you two pieces in one!
How to Prepare a Fleece Lining
The lining should follow the shape of the head. The hat should initially be knitted a little more; usually a margin of one centimeter is made .
The pattern is constructed from four or six triangular wedges.
Simple pattern
The easiest way is to trace the folded hat with chalk directly on the fleece, make a 10 cm cut in the top center. Two such parts are sewn together, with two intersecting seams on top.
Classic pattern
The classic lining is made in a different way.
- Measure a piece of fleece equal to the circumference of the head plus 1 cm for the seam and 2 cm for the fit. The height is equal to the depth of the hat, 1 cm will be removed when sewing.
- Divide and mark the resulting flap into 4 or 6 parts with chalk, draw vertical lines.
- Mark points at 2/3 of the height, draw triangular wedges in chalk that will be the top of the head.
- Cut out the part, make a connecting seam, close the part into a ring.
- Sew all triangular wedges together.
The result should be a simple dome-shaped hat . You should immediately try it on your head and check the size.
ADVICE! If you plan to attach a pompom with ribbons to a knitted hat, then you should immediately take care of the holes in the lining. Simply leave two holes in the seams on different sides at a distance of 2-3 cm from the crown.
The process of sewing hats
You need to sew with threads that match the material, otherwise they will show through when the fabric is stretched:
- First, stitch all the top edges, moving around the circumference.
- Then sew the seam in the middle - watch carefully so that the edges do not move. It is better to pin them or sew them with large stitches. Be sure to leave a small gap - it will be useful for turning the hat inside out.
- As a result, we received two parts - the main outer part and the lining part. They need to be sewn together.
- Turn the top inside out and the lining right side out. Nest inside each other, remembering that the front sides should face inward. Align all edges, align each cut and pin together.
- Sew everything with a zigzag seam, leaving a hole for turning it inside out - the bottom must be elastic, otherwise the seam will tear.
Everything is sewn, all that remains is to remove the pins, stitch and evenly trim the edges of the fabric.
Turn it inside out and carefully sew the hole by hand. Steam, and that’s it - the hat is ready! We wish you to wear it with joy!
How to properly sew a lining to a knitted hat
Although fleece does not require edge finishing, it is important to sew the lining to the hat correctly. Otherwise, it will curl and puff up. Nothing should be visible. Regardless of the pattern, the lining is sewn with a slight indentation of 3–5 millimeters.
Step by step process
- Insert the lining. Make sure its seam is at the back. This is where the sewing will begin. For reliability, you can pin the fleece to the knitted fabric with sewing pins in several places.
- Thread a needle and make a knot. Insert the needle into the lining so that the knot remains inside between the knitted fabric and the fleece.
- Sew with small and frequent stitches across the edge.
If desired, the lining can be sewn to the top of the hat with fixing stitches or left as is. If the pompom is attached with ribbons, it will completely hold the two tops of the heads, nothing will bristle and fall out.
Children's hat with ears
Children's hats can be sewn in very interesting and fun ways. To do this you need to prepare:
- hat pattern;
- several shades of fleece;
- sewing threads of different colors - for sewing on different colors of fabric.
This hat pattern for boys and girls is perfect and will give you the opportunity to create many completely different variations.
Decide what thing you want to get as a result. Our description will be a gray hat with a black lining.
First, we sew the ears. We fold 2 pieces inside out, stitch them and turn them inside out. We sew each seam on both parts, sewing in the ears on top (if they are provided by the model), but do not connect them together.
First, we decorate with an appliqué in the shape of an animal’s face in front of the hat. We embroider eyes and mustaches. We sew in cords - ties.
Fold the top and inner layers and stitch. Turn it inside out, sew the seam all the way through and steam it. That's it, the beautiful hat for the baby is ready!
Materials and tools
A knitted hat is an accessory that will never go out of style. Today, such a headdress is presented in different variations, so every woman will choose a model to suit her taste. To sew a knitted hat, it is better to use the following types of fabric:
- made of cotton threads - a light translucent fabric that allows air to pass through, stretches well, ideal for creating summer and spring models;
- made of wool - is a dense, warm fabric with a small pile, this material is used for sewing winter and autumn models;
- made of synthetics - the material stretches well and is used to create winter and summer hats.
Also on sale you can find combined knitwear, which is the best option. The fabric is made by mixing natural and synthetic fibers. It holds its shape well, does not wrinkle, does not fade. To sew a stocking cap from knitwear or any other model, you will need:
- fabric of your favorite color;
- matching threads;
- needle;
- pattern;
- scissors;
- sewing machine.
It is recommended to pre-print the diagram on a printer. If you use the electronic version, the likelihood of incorrectly cutting parts increases. It is recommended to print it in actual size.
Materials and tools for work
Fleece is a synthetic material, but it does not prevent the skin from breathing. It can have different densities and thicknesses.
REFERENCE! For home clothing and as insulation, medium-density (200 g/m) or dense (300 g/m) material is usually used. If the hat is made of high-quality merino or alpaca wool, which is warm in itself, then to protect your ears from blowing, you can also take thin fleece (100 g/m).
The pile can be on one or both sides, it doesn’t matter. Before sewing, the material must be washed, checked for shrinkage and paint reliability.
To work you will also need the following:
- threads;
- scissors;
- needle;
- pencil/soap/chalk;
- tape measure.
As for the threads, it is better to choose them to match the hat so that nothing shows through from the outside. Since fleece is fleecy, the seam will “sink” in it from the inside. It will be even neater and more convenient if the accessory and insulation are the same color.
ADVICE! If the fleece is light in color, then it is not recommended to use bright pencils or felt-tip pens for the pattern; they may not wash off. It makes more sense to take a regular chalk in a contrasting color.
Women's knitted sock hat
Particular attention is paid to the unique cap-sock model. It is called that because in its appearance and stretchy body it resembles a sock we are used to. In general, initially this model was used by men, however, ladies soon borrowed this image and found it very practical and convenient. This model is mainly suitable for young girls leading an active lifestyle. Thanks to its comfortable shape, it is easy to put on and reshape every time.
Hat-sock pattern for women
A quick sewing method includes creating a pattern, cutting and stitching the parts together. We are sharing an easy way to build a base for cutting fabric.
- Draw the future product on paper. The shape is a rectangle with a semicircle at the top. Make a small triangular cutout in the middle of the semicircle. This will serve as the location for the future seam.
- Fold the fabric in half twice.
- Place the drawing on the fabric and cut it according to the silhouette with a margin of about 1-2 cm.
We sew a hat-sock with our own hands
The step-by-step sewing plan is easy to follow and takes only a couple of hours:
- Cut a triangle at the top of each piece.
- Sew the incision site.
- Place 2 pattern pieces on top of each other.
- Using a sewing machine, sew the pieces in a circle, carefully tucking the fabric.
- Iron the resulting product.
DIY beanie hat
A great option for any age. Comfortable, pleasant to wear, it will ideally replace the previous model. And it’s even easier to make. Such models are especially popular and always please the eye.
Beanie hat pattern
Build the pattern according to the following diagram
- Draw a blank shaped like a leaf on a sheet of paper folded in four. Rectangular bottom with rounded top. Width 12 cm and height 30 cm.
- Cut out a layout from paper along the outline to create a hat.
- Unfold the paper base and transfer it onto the knitted fabric.
- The resulting shape corresponds to the body of the desired item.
- All that remains is to cut the fabric according to your measurements, leaving a margin for hems in the stitching area.
ON A NOTE! Do not throw away the resulting layout; save it for future work.
How to Sew a Beanie: Step-by-Step Guide
From the resulting part you can make the final version and sew the product.
- Fold the pattern in half and sew the divergence on the sides.
- All that remains is to grind the upper base. To do this, bend the hat in half so that the previous seam is on top.
- Stitch open spaces.
- Press all seams thoroughly.
- Turn the beanie right side out and enjoy the result.
How to sew fleece to a knitted baby hat
Sometimes a strip of material 10–15 centimeters wide is simply sewn into an adult knitted hat. It protects the ears and the main part of the head, so you can do it. If the hat is for a child, then it is important to play it safe, cut out a closed lining and even make ears.
Step-by-step production of lining
- Fold the baby hat in half, place it on two layers of fleece, and draw a chalk line around the perimeter, including the ears.
- Cut out the details. Make a cut in the middle of each. Sew the inner cap with a needle.
- Insert the lining, check the size fits.
- Hem the fleece lining to the knitted baby hat using small stitches over the edge.
You can cut out the most ordinary lining and make ears separately (not necessarily from fleece, cotton or knitwear will do) . In this case, they are the first to be sewn on. It is important that nothing is visible from the outside. Then the inner cap is inserted, it will hide the edges of the ears.
A simple knitted hat for a child
It is not necessary to spend many days and nights on production. There is a way to quickly complete all the steps to please your baby with a new thing.
Making a hat pattern
The pattern is built according to the following instructions.
- Draw a diagram of the product on paper. Rectangle measuring 24 by 25 cm.
- At the top you need to draw 4 identical 6x6 wedges.
- To do this, draw a line at the top at a distance of 6 cm and divide it with vertical stripes into 4 equal squares.
- Place dots in the middle of the top of each square and connect them to the edges with smooth, curved lines.
- It turns out to be a kind of “fence”.
How to sew a simple knitted hat for a child
Transfer the diagram to the fabric folded in half and cut along the contours. You can sew the details:
- Turn the material right side up.
- Start stitching the side lines of the wedges.
- After this, connect all the wedges in the center one by one using a seam.
- Stitch the side line and close the piece to give it the final look.
The single-layer simple hat is ready. For other models you can use this type of base pattern.
Knitting patterns for women, men and children
BY PATTERN
PATTERN DESCRIPTION
COMPACT PRINTING PATTERNS
Description of the pattern
The first block contains general information about the pattern:
general information about hat patterns
Calculation name . Optional field. For your convenience, you can give your calculation a name so that in the future you will know who knitted what.
Spoke number/density on the machine . Optional field. Here you can write down the number of the knitting needles you will knit with or the number on the knitting machine density indicator.
Yarn . This field is optional. You can specify the name of the yarn, yardage, etc.
Pattern . Optional field. You can write down the name of the pattern you plan to knit.
knitting density for calculating the hat pattern
Knitting density . Required to fill out. To measure the knitting density, you need to knit a control sample, wash it, carry out a wet heat treatment (WHT) and measure it. For more information on calculating the knitting density, follow the link.
This data is necessary in order to convert the calculation from centimeters to loops and rows. You should not enter zeros. This will cause an error in the calculation. For a more accurate calculation, it is better to enter numbers accurate to hundredths.
The fractional part is entered as a dot or a comma.
measurements for knitting a hat
Knitting measurements.
The head circumference and the depth of the hat are the dimensions by which the pattern will be built.
Additionally:
- A hat with a flap? Or do you want an elongated version of the hat? Enter additional centimeters in the Lapel Width field. This is necessary to correctly calculate the height of the crown of the hat.
- Are you planning to knit each wedge separately? Check the “Stitching wedges” box. In this case, the division of the fabric into wedges and the first decrease in the wedges will not coincide and a “corner” will not appear when stitching.
All. All data necessary for the calculation has been entered. Next you need to click the “ Calculate ” button and we will get the calculation that we see below.
calculation of cap 4 wedges
In the patterns, centimeters are not labeled; loops or rows indicate this or that number.
All numbers in blue are sizes in centimeters, green are loops and rows.
There are blue numbers on a gray background - these are values in centimeters that can be changed.
How to change? Click on the rectangle, erase the numbers you don’t like and enter what you need.
After the adjustment, you must click the “ Recalculate ”
“Reading” the pattern:
Cast on 176 stitches and knit 34 rows of lapel (if the hat has a lapel, for example, with an elastic band). Then knit straight up to row 102.
Cap wedges
In row 102 we begin to knit the cap wedges. The “stitched wedges” checkbox is not checked, which means the wedges are seamlessly knitted. For knitting on knitting needles this does not change anything, but for knitting on a knitting machine it means that the loops will have to be re-weighed. For each cap wedge, loops must be decreased in the indicated rows; the number of loops to be decreased is indicated in parentheses. So on both sides of the wedge (each) in the 102nd row you need to decrease 1 loop, in the 107th row - 1 loop, 112 - 1 loop, etc. up to row 158 in which 1 loop is also decreased.
After knitting all the wedges, 16 loops will remain, they will need to be tied together with thread.
Sew a vertical seam on the hat and the hat is ready.
Calculate " button
The calculation is done by pressing this button.
Recalculate " button
If you have made adjustments to the pattern, you can only take them into account using the “Recalculate” button
If, after making adjustments, you click the “Calculate” button, you will reset all changes made.
Print button _
The calculation can be printed or saved to a file using a virtual printer.
IMPORTANT!
Before knitting, look at the calculation
There should be no minuses or zeros in the calculation
You can count the number of decrease loops
The rows of decreases should also not exceed the total number of rows of the entire product.
Children's hat made of jersey with lining
For lower temperatures, the thin version is no longer suitable. It is necessary to insulate yourself, and for this you should make a hat with a lining.
Making a pattern for a hat with lining
There are no differences in construction from the previous version. Do everything strictly according to the instructions. Only now this operation will have to be repeated twice: on the knitted material and on the lining fabric (you can choose warmer cotton).
Sew a hat with lining
Now we sew together the details of the outer and inner parts. After preparing both parts, you need to sew them together. To do this, place the pieces next to each other and stitch, leaving a small gap at the top. Bend the product outward with the side that will be on top. Sew the remaining window all the way down.
Children's hat for spring or autumn (2 ways)
Method 1: Two-layer option
I sewed this hat in two layers of thin knitwear. The bottom layer is made of plain jersey, and the top layer has a pattern and holes. So, we cut out these parts from the fabric (2 pieces each). The dimensions of the parts depend on the circumference of the child’s head (plus we add 5-7mm on each side for the seams). For a baby's approximate age of 2.5-3 years and a head circumference of 48 cm, the width of the parts is 25 cm (the bottom layer is 5 mm less) and the height is 17.5-18 cm (the bottom layer is 1-1.5 cm less).
Sew the bottom and top parts from the wrong side. If you decide to sew a hat entirely from one fabric, then it is better to cut out only 2 such parts.
Then we sew both of these parts from the sides, leaving only the holes at the top and bottom unstitched (darts, see photo).
Through one of these holes we turn the cap right side out, leaving all the seams inside. Fold the cap in half and sew the remaining hole on the bottom side (see photo).
Turn the cap right side out. You can decorate our hat to your taste (flower, applique, etc.). I decorated it with this removable knitted flower.
Follow the link for a master class on a set of hats and snoods for both daughters and me with patterns.
Method 2: Hat with a hem
We will need some knitwear, from which we need to cut 3 parts (see photo). For a child 1.5-2 years old (head circumference 46 cm), cut out 2 parts 23x16 cm and 1 part 46x13 cm (cut out the parts so that the fabric stretches horizontally).
From the wrong side we sew together both parts 23x16 cm (the upper part of the cap), and we sew the lower part with the smaller side into a ring.
Then fold the bottom part in half (with the seam facing inward).
And sew the top and bottom parts of the cap together.
You can decorate our hat with a flower, embroidery or appliqué, or sew a hat from fabric of different colors.
How to make a lining pattern
To make the lining, the following measurements are required, which are taken along the cap.
- Cap girth . It should be taken into account that the product may have a beautiful and bright lapel, so the lining is usually not sewn to the very edge of the knitted hat. The girth is measured taking into account this lapel.
- Product height.
- The place where the cap begins to narrow . This measure depends on the shape of the hat.
Pattern options
Patterns can be of different types.
- You can draw a pattern on paper based on the measurements taken .
- You can simply trace the cap without taking measurements . To do this, the fabric is folded in two layers with the right side inward. Next, put a hat on it and straighten it slightly, holding it with your palm. You can trace the outline with soap or sewing chalk.
- Many people make patterns from six triangles and connect them .
- There is another way to give the crown of the lining the desired shape. To do this you need to make two darts . This method requires much less material and is much faster. Darts can be drawn by hand, retreating from the top of the head downwards from 5 to 7 cm in length. Approximately 5–7 cm are left between the middles of the darts. Their depth should be no more than 2.5 cm. To repeat the same arrangement of darts on another part, their edges marked with pins and then also drawn by hand.
Making a lining
Next, the pattern is cut out and the process of joining the lining parts begins.
Before this, the resulting darts are sewn . It is better to join all seams using a machine or overlocker. Excess material can be cut off so that the seams do not puff up inside the hat and create excess thickness.
You can make even cuts on the seam allowances, not reaching the edge of the seam a few millimeters.
An important point is the treatment of seams with an iron . This action should definitely not be ignored. The darts are ironed inward.
Cut out knitted hats
In this master class I will tell you how to sew a two-layer hat from knitted fabric.
Header construction diagram
How to sew a hat from knitwear pattern:
Dimensions of the hat: head circumference 52.0 cm - 4 cm (this value may vary depending on the density of the fabric) = volume of the hat around the head 48.0 cm .
48.0/2=24.0 cm (width of the hat according to the diagram ). The size is 24.0 cm. It can be changed individually for each person.
To find out your size, take a measuring tape and measure around your head. The resulting value will be the head circumference.
Seam allowances:
- top cut = 1.0 cm .
- bottom cut = 1.0 cm.
- average cut = 1.0 cm.
- along wedges = 0.7 cm.
You will need: tailor's scissors, safety pins, one spool of thread in the color of the fabric, machine needle for knitwear No. 70-75 , hand needle, ruler, measuring tape, sharpened chalk or soap.
Preparing fabric for cutting
Check the fabric for defects and textile defects, if there are any, draw a chalk line around it and take it into account when cutting.
Determine the front and back sides
Decatting: check the fabric for shrinkage; to do this, iron the fabric from the wrong side with an iron adding steam.
How to cut a hat correctly
Cutting out the main part
Since knitwear is knitted and not woven, it has its own thread direction. How to determine this? Find the cross thread on the fabric sections and pull it. If the loops begin to unravel, as on things knitted with knitting needles, then this will be the top of your future hat, let’s call it the upper cut , and where the loops do not unravel, the lower cut .
We cut out the details of the cap according to the diagram.
We place the fabric on a flat surface with the wrong side down, with the bottom cut towards you and fold the fabric on the left side to (24.0 cm + 1.0 cm ) = 25.0 cm with the right sides inward, this will be the main part of the hat.
Set aside an allowance of 1.0 cm from the top cut .
Then we divide the top cut of the cap into 4 equal parts: 24.0/4 = 6.0 cm.
Then, on each segment of 6.0 cm, we find the midpoints of the segments 6.0/2 = 3.0 cm.
We connect the midpoints of the segments with the lower points, which are located 6.0 cm below the top cut of the cap. We draw it with arcuate lines, as shown in the figure and mark allowances of 0.7 cm.
After the hat design is built on the fabric, we check all the dimensions again. Then we cut out the main part of the hat using tailor's scissors. If the fabric moves or slides, then to do this you need to pin the part together with safety pins so that the pins do not get under the scissors blade.
Cutting the lining of the hat: we arrange the fabric in the same way as when cutting the main part.
On the right side, fold the fabric to (24.0 cm + 1.0 cm) = 25.0 cm with right sides inward
Set aside an allowance of 1.0 cm from the top cut .
Then we divide the top cut of the hat lining into 2 equal parts: 24.0/2 = 12.0 cm.
On these segments we find the midpoint (12.0/2) = 6.0 cm.
We connect the midpoints of the segments with the lower points, which are located at 8.0 cm . below from the top cut of the hat lining. We draw with arcuate lines, mark allowances of 0.7 cm , as shown in the figure:
We check all the dimensions and cut out the lining of the hat, taking into account all the allowances.
How to knit a lining for a hat
You knitted a wonderful hat with a beautiful pattern from good yarn, but for some reason it is not warm enough during the cold season. What's the matter? It turns out that it is enough to tie the lining to the hat to prevent the wind from blowing through your head in winter. But if the headdress is very warm, you can sweat, but it won’t take long to catch a cold. Therefore, it is best to knit the lining from natural yarn (cotton, linen). It is desirable that the yarn be a little thinner than the one from which the hat itself was knitted, and match the color. Master class by Yulia Popova.
To knit a lining you will need:
- circular knitting needles;
- suitable yarn;
- needle for sewing knitted items.
Stages of work.
1. We cast on only the knit stitches on the elastic band on circular knitting needles from the wrong side (if the elastic band was knitted in a 1×1 pattern).
If the elastic was knitted in a different way (for example, with a 2×2 pattern), or the hat was knitted with a pattern without an elastic band, then you need to pick up the same number of loops as were originally on the knitted product. The most convenient way to knit the lining is like a beanie hat with 4 sectors of contractions in a knit stitch pattern.
2. When 5 cm of lining is knitted, you need to measure with a measuring tape how many rows are in 1 cm (for example, 3 rows in 1 cm).
3. Calculate how many rows need to be knitted before the cuts begin. For example, the height of the cap from the elastic band to the top of the head is 17 cm.
140 stitches were cast on for the lining. At the end of knitting, there should be 12 loops left for assembly (maybe 10 or 8, but no more than 14 loops).
140 — 12 = 128;
128 / 8 (number of stitches cut per row) = 16 rows cut.
Since reductions need to be done after 1 row, we multiply 16 by 2, we get 32 rows.
To convert the number of rows to centimeters, divide the resulting value by the number of rows per 1 cm.
32 / 3 = 10.6 cm, rounded to 10 cm.
Subtract 10 cm from the height of the cap.
17 - 10 = 7 cm.
Thus, you need to tie 7 cm before contractions begin.
4. After 7 cm of lining have been knitted, mark 4 sectors for cuts using a thread of a different color or markers.
The sectors for reductions can be equal, or they can alternate. For example, if there are 140 loops on the knitting needles, they can be divided into 4 equal parts of 35 loops each. If the number of loops is not divisible by 4 (142 loops), then we alternate the number of loops as follows: 35, 36, 35.36.
We make reductions through 1 row of 8 loops. Before each sector, cut 1 loop with a slant to the left, and after each sector, 1 loop with a slant to the right.
We knit in this way until there are 12 loops left on the knitting needles.
We tighten the remaining loops with a stitching needle and hide the thread on the wrong side of the lining.
Our lining is ready. And let the winter cold be only a joy!
We also have a master class on how to sew a fleece lining for a hat.
In order not to forget the page address and share with friends, add it to your social network:
More interesting:
Tags: Knitted hats, DIY hats
Attention! It is better to write urgent questions in the comments on the website (form at the bottom of the page) or, better yet, directly by email. There are no notifications about comments from the VKontakte form! This form is more for feedback. 
Your comment Cancel reply
Sewing a hat
We select threads to match the color of the hat fabric
Stitching parts
We begin to grind the wedges along the upper cut of the cap, starting on the main part
and then on the lining of the cap
We grind the wedges one by one in a circle
Finally, we sew down the middle seam on the main part of the hat, and then on the lining of the hat. Pin the middle seam:
Sew the middle seam, starting on the main part, then on the lining. If the seams move when sewing, they can be basted with temporary hand stitches.
Connection with lining
Thus, we got two processed parts of the hat, the main part and the lining.
Now they need to be connected to each other. To do this, turn the main part of the hat inside out, and leave the lining on the front side. Next, we insert the lining into the main part with the right sides inward, matching the middle seams of the main part and the lining. We align the lower sections of the parts and pin them along the entire circumference.
We sew on a sewing machine (allowance width 0.7-1.0 cm ) with a light, zigzag stitch, this is necessary so that the stitch does not burst when worn.
After all the seams are finished, remove all the pins and turn the hat right side out.
To do this, in the middle of the middle seam of the lining, rip a seam with a distance of 8.0 cm.
and through the hole formed, turn the entire hat right side out.
Then we secure the opened seam gap using hand blind stitches.
Sewing a lining into a hat
Knowing the technology, you can sew a lining into a hat very quickly.
- First, using a thread and a needle, they are connected at the top of the head, making a couple of strong stitches. This will secure the lining inside the hat.
- Care should be taken to ensure that the front and back parts of the lining and hat match each other . They also need to be sewn together with a couple of stitches.
- Next, the lining is evenly distributed over the surface of the hat, securing it with pins .
- Then they begin to sew it to the hat using hidden stitches.
- At the end of the work, you should remove all unnecessary stitches using scissors and wash the resulting hat.
IMPORTANT! Using hidden seams allows you to firmly connect two things.
The technique is very simple, you can master it even without special sewing skills.
We sew a beanie hat from knitwear
I would like to focus on sewing a hat from a sweater. Patterns may differ from each other in the number of darts, the presence of a lapel and the number of layers. Since the peculiarity of the beanie model is the volume at the back of the head and the elongated shape (beanie - translated as “bean”).
Let's consider a product option with two darts, a single-layer cap, with a lapel.
Drawing a beanie hat pattern
An accurate pattern will ensure the success of the entire work. Thin paper is suitable for the template. The size of the tracing paper is taken as follows: 30 cm in length, and the width depends on the circumference of the head. Fold the paper sheet in half, then another ½.
Draw a rectangle, where one side is the length of the hat (30 cm), the second is 12 cm (1/4 of 48 cm). On the left side of the rectangle, set aside 17 cm from bottom to top. From this point we draw a smooth convex arc to the upper right corner.
From the bottom corner point we set aside 20 cm upward. From the resulting vertex we draw an angle of 30 degrees to the left and draw it to the arc. The resulting triangle will be a dart. Cut along the lines.
Step-by-step instructions for sewing a beanie hat
- We unfold the sketch, straighten it and apply it to the fabric.
- We outline with chalk and cut out the resulting outline.
- We fold the fabric part with the front part facing inward. The elastic of the hat is located at the bottom, and the short cut (undercut) is in the upper left corner.
- First, we sew down the undercut, then the long side seam, down to the elastic.
- Turn it inside out and sew on the elastic. When you make the lapel, the seam will not be visible. If you are sewing a beanie without a lapel, sew the seam to the end.
- Lay out the hat so that the long back seam is in the middle. We pin the top of the beanie with pins and stitch it.
Advice! To prevent the seam from coming out too thick, we lay out the ends of the sides of the back seam and the dart and iron them in different directions.
- We turn the product right side out and form a lapel.
The hat is ready, we try it on and wear it.
Tips for sewing a reversible beanie hat
Knitted hat models are suitable for the cool spring-autumn season. The whole family can wear them. Hats of the same color are an interesting design move that will emphasize the unified spirit of the family.
- If you decide to sew a two-layer hat, take 70 cm of fabric.
- When we transfer the pattern from paper to fabric, fold it with the fold down.
- When you baste the side seam, leave a 3 cm area unsewn. This is needed so that you can later turn the product inside out.
- The result was a long stocking with darts on both sides. We stitch them, and then turn the hat inside out, placing one inside the other. We sew the hole with a hidden seam.
- We select the color and density of the fabric taking into account your wishes; you can additionally decorate it with a sticker, rhinestones, or attach a pompom.
Sew several cute hats in different colors and delight yourself with new items every day.
Headdress quickly - without a pattern
It is worth noting that you can quickly sew a hat for a baby without a pattern. To do this, you only need material, for example, even an old blouse or T-shirt and a hat that the baby already wears may be suitable. Here are the steps to create a header:
- Fold the fabric or item in half and attach the baby's old hat.
- Cut pieces with seam allowance.
Headdress without a pattern
- Also cut out the hem.
Cut out the parts
- Fold the resulting part of the collar in half.
- Then insert it inside the hat and sew the sides.
Insert one part inside another
- The new thing is ready, you can try it on your baby.
The hat is ready.
Watch the video below to see how else you can sew a hat and snood for a child. The craftswoman does it in 10 minutes - quickly and easily.
Video: How to sew a hat and snood in 10 minutes?
Useful tips
There are a couple more subtleties worth mentioning.
- When creating a lining pattern, seam allowances are usually not made , since it should be slightly smaller in size than the hat itself. This allows the liner to not bulge and lie flat inside the product. This rule applies mainly to knitted stretch fabrics.
- In some cases, the lining needs to be measured per person , especially if the fabric does not have stretch properties.
- If there are ears on the hat, they need to be outlined, leaving seam allowances of about 1 cm.
- The sewing process can be much easier and more convenient if you have a mannequin head. For these purposes, you can also use a regular three-liter jar.
- When ironing seams, be sure to do the work from the wrong side. This will help avoid iron marks and other unpleasant stains on the front side of the product. Fleece is a particularly sensitive material to heat treatment.
Thus, you can insulate your favorite knitted hat with your own hands very quickly. We hope that this article was useful and will help you prepare your product for the cold season.
We sew a Muslim headdress: master class, pattern
Do-it-yourself Muslim headdress
You can sew such a headdress and give it to one of your relatives before prayer. When sewing a Muslim hijab, there are some subtleties. All of them will be consecrated in this master class. You will need the following materials:
- Elastic knitwear in discreet colors - 20 cm
- Threads to match the fabric
- Elastic band for clothes – 10 cm
- Sewing machine needles
Prepare the fabric and tools.
Carry out the sewing work in the following steps:
- You don’t have to draw a pattern on paper, but immediately make the details on the fabric.
- To create the first part, the fabric needs to be folded. The second detail is a circle. All calculations are given with seam allowances.
Cut out the details of the headdress
- Bend the tails of the part from the wrong side, as shown in the figure below. Round the corners.
- Machine stitch in the areas where you pinned. These will be the ties of the future headdress.
Cut and round the edges
- Now unfold the top part of the scarf with ties, and fasten it from the inside to the circle piece. To do this, find the middle of these parts and secure with pins.
- Sew on a machine using an overlocker. If the length is slightly short, slightly stretch the fabric.
Connect the middle of two parts
- You should now have something similar to a headdress.
Almost finished product
- Then sew 3cm at the back where the arrow points in the picture below.
Sew 3 cm at the back of the headdress
- At the bottom of the product, make a hem a couple of cm inward.
- Sew along the bottom, not reaching the ties.
- Typically, a flat seam is used to sew such parts. If your machine does not have this function, then process it with a zigzag or overlock and sew right through, without sewing to the ties.
Fold and stitch
- Fold the fabric at the back of the scarf 3 cm inward.
- Sew. It should look like in the picture.
Fold the back again
- Now insert the elastic into the hem seam at the back of the scarf.
- Tighten the elastic until it is no more than 6 cm at the back of the head.
- Secure with pins and sew the elastic to the headdress on both sides.
Insert the elastic and sew
the scarf is ready. But all that remains is to sew on the decor. To do this, do the following:
- Twist a rope from the remaining fabric measuring 20x47 cm.
- Sew the ends together and hand sew the harness to the base of the headdress.
Make a bundle of fabric and sew it on.
That's it - the Muslim headdress is ready. The result is a comfortable and beautiful hijab that meets all the rules, namely covering the hair.
Preparing for work
During the preparatory work, it is necessary to select the material from which the lining will be made. And also prepare the necessary tools and equipment. The necessary measurements to construct the pattern should be taken in advance.
Lining material
For the hat to perform its functions, the lining fabric must be dense, warm and windproof. The fabric must also meet several requirements.
- Be comfortable and light.
- Have a small percentage of electrostaticity.
- Possess high strength and wear resistance.
- Have a hypoallergenic composition.
Usually, when preparing for autumn, fleece or brushed knitwear is used for this purpose .
Knitted fabrics are very convenient to use: they sew and wash well. These materials have excellent stretch and are particularly soft and light.
Fleece is a comfortable, stretchy material that dries quickly.
But the color of the lining can be absolutely any and depends only on the imagination of the master. Some people like plain materials and match them to the color of the product. You can also create interesting contrasting combinations of lining and hat.
REFERENCE! Fabric consumption depends on the volume of the head and the design features of the product.
Usually 50–60 cm of material is enough.
Materials and tools
The following things may be needed for work.
- Textile.
- Threads.
- Scissors.
- Hand needle.
- Sewing machine.
- Chalk or a piece of soap.