The bonnet headdress came into fashion in Europe at the beginning of the 19th century. The origin of the word is from the Dutch “kaper”, which means hat. Initially, it was a piece of clothing for maids and served as a hair protector or nightcap. Later, thanks to the efforts of hatmakers, the hood became a fashionable hat and entered the wardrobe of society ladies and privileged persons.
A bonnet is an ideal winter headdress for women. And funny helmets, stylized to resemble the heads of different animals - from a baby dragon, a bear to a long-eared bunny - are perfect for kids.
Knitting a bonnet for a girl was the responsibility of every caring mother. The cap, decorated with ribbons and flowers, looked especially charming on babies aged 1 to 2 years.
A knitted bonnet will decorate the wardrobe of every charming girl . The design of the product is simple to implement; the pattern represents two halves of a cap and a shirtfront sewn along the edge.
Main features of the hood:
- The cap fits tightly to the child's head and is secured with a ribbon under the chin. It won't fly away from a gust of wind and will protect your baby's ears.
- In hot summers it perfectly protects from the sun's rays, and in cold winters it warms you up while walking.
- Lace and openwork bonnets, decorated with additional trinkets, serve as festive headdresses and perfectly complement weekend dresses and suits.
A simple way to knit a bonnet using MK photo
For work you will need:
- Yarn – 100 g (100% bouclé wool);
- Knitting needles - No. 5;
- Velvet ribbon – 60 cm.
Progress:
- Cast on 23 stitches and knit 3 cm in garter stitch.
- Then in every 4 r. add 1 p. before the last edge, only 4 times and get 27 p.
- When the height of the canvas reaches 20 cm, we begin decreasing. In each 2 r. 2 times 2 p. and 4 times 1 p., 19 p. remain. Advice! In order not to sew the two halves of the hood along the top of the head, you can proceed to knitting the second part without closing the loops!
- The left half is ready, we knit the right half symmetrically to the finished part.
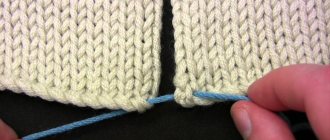
- We sew the halves of the hood along the back of the head.
- To insulate the shoulders and chest, it is advisable to knit an additional piece to the hat. We cast on 18 stitches on the knitting needles and knit 70 cm in garter stitch.
- To attach the finished part, find the center of the scarf and align it with the back seam of the hood. We sew an improvised shirtfront along the entire lower circumference of the warm hat.
- We evenly pass the velvety braid along the joining seam and leave long ends for bow ties.
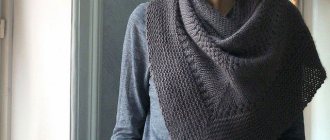
A red fluffy bonnet with a velvet ribbon, knitted by mother’s hands, will become a girl’s favorite thing in her fall-winter wardrobe.
How to knit a bonnet for a girl with your own hands
Among the many knitted patterns, there are classic options that do not lose their relevance from year to year. So, if you want to knit a hat for your daughter or granddaughter, then it is better to take proven patterns. In this master class you will learn how to knit a daisy pattern. It fits perfectly with delicate knitted headdresses for girls. This idea is not new, but very popular this winter season.
To knit a beautiful and warm hat for a girl, you will need:
- thick yarn, about 150 g;
- knitting needles No. 8.
As you can see, to achieve the effect of volume, it is better to take thick materials. If you do not have thick yarn available, then use ordinary woolen threads, folding them several times. Let's start the process of creating a winter headdress:
- We prepare the necessary materials. Our base will be knitted from classic loops. The fabric itself is knitted with a beautiful, original pattern. The diagram of the “Daisy” pattern is shown in the photo below.
- We put on the knitting needles the number of loops for the cross elastic that corresponds to the measurements of the circumference of the child’s head and add 20 cm. This is done because the ties in this model of headdress are not made separately, and the cross elastic itself is used as ropes. Pompoms are attached to the strings below.
- Let's start knitting the daisy pattern. We use about 40 cm of loops in the middle, and close about 10 cm of elastic on each side.
- The crown is knitted next. It can be knitted using regular stockinette stitch. We also make reductions for subsequent tightening as you like. This can be alternating knit and purl stitches.
- We make 3 pompoms from yarn. One will be located on the top of the head, and the other two on the side ties.
If you also really liked this hat, then try knitting it with your own hands, the result will exceed all your expectations! The main thing is to put your soul into the creative process.
Knitting a women's bonnet from mohair
Among Russian traditional headdresses, the kapor is presented in the form of a warm cap that extends into a wide mantle. Any home needlewoman can knit such a magnificent model with knitting needles with a detailed description.
The work scheme is presented in the form of parts that smoothly transform into each other. Knitting progress in the following several points:
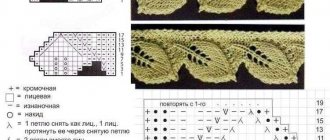
- Using knitting needles No. 3, cast on 31 sts from a skein of chocolate fluffy yarn (consumption 400 g). We knit openwork strip A according to the presented pattern, where the circle is a yarn over, the triangle is 2 stitches, along with a slope to the left or right side. The length of the transverse strip is 110 cm. Advice! To ensure that the frill along the bottom edge has pointed ends, you can start with 3 stitches and increase the fabric to the desired width, adding 2 stitches in each face. R. The second pointed end is made by decreasing the loops.
- From the edge of the frill we cast on 180 stitches and knit strip B with garter stitch.
- In the next front row. decrease every 3 stitches by 2 together. Thus, we reduce the width of the canvas 2 more times. The width of part B is 5 cm.
- Next we move on to the dense neck part of the hood. We knit 2 stitches, 2 crossed stitches. It turns out a beautiful elastic band (part B) 5 cm wide. For beginners! Crossed knits are knitted like this, first the second knit behind the front wall, then the first - behind the back wall, both are removed on the right needle!
- The upper part of the hood (part D) is knitted with even stitches added to the sides. There should be a total of 90 stitches and the height of the fabric should be 17 cm.
- Next, the part is divided into 3 parts, the central 30 stitches are highlighted. They are knitted back and forth, grabbing the outer loops 2 together. Important! To understand how the upper part of the hood decreases, it is enough to remember knitting the heel of the toe. The central loops are knitted in the forward and reverse directions, with the last loop being knitted 2 together with the first loop of the outer part.
- When the main part of the hood is ready, all that remains is to decorate the lapel with an additional frill. The knitting pattern for the openwork part is represented by diagonal tracks, where the circles are yarn overs, and the triangles are 2, along with a tilt to the left. The width of the frill is approximately 20-25 cm, length 100-110 cm. Scheme 2 and 3.
- The edges of all parts can be beautifully decorated with a contrasting thread to emphasize the airiness and grace of the headdress. Crochet according to the pattern or decorate with a knitted frill; if desired, use ready-made lace and ribbons.
- As a fastener, you can use the frill ears and tie them with a knot, or skip the braid and decorate the ties with a beautiful bow.
Knitting tools and materials
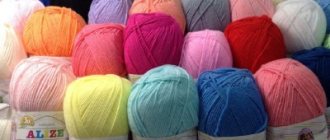
To start knitting, you should prepare all the necessary materials and tools. The material for work is selected in accordance with the hood model in terms of composition, texture, color, thickness and yarn consumption for the product. Almost any yarn is suitable for a bonnet, and the color and thickness of the thread are selected according to individual taste.
Before you start knitting a bonnet for women, you should decide on the choice of knitting needles. These hats are knitted on straight or circular knitting needles or crocheted. It should be noted that the quality and appearance of the hood depend on the correctly selected knitting needles, so this preliminary stage must be taken with full responsibility.
To make a hood you may need the following tools:
| Knitting device | Description, application |
| The knitting needles are straight with stoppers. They are used for knitting flat knitting pieces and come in long, short, single-edged and double-edged. They are made of metal, plastic, wood, bamboo, Teflon, aluminum. | |
| Circular knitting needles. These are single-pointed knitting needles with a flexible connection (fishing line, plastic cable). Used for knitting flat parts and parts with a closed circle (in the form of a pipe). They are made of metal, brass, aluminum, wood or a combination. | |
| Hooks. Hooks of different sizes are used for knitting a wide variety of clothes, as well as for decorative tying of parts. They can be long and short, thick and very thin. They are made from metal, aluminum, copper, bone, plastic or wood. | |
| Knitting needles for openwork. With the help of such knitting needles, the process of tying braids and plaits when crossing several loops during the main work is greatly simplified. Additional spokes come in metal, plastic and aluminum and vary in thickness, shape and length. | |
| Markers. Markers are used in knitting to mark the beginning or end of a pattern, fixing the length or width of a section of a piece. They are made of colored plastic. | |
| Needles for stitching parts. Special needles for sewing knitted parts with a wide eye and a blunt nose. They are made of metal and plastic. |
It goes without saying that for any needlework you will also need a flexible measuring tape, a ruler and scissors. Now that you're properly armed, it's time to get creative.
Large collection for knitting bonnets according to patterns
Crochet baby hood
For knitting we need to prepare:
- Berna Softee Baby Chunky yarn (100% acrylic, 142 meters per 140 grams) – 1 (2) skein of gray and 1 skein of blue;
- hook No. 8;
- small buttons with a diameter of 2.5 mm - 2 pieces.
Description
Collar
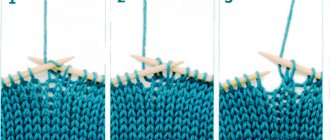
Using a gray thread we make a chain of 54 (60) sts. P.
- 1 rub. (front side): 1 s. without n. in the 2nd century. p. from cr., *1 c. p., skip the next one. V. p., 1 p. without n. in the next V. p.*, repeat from * to *, turn = 53 (59) p.
- 2 p.: 1 v. p., 1 p. without n. in the 1st s. without n., 1 p. without n. in the next V. n., *1 c. p., skip the next one. With. without n., 1 p. without n. in the next V. n.*, repeat from * to * until the last s. without n., 1 p. without n. in the last s. without n. lower row, turn the knitting.
- 3 p.: 1 v. p., 1 p. without n. in the 1st s. without n., *1 v. p., skip the next one. With. without n., 1 p. without n. in the next V. p.*, repeat from * to * until the last two p., 1 st. p., skip the next one. With. without n., 1 p. without n. in the last s. without n. lower river, turn.
- 4 rubles: as 2nd rub.
Repeat the last two rows to a height of 12.5 (15) cm, finishing knitting from the wrong side.
Hood
We join from persons. hand gray thread in the 8th century. p. last r.
- 1 p.: 1 v. p., 1 p. without n. in the 1st century. n., *1 c. p., skip the next one. With. without n., 1 p. without n. in the next V. n.*, from * to * to 4th last. p., turn without knitting these 4 p. = 35 (39) p.
- 2 p.: 1 v. p., 1 p. without n. in the 1st s. without n., 1 p. without n. in the next V. n., *1 c. p., prop. sl. With. without n., 1 p. without n. in the next p.*, from * to * to to 1 last. p., 1 p. without n., turn.
- 3 p.: 1 v. p., 1 p. without n. in the 1st s. without n., *1 v. p., prop. sl. With. without n., 1 p. without n. in the next With. without n.*, from * to * to 2 villages. p., 1st century p., prop. sl. With. without n., 1 p. without n. in the last With. without n., turn.
- 4 rubles: as 2nd rub.
Rep. last 2 r. to a height of 20.5 (23) cm, finishing on the wrong side.
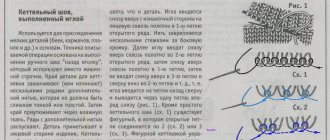
Fold the hood in half with the right side facing inward and sew a seam.
Hoods for the family
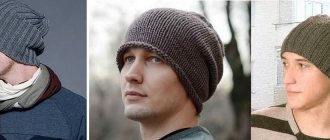
A stylish men's cardigan or sweater with a hood looks complete and extraordinary. A separate MC for knitting the element is not needed; it is performed using previous technologies. For a man, you shouldn’t settle for a strict look, because for the holiday you can knit a hooded hat in an unusual version.
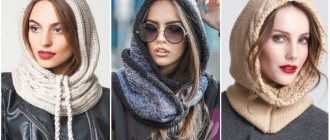
It won’t be difficult to choose a bonnet model for a girl. Knitting - from columns to openwork flowers. The girl will be delighted with a bonnet in a romantic style or in the shape of an animal. Examples of photos for selecting models:
Models for adults and children
To replace a scarf and complete the chosen look, hoods are knitted for the whole family.
Women's openwork blouse with hood
The creativity of the model is given by:
- material for knitting – ribbon yarn;
- loose silhouette - suitable for girls and women;
- The hood is the highlight of the summer product.
The model can be knitted in two versions. For young girls, a shortened one is recommended - the length is above the waistline, and for older women, the length is kept along the hips.
The hood is tied to the neck and is made in the same pattern as the blouse. Color and pattern are selected according to individual preference.
Bunny hood for adults and children
The technique of knitting a “hare” hood is performed in the classic version, but bunny ears are tied to the finished product. To design them, a ready-made diagram is used.
The wide end of the ears must be tied with thread before sewing. Otherwise, the ears will not protrude above the headdress and will merge with it. The child will be happy if the mother wears the same model as his.
Owl model
Another original project is the “owl” hood. It will take longer to complete due to the number of parts. Shades of color are chosen so that the combination is harmonious.
The base is knitted in the traditional way, and then the details. For the owl we will need to knit the ears, eyes and beak. The parts are made separately and then sewn to the finished product. Tassels are made on the ears to make the owl's image look complete. If desired, the same tassels can be used to frame the bottom or sleeves of the product, if it is a blouse.
To reinforce the material, watch a video with detailed explanations of the technology of crocheting a hood.